Archive for ‘Financial’ Category
Paper Doll Investigates Birthday Freebies: The Hidden Cost of Free Stuff

My birthday was last week. I don’t need to say exactly how old I am; let’s just say I was born sometime between the Pleistocene Era and the invention of the internet. I came into the world with big mouth (as evidence below) and a fondness for sharing my thoughts.

Paper Doll and Paper Mommy, mid-March 1967
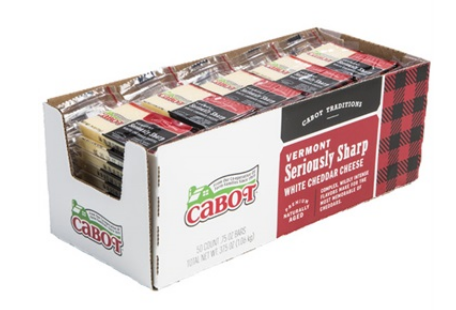
Birthdays are nice. They come with gifts and cake. In my case, they come with cheese, too. All my favorite people know how much I love cheese, and Craig, my friend since grad school, has started a tradition of sending me a box of 50 mini (3/4-ounce) wrapped Cabot Seriously Sharp white cheddar cheeses every year through Vermont’s Dakin Farm.
In the 21st century with relatively little effort on one’s part, birthdays can also come with freebies. So far this month, I’ve received emails and texts alerting me to the following birthday freebies and discounts:
Birthday Food Freebies
- Auntie Anne’s — one free hot pretzel
- Bad Daddy Burger Bar — one free burger, salad, or sandwich
- Ben & Jerry’s — one free scoop of ice cream
- Chicken Salad Chick — one free meal (I get the Pimento Cheese on a croissant!)
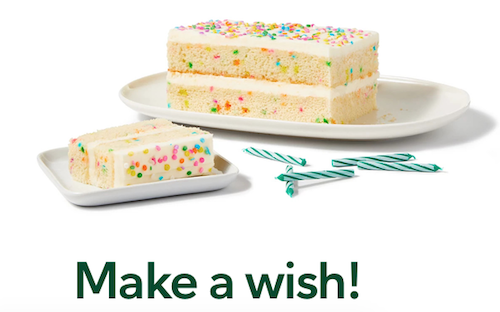
- Fresh Market — one free (gigantic) slice of cake
- Jimmy John’s — one free sandwich or wrap
- Krispy Kreme — free 3-count of Original Glazed doughnuts
- Moe’s Southwest Grill — one free order of queso (cheese!) or guacamole
- Publix — one free container of ice cream or a cake “bar” from the bakery
- Regal Theater — one free small popcorn
- Starbucks — one free drink or snack
- Waffle House — one free classic waffle
Birthday Non-Food Freebies
- The Container Store — 15% off
- IKEA — $10 off any purchase of $10 or more
- Kohl’s — $5 off
- Lane Bryant — $20 off any purchase of $20.01 or more (Ample-bosomed ladies, this is definitely the big ticket winner!)
- Target — 5% off any shopping trip (and yes, I acknowledge Target’s “issues”)
- World Market — $5 off as well as a separate 15% off
By now, you may be wondering, what does this have to do with organizing?
FREEBIES: A DOUBLE-EDGED SLICE OF CAKE
I didn’t have to go to much effort to secure these freebies and discounts. Most apps and reward programs ask for your birthday when you sign up. We can debate whether giving up our month and date of birth to a corporate entity is an invasion of privacy (and whether it’s worth it to get a Bloomin’ Onion or a Chocolate Thunder from Down Under).
By the time my inbox finished shouting “Happy Birthday!” I felt less like the birthday girl and more like a walking coupon book. Birthday freebies, and freebies in general, feel like a win. And when I nibbled a bite of cinnamon coffee cake or try on a deeply-discounted article of clothing I coveted, but didn’t want to splurge on, I felt like a winner.

But these freebies can come with strings attached — financial, organizational, and productivity-related strings.
Obviously, birthday freebies are a marketing tool. We generally ignore that, though, as we all get that little dopamine rush when someone (even a random corporation) recognizes our birthday.
And we all love “free” things, even as we recognize that being the object of a marketing campaign means that, while we are not necessarily paying for something with money, we are paying with our loyalty and our attention. As the saying goes, if you’re not paying for it, you’re the product.
Advertisers are buying our attention; rewards programs are buying our loyalty. Conversely, my grad school friend Craig is only getting my good will and my resplendently awful — or awfully gouda — cheese puns in my thank you cards.
Maybe you feel like you’re wise to the freebie game, but there are some sneaky gremlins hiding among the balloons and presents.
The “I’ll Just Spend a Little Extra” Trap
Let’s say your freebie gives you a free fancy burger, like the Fried Mozzarella Burger at Bad Daddy’s Burger Bar. (It’s my go-to, with the Impossible Burger pinch hitting for the meat version.)

You’re probably not going out to eat by yourself. Yes, you may make a Starbies run on your own, but you’ll probably bring your spouse or significant other, your kids, your bestie, or whomever is available so you don’t have to eat dinner alone while scrolling your phone. On one hand, this prompts a social activity; on the other, depending on the economics of those with you, you may be digging into your wallet. (I mean, when it’s not your actual birthday; on that day, people are likely to treat you.)
Second, everything on this particular menu is standalone. Who eats a burger (even a plant-based one) without fries or onion rings or, in this case, fried pickles? So, you’re going to pay for that. And when you’re having a burger, are you really going to wash it down with water? You probably want a cola, or perhaps an adult beverage.
And hey, it’s your birthday! (Or, at least it was when you found out about this freebie). On your birthday, or whenever you’re dining out for a special occasion — even if that special occasion is just that you’re dining out — you’re going to want a delicious dessert, too, even if it’s not your habit to get dessert.
Last week at the Greek restaurant, my dining companion had a Bananas Foster cheesecake and I had a baklava cheesecake. And I barely looked at the price because it was a special occasion.
It’s rare to get a free food item and not end up buying a beverage, a side dish, or a dessert. Suddenly, that “free” molten lava cake costs you $24.99 in dinner, beverage, tax, and tip. That “free” milkshake? It came with a $15 burger and a side of buyer’s remorse.
When you get a freebie, what you “spend” is almost certainly going to dig into your financial budget, but it’s also draining your calorie or carbohydrate budget.
The “Gotta Catch ‘Em All” Effect
Freebies create a sense of urgency: “If I don’t grab this TODAY, I’m missing out!”
I received some of the notices on the first of the month and they are good for all of March; others I received on my birthday and are good for thirty days after. Just a few of the meals are only good until the middle of the last week of March, and one, for Starbucks, had to be used on my birthday. (My dinner with a friend at my favorite Greek restaurant just happenned to be next to Starbucks, which made that easy, but some years, I’ve been known to take a Starbucks run at 10 p.m. just to grab my freebie.)
If you aren’t organized in your approach to taking advantage of them, you may feel pressured to go out chasing your freebies like they’re Pokémon and — spoiler alert — you can’t catch ’em all.
This attitude can lead to impulse shopping. You plan to just use the $5 off at a store to buy something you want, but maybe when you get there, the item you had in mind isn’t in stock. Or maybe you didn’t have anything in mind (beyond getting something worth $5), so you roam the aisles and end up buying something random you didn’t need because you’re not going to be cheated out of your opportunity to get something for free!
This doesn’t just apply to birthday freebies, of course. Sometimes you’ll see a great deal in an ad, and you’ll think, “Ooh, SuchAndSuchAStore is having a 30% off sale; I have to go!” But unless you were already interested in buying something that you know they have, and you were just waiting for a convenient time to go, that sale is sneaking into your subconscious, and you’re not going to leave the store without some purchase, even possibly something you didn’t (and still don’t really) want or need.
The Clutter Conundrum of Freebies
Your voicemail is full. Why?
Your junk drawer called — it’s staging an intervention. (Speaking of which, this is a good time to plug a classic Paper Doll post, Is Your Junk Drawer a Drunk Drawer? 3 Steps to An Organized Junk Drawer.)
Oh, and your pile of free T-shirts called — it’s tired of being the wardrobe for your imaginary gym life.
This is less of a problem with birthdays freebies, as you already participate in the rewards programs of all of the companies inviting you, their loyal customer, to partake of their largesse in wishing you a glorious natal day! And what they’re offering you is something in the general area of what you already want — food you like or the kind of merchandise you already buy.
But if you’ve ever gone to a conference, a convention, a fair, a festival, a workshop, or anyplace that they were giving away free swag, you know what those kinds of freebies that pile up:
- pens — The ink will dry up before you’ll ever use them
- canvas bags — Your trunk is already overloaded with more canvas bags than any amount of groceries you could possible tote in them — or even afford. You don’t need to adopt every orphaned tote bag on the planet!
- keychains — How many keychains does a person need? That’s why the extras end up in your junk drawer!
- T-shirts promoting somebody else’s business, so that you becoming a walking billboard (which is why you never wear any of them in public)
- candles — It may be adorable or smell delicious until you realize you’ve collected enough unused free candles to illuminate the final season of Stranger Things.
The Time-Suck Spiral of Freebies: What Is Your Time Worth?
Hunting down all of your freebies takes time and energy.
Let’s go back to what I said about feeling that you need to “catch ’em all.” That prompts you to run errands to places you might otherwise have skipped. For example, while I love Ben & Jerry’s ice cream, the only Ben & Jerry’s ice cream parlor is downtown, and I don’t get there very often. If I want their ice cream (and when don’t I?) I could go to the corner grocery store and buy a pint; but with self-induced pressure to use up all my freebies, I could be tempted to come up with a reason (OK, an excuse) to go downtown.
But I’d be missing something important. My time has value!
I don’t have any errands to run downtown. Do I need to use up the time and gasoline to go there just to get a scoop of ice cream?
Consider this: if you’re driving twenty minutes for a free coffee or pastry, is it actually free?
Develop a Freebie ROI Rule. Discern what the return on your investment is, in order to figure out if it’s worth the effort.
To be fair, it might be. If you’re an overworked, over-scheduled parent, taking advantage of a food freebie like a coffee or an ice cream doesn’t just mean you’ll get a food treat at no cost. It means you get a reason — or yeah, an excuse — to put yourself first. That round-trip drive, and that time to a far-away store or coffee house and the time to enjoy it, might very well be the only “you” time you get all week. You have this stranger on the internet’s permission: take inner peace where you can get it.

The only way, for sure, that you will know whether it’s worth your time to collect on your freebie is that if you make sure you remember that your freebie is an option, not an obligation.
HOW TO ENJOY FREEBIES WITHOUT THE CHAOS
It doesn’t seem like birthday freebies were this chaotic a decade ago, or even just before the pandemic. It feels like it’s really become a key marketing technique to get people into restaurants and stores. Embrace them, but employ caution.
Be Organized
At the start of March, I made an inbox folder and routed all birthday freebie/discount-related emails to it. Once I had several, I made two lists, one for edible freebies and one for merchandise freebies.
Most of the emails alerted me to freebies in the apps, but this is one of those times where Paper Doll really prefers paper. I printed the pages of the emails with essential info: QR codes, bar codes, deadlines, and crucial legalese. I made note of the expiration dates in the upper right corner of each printout, separated officers by food and non-food, and sorted them with the earliest expiration dates on the top of the stack.
Of course, I could have just as easily routed the emails to Evernote and set a pre-deadline reminder on each note. A short list of the freebie and expiration date maybe organized enough for you.
On my actual birthday, I got a whole new slew of alerts, and followed the same procedure, so what I needed to attend to the soonest was at the top of each clipped stack.
I’m keeping the folder in the car, so if I unexpectedly find myself near the place to redeem the freebie, I’ll have what I need.
This doesn’t mean I’ll absolutely take advantage of each birthday freebie; it just means I won’t miss any opportunities due to the clutter or chaos of announcements in random places.
Be Selective
Prioritize freebies you genuinely want or will use.
There are some apps or accounts I have because I needed to take advantage of a very specific discount or availability of something that I’ll never need again. Maybe it was for buying a gift for an ex-boyfriend who is no longer in the picture. (Who’s to say?)
Just because you have the opportunity to use a freebie (really and truly) doesn’t mean you have to. You have options:
- Ignore it — Toss out the mail or close the app, and just don’t think about it. (Yes, if you’re a Frugal Felicity, that may be difficult, but Paper Doll gives you permission.)
- Go halfsies — Don’t feel like you have to make an immediate decision. Look up the restaurant menu online and if something appeals to you, order just the free item in the app and arrange for curbside pickup so you won’t be tempted to eat/buy more than you want. For a store, surf the app or the website and see if there’s anything you were already planning to buy. If so, let the idea percolate and see if it boils over or your better angels turn off the burner. If not, let the freebie expire.
- Arrange to let a friend use the freebie or discount. — Even if you have to go there with your friend, you get the benefit of their company without the obligation to spend from your financial or caloric budgets.
Declutter as you go. If a freebie isn’t useful, set it free or find a way to make it a blessing for someone else. But as you do acquire tangible things with your freebies, make an effort to toss whatever is being replaced.
Set a Spending Limit
Decide in advance how much you’re willing to spend when redeeming a “free” item.
This might be a monetary amount you’re comfortable with because of your actual budget, or you may just want to keep yourself from going hog-wild with temptation.
Sometimes when I’m bored or in the neighborhood and waiting for an appointment, I’ll go into Ollie’s Bargain Outlet, a sort-of factory discount store and window shop for entertainment value. But I will set a dollar limit in advance — usually $15, but sometimes even $5 or $10. I can afford more, thank goodness, but I’m much more discerning if I’ve got that limit in mind. If I really want to spend more, I know I can, but the limit forces me to be mindful, and I’m more likely to leave without that impulse purchase. (And of course, I can always come back the next day if I’m hankering for a purchase.)
Similarly, you may want to set a caloric budget when taking advantage of an edible freebie. I’m diabetic, so I already know that I have a limited number of carbs I want to eat at a meal. If I’m going to a restaurant with amazing desserts, I’ll probably opt for seafood for dinner to use my carb count for cake; if the desserts aren’t tempting, I am much more likely to get pasta or something else equally carbalicious.
That free caramel macchiato will feel less like a win when you add a muffin, a sandwich, and a reusable cup that’s destined to live in your car’s cup holder.
If you have (or would like to have) more willpower when dining out with a freebie offer, organize your ordering plan around your food budget.
Schedule Strategically
Just as you’re being judicious with your financial resources or nutritional boundaries, be just as cautious and wise when scheduling how and when you’ll take advantage of freebies.
Don’t cram a dozen freebie redemptions into one weekend!
If you’ve never seen the Gilmore Girls episode called A Deep-Fried Korean Thanksgiving, Lorelai and Rory end up racing to four different Thanksgiving celebrations in one day. At Emily and Richard’s, there a get-dressed-up traditional meal. At Lane’s house, Mrs. Kim’s holds a strict, Korean dinner. At Sookie and Jackson’s, there’s a farm-to-table feast complete with Jackson’s wild and turkey-frying family, and at Luke’s diner, they settle in for a real family meal.
They found it fun (like freebies), but stressful (also like freebies).
If you’re sprinting through the mall like you’re on Supermarket Sweep, maybe it’s time to rethink your freebie game plan.
Spreading redemptions out will have three benefits.
First, you’ll have less stress. You’ll be fitting freebies into a carefully considered calendar instead of feeling like you’re battling Black Friday crowds.
Second, you’ll be less likely to bump up against the margins of your willpower (re: your financial and caloric budgets).
Third, the special delight of your birthday will last longer. Won’t it be more fun to celebrate each day of your birthday month (or the weeks following your actual birthday) if there’s a little treat each day?
Turn Down the Guilt
If you were raised with few resources, you may feel guilty or uncomfortable not taking reaping the financial benefits of free things. But, again, some free things have strings attached.
Your resources (of money, physical and mental health, and time) affiliated with the freebies have value, as does your sanity and chance to have a less chaotic schedule. And nobody gets to say how you spend your resources except you.
It’s alright to enjoy your freebies. It’s okay to let some offers go. It’s your (birthday) party, and you can cry if you want to, but you can also get $20 off a pretty bra at Lane Bryant or eat a free slice of cake if you want to, too!
Your birthday’s about you, not about proving you’re the reigning champ of Birthday Freebie Bingo!
FINAL BIRTHDAY FREEBIE THOUGHTS
There’s a yummy Italian restaurant, Provino’s, with six locations in Georgia and one here in Chattanooga. They’re known for their buttery garlic knots and free birthday dinners:
We have made quite a name for ourselves when it comes time for a birthday celebration. Come in on your birthday and get the Spaghetti Classica with marinara or meat sauce or if you choose take $14.50 off any menu choice, this includes our famous salad, garlic rolls and a birthday dessert. (Please show I.D.)
This is why there’s always a massive crowd in Provino’s lobby waiting to get in. There are only 365 days in year, which means there’s a good chance on any given day, that it’s a lot of people’s birthdays, and as previously noted, when you are getting a free meal, you’re pretty likely to want to take people with you.
On the plus side, free food and festivity! (Also on the plus side, those garlicky, buttery knots.) On the downside, the crowds mean there may be a long wait. Only you know which matters more to you.
Don’t let a handful of free offers turn your birthday into a part-time job. The real gift is your time, so spend it wisely — and maybe on cake. Or cheese. Or cheesecake.
How to Organize Your Response to the 2024 National Public Data Breach
Hack! Breach! Data theft!
You see a news story about yet another company getting hacked, or you receive a letter from some service provider telling you that their servers were “breached.” Sometimes the letter offers advice, or perhaps a year of free credit monitoring.
Organizing your records, passwords, financial resources, and entire identity to protect against identity theft is exhausting. It would be understandable if you tend to tune out any news about such hacks and breaches.
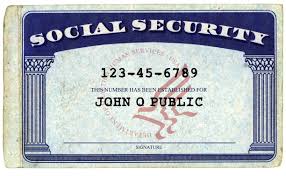
Over the past week or so, however, you might have heard about a particularly nasty breach, leaving bad guys with access to millions of Social Security numbers. That probably made you sit up and take notice…and get queasy.
THE UNPRECEDENTED BREACH OF SOCIAL SECURITY NUMBERS AND MORE
At the outset, I should note that contrary to popular perception — the Social Security Administration was not hacked. The federal government wasn’t breached.
Who Got Hacked and When?
A Florida-based data brokerage company, National Public Data (NPD), got hacked. You may wonder how NPD got so much personal data in the first place. It, like many companies of its kind, scrapes data from wherever they can, including federal and state public records databases like voter registries, DMV records, professional license filings, birth/marriage/death records, criminal and civil course records, and non-public databases.
So, private information, by way of how the modern world works, gets stored somewhere over which we have no control, and then scraped, gobbled up by companies like NPD. They then turn around and sell our private data to anyone willing to pay — from employee background-check sites to private investigators (not cool, Sam Spade!) to data resellers.
According to NPD, the crime took place in December 2023; it just took a while to become known (and then a lot longer for NPD to own up to it). It’s not clear who actually stole the data.
What is clear is that the breach became known in on April 7, 2024, when a hacker group identified as USDoD posted on the dark web, offering an estimated 2.9 billion individual rows of data records for $3,5000,000. Jeez Louise!
At this point, various “bad actors” (by which I don’t mean David Hasselhoff or Pauly Shore) began posting on the dark web and leaking about the availability of the purloined data.
The breach was reported by the Daily Dark Web in a piece entitled NationalPublicData.com Hack Exposes a Nation’s Data:
The leaked data, which spans from the years 2019 to 2024, is of unprecedented magnitude, comprising 2.9 billion rows. The sheer volume of information involved is monumental, with the compressed data reaching 200GB to a staggering 4TB when uncompressed. The breached database includes comprehensive citizen information, firstname, lastname, middlename, name_suff, address,city, county name, phone 1,aka1 fullname, ssn and more. Such a massive breach raises serious concerns regarding data privacy, security, and the potential for widespread misuse or exploitation.
However, Daily Dark Web also noted that there was “a strong possibility that the assertion may be exaggerated and that the data could have been scraped from publicly available sources. Additional scrutiny and analysis are required to validate or refute these allegations.”
You’d expect that the mainstream media might attack this story like a dog with a bone, but few outlets took any notice. Instead, they focused on all the usual wars, natural disasters, sports, bird flu, Taylor Swift, and Congress trying to shut down TikTok.
Then, on July 21, 2024, someone leaked exactly what was stolen. Members of the cybercrime community Breachforums released in excess of 4 terabytes of data they claimed had been stolen (though not by them) from NPD.

Photo by Markus Spiske on Pexels.com
What Did the Hackers Get?
The breach contained massive database holdings at the nationalpublicdata.com domain, stealing Social Security records, phone numbers, physical address histories, and some email addresses of many millions of Americans. Information datasets from Canada and the United Kingdom were also included.
Per Troy Hunt, a regional director of Microsoft and founder of Have I Been Pwned (a site that helps people determine whether their email address has been included in data breaches), there were also 70 million rows from a database of U.S. criminal records.
Techcrunch referred to the data stolen as “partly legitimate — if imperfect.”
Brian Krebs of Krebs on Security further wrote that Atlas Data Privacy Corp. researchers found that there were 272 million unique Social Security Numbers in the entire records set, and that most of the records had a name, Social Security Number, and home address; approximately 26% of those records also included a phone number.
Apparently Atlas verified a subset of 5,000 addresses and phone numbers, and found that those records were, with “very few exceptions” for people born before January 1, 2002. So, maybe your college student is safe. But the rest of us? Oy.
Atlas also found that the average age of consumers in the records was 70 — with approximately two million records related to people who would be at least 120 years old at this point, so at least some of have already shuffled off this mortal coil, taking their credit lines with them.
This still leaves a lot of questions. Which data got out? Was it accurate or out of date? Which data was for deceased persons and which for real, live peeps? And what good data is paired with bad data?
If you’re feeling cyberwonky, read Troy Hunt’s Inside the “3 Billion People” National Public Data Breach. Hunt states that, “[t]here were no email addresses in the Social Security number files.” So, figuring out how bad it all is may take a while, because it’s hard to know what info is current and properly matched to your public identity.
Where Do Things Stand Now?
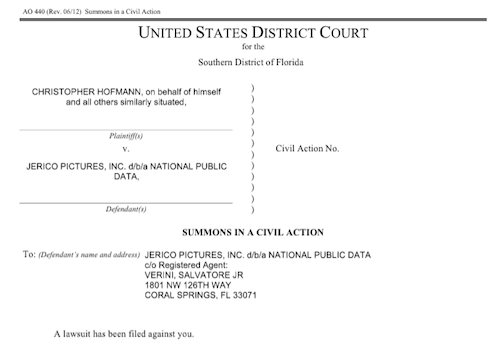
Mainstream media finally took notice on August 1, 2024, when California resident Christopher Hoffman filed a class action suit. Even then, NPD didn’t respond publicly until Friday, August 16, 2024, more than two weeks later, four months after the breach was originally reported, and more than eight months after the initial crime occurred!
And when NPD finally did post a milquetoast-y comment, it merely said that the breach involved a “third-party bad actor that was trying to hack into data in late December 2023, with potential leaks of certain data in April 2024 and summer 2024.” Well, duh.
That’s not even all! According to two Bleeping Computer pieces, National Public Data Confirms Breach Exposing Social Security Numbers, and Hackers Leak 2.7 Billion Data Records with Social Security Numbers, on August 6, 2024, “another threat actor known as Fenice shared for free the most comprehensive variant of the database with 2.7 billion records, with multiple records referring to a single person” and further, the “threat actor known as “Fenice” leaked the most complete version of the stolen National Public Data data for free on the Breached hacking forum.”
Meanwhile, in finger-pointing worthy of the Spider-Man memes, this Fenice claimed that the data breach was actually conducted by a different threat actor named “SXUL” rather than USDoD. (What, nobody’s named Mike anymore?)

(I created this from a meme generator. Apologies for offended artistic tastes.)
So, our data was stolen, priced for sale for $3.5 million, and then offered up for free to hackers, but nobody told us regular folk until the lawyers wanted attention for a class action suit?
If you feel like you need an aspirin, you’re not alone. Nothing about this feels particularly organized. Or fair.
This class action suit is a big deal, because, as the plaintiff’s law firm explained in a press release, Hoffman was not a customer of NPD. None of us were.
Thus, unlike when we get those letters from our doctor’s office or credit card companies, we never voluntarily gave our personal information to NPD in the first place, so most Americans (and Canadians, and citizens of the UK) won’t even know if they’ve been affected by the breach until or unless something along a continuum from hinky to financially catastrophic happens.
As a result, it’s essential to take action and organize your resources against potential fallout.
HOW TO KNOW IF YOUR INFORMATION WAS HACKED
The cybersecurity firm Pentester accessed the files included in the breach and created a free database/breach check of the stolen information — but with Social Security numbers redacted, birthdates partially redacted, and phone numbers and street addresses in the clear.

I know it doesn’t look very impressive, but experts and journalists, including at Time Magazine, have recommended using it.
Enter your first name, last name, state, and birth year. It will search billions of leaked records and note whether your information was included in the breach.
If your data isn’t found, you’ll get an error message instead of a list of records. Yay! Except that’s the starting point, not the finish line. Boo!
- Check every state you’ve lived in. Ever.
- Check your maiden name, or any other name by which you’ve been known, legally or otherwise.
- Check for your significant other, your parents, your kids, and pretty much everyone you care about. (I mean, you could also search for your horrible boss, the kid who stuffed you in a locker in seventh grade, and your ex-mother-in-law, just to enjoy a little schadenfreude. I won’t tell.)
However, will only tell you is whether your information is out there, somewhere, naked. Your next step is protect that data from molestation as best you can.
PROTECT YOURSELF AGAINST YOUR DATA BEING USED AGAINST YOU
Monitor your financial life
You should already be regularly checking your bank accounts and credit card statements for anomalies. Either log in to one at a time or use a financial dashboard like Empower, Rocket Money, or one of the other popular alternatives to the late, lamented Mint.
Next, monitor your credit reports.

Longtime Paper Doll readers know that I always advise using AnnualCreditReport.com, which, by law, guarantees a free credit report from each of the three credit reporting bureaus per year. Better yet, after the onset of the COVID pandemic and the related financial chaos that ensued, Equifax, Experian, and Trans-Union temporarily offered free weekly credit reports.
The bureaus extended those offers twice over the years, and as of last October, the Federal Trade Commission reported that AnnualCreditReport.com will now permanently make available weekly credit reports at no charge so that consumers can dispute errors, be watchful for any fraudulent account openings or changes, and report identity crimes at IdentityTheft.gov.
While you’re pulling your own credit report, pull them for your children, too. Even the existence of a credit report for a child who has never applied for credit is a big, honking sign that something fraudulent may have occurred.
Place a fraud alert on your credit file
This requires that any creditors contact you before making changes to any of the accounts you already have or before opening any new accounts in your name. You needn’t contact all three credit bureaus; rather, once you request a fraud alert with one bureau (say Equifax), the other two (Experian and Trans-Union) will be notified.
Per a law passed in 2018, fraud alerts stay in place for a full year (unless you rescind it earlier), and victims of identity theft and related crimes can secure an extended fraud alert for seven years. Previously, fraud alerts lasted only 90 days.
Also, the law requires that each of the credit reporting bureau must automatically send you a free credit report after you request a fraud alert. Scrutinize them carefully.
To request a fraud alert, contact one of the three credit bureaus’ fraud alert divisions:
- Equifax — or call 1-800-525-6285
- Experian — or call 1-888-397-3742
- TransUnion — or call 1-800-680-7289 (Note: an extended TransUnion fraud alert must be requested by mail.)
But before you choose this path, there’s a better option.
Freeze your credit file
A credit freeze is different from a fraud alert. While the fraud alert says that creditors have to contact you before changing or opening accounts, a freeze says, “Nope. Do not pass GO. Do not collect $200.” A freeze prevents any new loans or credit from being taken out in your name — even by you!
A credit freeze is different from a fraud alert. A fraud alert requires creditors contact you before changing/opening accounts; a freeze says, *Nope. Do not pass GO. Do not collect $200.* A freeze prevents any new loans/credit from… Share on XThe freeze stays in place until or unless you revoke it. So, if you need to buy a new car, seek a student loan or mortgage, or apply for a credit card, you can temporarily remove the freeze. After you secure funding, you can put the freeze back on.

Ice Photo by Enrique Zafra at Pexels.com
- Contact each of the three credit bureaus.
Unlike with the fraud alert, where you only have to contact one of the credit bureaus, you’ll need to contact all three at the following freeze division links or numbers:
-
- Equifax — or call 888-397-3742
- Experian — or call 866-478-0027
- TransUnion — or call 800-916-8800
You must create an account with login credentials before you can proceed to request a freeze.
- Keep your PINs in a safe place.
When you place a freeze on your credit, you’ll get PIN. You’ll need those PINs to defrost — I mean, unfreeze — your credit later. (Note: I helped a less tech-savvy client in her 80s accomplish this on Friday, and we learned that TransUnion no longer requires a PIN; your TransUnion login will suffice.)
Where you safeguard your PIN depends on the standard methods that you already use; you don’t want to be dependent upon your memory of an out-of-character decision.
- Write PINs down and put them in your fireproof safe or safety deposit box.
- Enter PINs in your digital password manager.
- Put PINs in your secure password book in code.
Do NOT put them on a sticky note affixed to the front of your computer. Do NOT write them in a little notebook that you take out of your home.
- Protect the credit files of your loved ones and those in your care
That 2018 law guarantees that you can freeze (and unfreeze) your own credit for free. (This is different from a credit lock, which requires a subscription to a credit bureaus’ services.) In addition to setting a freeze for yourself, you can obtain a credit freeze for your children under the age of 16. (Minors aged 16 or 17 may request their own freezes.)

Photo by Julia M Cameron on Pexels.com
Because minors can’t apply for loans, people rarely check children’s credit history. In theory, there shouldn’t even be a credit bureau file for a child, so when young adults start out trying to get student loans or credit cards, they may be in for a shock to learn that someone has already destroyed their credit!
For more on preventing children from being the victims of identity theft, check out:
https://consumer.ftc.gov/articles/how-protect-your-child-identity-theft
Additionally, if you serve as a conservator or guardian, or if you hold someone’s Power of Attorney, you may secure a free credit freeze for them, as well.
Why else should you get a credit freeze?
Any time you are at greater risk of identity theft, whether through a massive data breach, a run-in with a bad roommate, a breakup with a creep, or you’ve had your wallet stolen or your home burgled, a credit freeze can give you peace of mind that nobody will be able to access credit in your name.
Similarly, if elderly relatives develop dementia or anything that impairs their cognitive capacity, they can become prey to predatory lenders and charlatans selling everything from scammy auto repair warranties to non-existent services. A credit freeze prevents scams from moving past the spam stage.
Military Fraud Alerts
Members of all United States military branches have an additional resource that predates the 2018 law. They can set active duty alerts, allowing them to place a fraud alert for one year, renewable for the entirety of their deployment.
For Equifax, use the online form for an Active Duty Alert or call 800-525-6285. Meanwhile Experian has an online form but no phone number, and TransUnion has a phone number (800-680-7289) but no online form.
As a bonus, securing an active duty alert prompts the credit reporting agencies to remove a service member from the marketing lists for sneaky pre-screened credit card offers. (Service members can request to be added back, but who wants that junk mail?)
DON’T GET SCAMMED
Even partial information allows scammers to contact you, pretending they’re preventing scams. A caller might fake being from your bank or credit card, alerting you to a hacking risk. They may request you log into one of your accounts and change passwords (to something they provide) for “testing” purposes that might sound reasonable if you’ve been interrupted while chasing a toddler or running a meeting.
Photo by mohamed_hassan from PxHere
Be vigilant. If contacted by phone, text, or email, don’t respond, even (or especially) if the contact appears to already have some of your data. They’re using what they DO have to get you to reveal what they DON’T have — more of your private information. Call your financial institution directly.
The Social Security Administration won’t call you. They won’t email. They won’t text you. (Government sites may email or text two-factor authentication codes when you log into a federal site, like ssa.gov, but that’s initiated by you.)
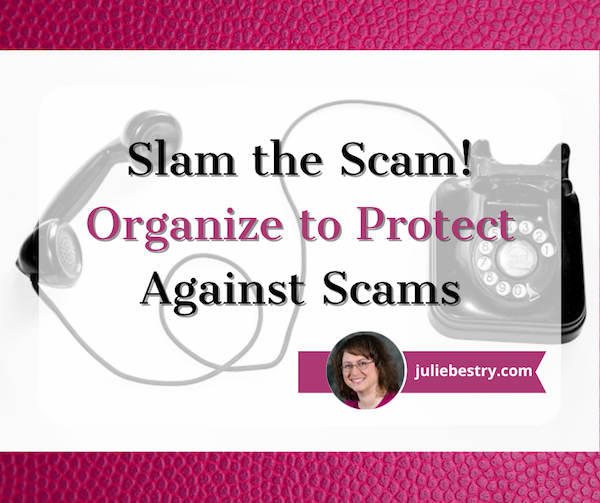
My March post, Slam the Scam! Organize to Protect Against Scams, focused mainly on scams targeting seniors, but will help you protect yourself and loved ones from most common scams, and provides resources to help you learn more.
The Hill‘s August 15, 2024 piece, Was your data leaked in massive breach?: How to Know, and What to Do Now, has a good point about the likelihood of being at risk:
“If you’re a high-value individual that maybe has a high net worth or works at a company that they can extort you, you might actually be a real target,” Kyle Hanslovan, CEO of cybersecurity firm Huntress, previously told Nexstar. “For the masses though, the everyday common person, you’re more of a target of opportunity.”
Most people shouldn’t spend too much time worrying about what may happen if their information ends up in the wrong hands. Instead, Hanslovan recommends keeping an eye on your important accounts and making sure you’re prepared to act in case something does go wrong.
“It stinks for privacy, but it kind of normalizes just what’s happening,” Hanslovan said. “It doesn’t make it right, and it definitely doesn’t wave, you know, a company’s true fiduciary responsibilities to protect your data.”
Someone should tell NPD that.
Other Ways to Keep Bad Guys From Using Your Data to Hack You
- Make your passwords long and complex. Using at least 16 characters, with a mix of capitals, lowercase, numbers, and special symbols, will make it hard to hack you.
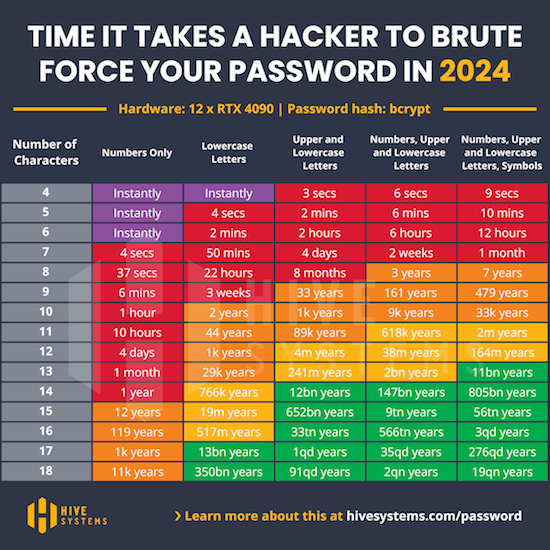
Image Source @2024 Hive Systems
- Use a password manager for all your longer, more complex passwords.
- Turn on two-factor or multifactor authentication for as many of your online accounts as allow it. (That’s like when you get a text or email with a code to enter before your login is authenticated.) Alternatively, you can use an authenticator app.
- Set up account alerts for your bank, investment, and credit card accounts, particularly to flag online or in-person purchases or ATM transactions outside of the US.
- Keep security software updated on your computer and phone.
- Don’t check financial accounts on insecure Wi-Fi networks; wait until you’re home, on secured WI-Fi network.
WHAT TO DO IF YOUR DATA IS USED FRAUDULENTLY
- File a police report.
- Report fraud to the Federal Trade Commission.
- If someone uses your Social Security number, report it at IdentityTheft.gov.
ONE LAST WEIRD THING
You may have noticed something odd about the class action suit. You’d expect National Public Data’s parent company to have a tech-leaning name, like InfoDynamics or Identidata.
Nope. The parent company is Jerico Pictures Inc., a Florida-based film studio owned by Salvatore (Sal) Verini, Jr., a retired deputy with the Broward County Sheriff’s office who fashions himself as an actor, producer, and writer.
Verini is also listed as the owner of companies called Trinity Entertainment Inc., National Criminal Data LLC, Shadowglade LLC (which sounds like a housing development in a horror movie produced by a company with a name like Jerico Pictures), and Twisted History LLC, which sounds like a joke.
Meanwhile, victims of data hacking won’t be doing a lot of laughing.
REFERENCES
As a Certified Professional Organizer®, I often help clients protect their identities and financial information. However, I am not a cybercrime specialist, nor do I play one on television. To research the specifics of this breach, in addition to the many government and tech-oriented links in the above post, I used a clarifying mainstream sources, including:
- 7 On Your Side steps to take to keep personal information safe amid latest data breach (WABC-TV)
- Hackers May Have Stolen Your Social Security Number in a Massive Breach. Here’s What to Know. (CBS News MoneyWatch)
- How to Check if Your Information Was Compromised in the Social Security Number Breach (Time Magazine)
- It’s Free to Freeze Your Credit: Here’s What You’ll Need to Do (HerMoney.com)
- The Weirdest ‘3 Billion People’ Data Breach Ever (The Verge)
- What to Know about Credit Card Freezes and Fraud Alerts (FTC.gov)
Keep your eyes open and your personal information close to the vest.
Paper Doll’s Ultimate Guide to Tax-Smart Organizing: 2024
Every few years, I share a series of tax-related organizing tips for readers. Recently I’ve received inquiries from first-time filers asking for how to even begin the process. So, today’s post mixes tax-related news with a larger baseline of how to accomplish preparing and submitting your 2023 tax return.
Note: I’m neither an accountant nor a tax preparer. I don’t even play one on television. But I do help my clients find, organize, and make sense of the documents they need in order to prepare their tax returns.
ESSENTIAL TAX INFO TO KEEP ORGANIZED
Tax Deadlines
The federal Tax Day is April 15, 2024 (unless you live in Maine or Massachusetts, where it’s April 17, 2024).
If you file a (valid) extension request, you must file your tax return by October 15, 2024. Note, you still have to PAY what you (estimate that you) owe by April 15th to avoid a fine. However, if you strongly believe you’re not going to owe anything, you may file late (without filing for an extension) and there’s no penalty fee. But then you’ll also be delaying getting a refund if you’re owed one, so Paper Doll advises against procrastinating.

How To Prepare and File Your Taxes
You have a variety of options for how you prepare and file your federal taxes:
- Prepare your taxes yourself on paper forms. Like a caveman. And you’ll have to do your own math.
- Hire an accountant or CPA firm. You still have to gather all of your forms and your receipts and tell your tax preparer all the wiggly little oddities in your life last year, but you won’t have to do math. The complexity of your return (and how well you organized your supporting document) will determine the cost of the service.
- Visit a tax preparation service like H&R Block or Jackson Hewitt. Find them in independent storefronts or at desks inside big box stores, like Walmart. However, you may want to reconsider this option.
Color Of Change, in collaboration with Better IRS, just released a report called Preying Preparers: How Storefront Tax Preparation Companies Target Low-Income Black and Brown Communities. In it, they cite that many of these companies are unqualified, hiring non-accountant “unenrolled tax preparers,” who are neither credentialed nor certified in tax policy and regulations, and who do not adhere to continuing education requirements — and in 43 states aren’t even obliged to meet basic standards!
As such, many of these unenrolled preparers have been found to have made excessive errors; indeed, one study by the U.S. Government Accountability Office (GAO) found that only 10% of preparers at large tax prep chains calculated tax refunds correctly! Additionally, many of these companies are preying on low-income and minority taxpayers by charging for advances on refund checks, and promoting unnecessary tax products and high-interest refund anticipation loans.
- Use online tax preparation software, like TurboTax, H&R Block Online, TaxAct, Cash App Taxes, and Free Tax USA. They’ll hold your hand through prompting questions and you won’t have to do the math, but you’re ultimately responsible if you misunderstand a question or make an error. And it can be pricey!
The IRS already receives copies of our income information directly from employers, banks, investment companies, etc., so why do we have to do all of this? And why is it so expensive, especially for those who don’t even owe? Because these companies lobby and bribe — ahem, sorry, contribute — to congressional representatives’ election campaigns to prevent the federal government from creating a free option for all!
More Affordable Filing Options
The IRS estimates that Americans spend an average of $250 to prepare and file their taxes, but there are options for lessening that burden.
- If you are age 60 or older, make $64,000/year or less, are disabled, or need language support, you can get free help from IRS-certified volunteers in the Volunteer Income Tax Assistance (VITA) or Tax Counseling for the Elderly (TCE) programs.
-
-
- Find VITA and TCE program locations at the IRS locator page.
- Seek related help from the AARP Tax-Aide Service.
- The United Way can connect you to preparation and filing assistance via MyFreeTaxes.
-
- If you’re a member of the military (or a military family), you can prepare and file a federal return and up to three state returns, for free, through MilTax. Eligibility requires that you are:
-
- An active-duty service member, and/or their spouse and dependent child(ren).
- A member of the National Guard and National Guard Reserve (no matter your activation status).
- Survivors of deceased active-duty service members, National Guard, or National Guard Reserve members (without regard to activation status or conflict).
- Honorably discharged, retired service members from all branches, including the Coast Guard, if you’ve been discharged within the past 365 days.
- Designated family members of service personnel who’ve been authorized to manage the eligible member’s financial affairs during deployment. Similarly, any designated family member of a service member deemed “severely injured” and not capable of handing their own financial affairs.
-
- If your 2023 adjusted gross income (AGI) was $79,000 or less in 2023, you can use the government’s Free File program. Here, the IRS partners with online tax preparers each year and eligible users (for 2023 filing, that means those with an adjusted gross income (AGI) of $79,000 or less) can file federal taxes with no fee. (State tax costs vary.)
However, the contracted companies change year-to-year, so if you prefer to maintain your data in your account, making it easier to do year-to-year comparisons and be prompted to recall charitable recipients and sources of W2s, 1099s, etc., next year you may have to decide between switching to a new program partner or paying for what was once free.
Some past participating partners in the Free File program have been problematic. The Federal Trade Commission (FTC) found that TurboTax engaged in deceptive advertising (forcing up-selling), and investigated H&R Block for improperly handling and deleting customer data (as well as for deceptive advertising).
Unsurprisingly, both companies have supported legislation to ban the IRS from offering free tax filing services.
- If you qualify, try the US government’s new Direct File trial program. Only 12 states (Arizona, California, Florida, New Hampshire, New York, Nevada, Massachusetts, South Dakota, Tennessee, Texas, Washington, and Wyoming) are participating in this trial effort.
Direct File eligibility is limited to those with income from employment (reported via W2), unemployment compensation, or from Social Security, so self-employed individuals, gig workers, and those with pensions can’t use it. To try Direct File, you have to take the Standard Deduction and can’t itemize. (You can have up to $1500 in interest or savings bond income, but not earnings through payment apps, rent, or prizes. Wages are limited to $200,000, or $125,000 if you are filing Married Filing Separately.)
Unfortunately, Direct File’s future is uncertain. The Biden administration allocated $15 million from the Inflation Reduction Act for IRS to evaluate the viability of a a free online tax preparation and filing service, with $80 billion apportioned for over the next decade. However, Congress’ debt ceiling agreement “clawed back” some of those funds.
Special K: It’s Not Just for Breakfast Anymore
Do you have an online platform on Etsy or eBay, or use a payment platform to sell through your website? Then you may have heard rumblings about the 1099-K form finally getting the $600 rule up and running. Well, it’s been delayed again.
The rule is designed so that anyone who receives money from a third-party network like Venmo, Cash App, PayPal, Square, or Stripe for having made $600 or more in sales for either goods or services would receive a Form 1099-K by late January or early February (when we’re supposed to get all of our 1099s). But the IRS has repeatedly delayed implementing the rule, so some people have received 1099-Ks and others haven’t, causing confusion.
So, if you got a 1099-K, check to make sure the numbers match the income you believe you received. (If there’s a mismatch between your records and the form, contact your financial network and correct it before you file your return.)
If you didn’t get a 1099-K, that doesn’t mean that you can fib to the IRS! You must report all taxable income, even if someone who was supposed to send you a form didn’t do their job.

Photo courtesy of Chris Potter/CCPix at www.ccPixs.com under CC 2.0
START THE TREASURE HUNT
Know What You Spent
Start by gathering expense information, like:
- receipts for tax-deductible purchases — check paper receipts as well as email confirmations of purchases
- statements or summaries from ongoing accounts. (On Amazon, select the year from the drop-down under Your Orders in your account. Don’t forget to check the tab for digital orders, too!)
- online financial dashboards — Mint closed in March, so plan to find a new dashboard like Quicken Simplifi, Empower, or YNAB.
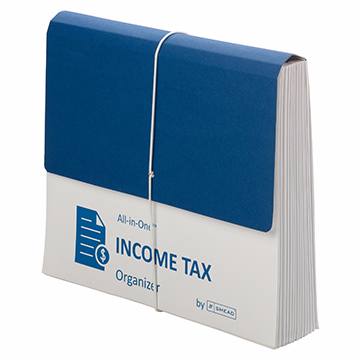
Gather tangible information in a folder labeled Tax Prep 2023, or use something like the Smead All-In-One Income Tax Organizer. Just having it all together will be the first step toward tabulating the correct amounts.
Gather Ye Forms
Most of the essential data you’ll enter into your tax return will come as supporting documents called information returns. These are sent to you by others — employers, banks, brokerage houses, schools, casinos, etc. — and they’re required to mail them by January 31st! That scary-but-official mail you threw on top of the microwave the week before Valentine’s Day? Move the oven mitts and get looking!
The rest of this post is an update of past year’s posts, laying out the different kinds of forms you might need.
MONEY YOU RECEIVED
W-2 (Wage and Tax Statement)
If you were an employee at any point in 2023, your employer should have sent one W2 copy to you and one to the IRS, reporting how much you were paid (in wages, salaries, and/or tips). If applicable, it should also indicate how much money was withheld from you and paid to federal and/or state governments for taxes and FICA (Social Security and Medicare).
Federal, state, and local taxes, FICA, unemployment insurance, and a few other withholdings are considered statutory payroll tax deductions. Statutes (that is, laws) require them, so your employer can’t just blow off withholding this money and sending it to the right agencies.
Sometimes, a court might rule that an an employee’s wages may be garnished, but this has nothing to do with sprigs of parsley. People behind on child support payments or who owe money in lawsuits may have money removed from their earnings, before it ever gets to their paychecks, to ensure it goes directly to whomever is owed.
Your W-2 may also report voluntary payroll deductions. These are amounts withheld from your paycheck because you’ve granted permission. These may include your portion of health and life insurance premiums, contributions to your 401(k) or other retirement fund, employee stock purchasing plans, one-time or ongoing donations to the United Way, union dues, etc.
Photo by The New York Public Library on Unsplash
Did you get multiple copies of the same W-2? Employers submit copy A directly to the Social Security Administration for FICA and keep copy D for their own records. Copies B and C are for you (the employee) – you send one to the IRS with your federal tax return and keep one for your own records. Then, they provide copies 1 and 2 to file with applicable state or local tax authorities. (I’ve never figured out why W-2 copies 1 and 2 aren’t called E and F. Did the same person who came up with this decide that bras should be sized as A, B, C, D, DD, DDD, F, FF, and G, skipping E entirely?)
I've never figured out why W-2 copies 1 and 2 aren't called E and F. Did the same person who came up with this decide that bras should be sized as A, B, C, D, DD, DDD, F, and G, skipping E entirely? Share on XIn theory, a W-2 should be mailed to the address listed on your W-4. (Don’t be confused. The W-4, is the form that tells your boss how much to withhold based on your number of dependents you have.)
Smaller companies may just hand you your W-2 instead of mailing it, but if your W2 is missing, consider:
- Did you change employers last year? You should have received W-2s from each employer. (If you changed jobs at the same company, you’ll receive one W-2 from each employer, not one per position. If you changed companies within a larger corporation, though, you may get one for each.)
- Did you change addresses since you filled out your W-4? There’s only so much a former employer will do to track you down to give you your W-2. Keep the Madge in HR updated!
Don’t assume that if you don’t have your W-2, then nobody knows what you made. Remember, the IRS got Copy A. The IRS knows what you made, so be sure you do, too! (If your former company went out of business or is otherwise not returning your calls, the IRS has a procedure to allow you to file your taxes in the absence of a W-2.)
Examine your W-2 it carefully. Do the numbers seem right? Compare them to the final pay stub you got for last year. Calendar years may end mid-week (or even mid-pay period), so the numbers won’t correspond perfectly, but they’ll be close enough for you to spot if something is seriously wrong. The sooner you call your employer’s attention to an error, the sooner you can prepare your return.
W-2G (Certain Gambling Winnings)

Gambling Photo by Aidan Howe on Unsplash
The W2G is the freewheeling cousin of the W-2. While a W-2 is for money you make while working, the W-2G is what you get while playing. If you win more than $600 in any gambling session at a casino – whoohoo! – the “house” should request your Tax ID (generally your Social Security number) and either prepare a W-2G on the spot or send it to you in January.
Casinos aren’t interested in keeping up with your losses, just your winnings, so they only tell the IRS about what they paid you. If you gamble and want to deduct losses, the IRS requires you have provide receipts, tickets, statements, or other records to support both your winnings and losses.
1099s (Income)
A 1099 is a form that basically says, “Hey, we paid you some money for something, but you weren’t an employee.” You get a copy; the IRS gets a copy. Easy-peasy.
There’s not just one type of 1099; actually, there are 22 different kinds of 1099s. Some of the more common are:
This form reflects the interest income you receive from interest-bearing savings and checking accounts, money market bank accounts, certificates of deposit, and other accounts that pay interest. It also notes whether foreign or U.S. taxes were withheld and if there were any penalties assigned for early withdrawal from an interest-bearing account.
Internet-only banks may require you to log into your account to get your 1099-INT, so don’t count on it coming by mail. If you received less than $10 in interest, your bank may not send a 1099-INT.
Do you own stock or other taxable investments? This form indicates the dividends or capital gains you received as an investor. Your broker, plan services company, mutual fund company or other type of investment company will send this form. Not all dividends are created equal; ask your tax professional if you have any that seem unusual or complicated. Whether you receive dividend checks or your dividends are held in a DRIP (a direct re-investment plan), if you didn’t earn at least $10 in dividends, you are unlikely to receive a 1099-DIV.
This random form is subtitled “Certain Government Payments” and can cover everything from state unemployment compensation to tax refunds, credits, and offsets at the state and local level. It can also be used to report payment of taxable grants, agricultural payments, and other nifty things where a state or local government gives you money.
This new(ish) form replaces some uses of the 1099-MISC. If you’re self-employed (a freelancer, an independent contractor, etc.), you should get a 1099-NEC. However, 1099-NEC just started in 2021, so people unfamiliar with it may send you a 1099-MISC by mistake.
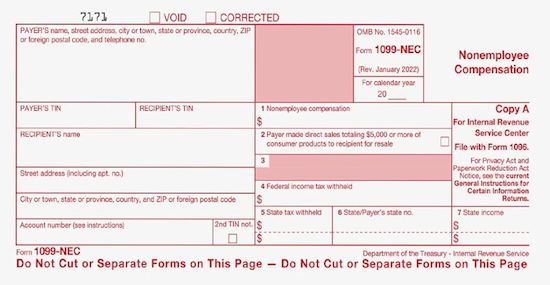
Another problem is that even if someone paid you for doing work as an independent contractor, they may not know they should be sending you a 1099-NEC. So, if you are self-employed or irregularly employed, it’s essential to keep track of your own incoming revenue. Otherwise, if the person who paid you ever gets audited, it could trigger some messy situations for you, too.
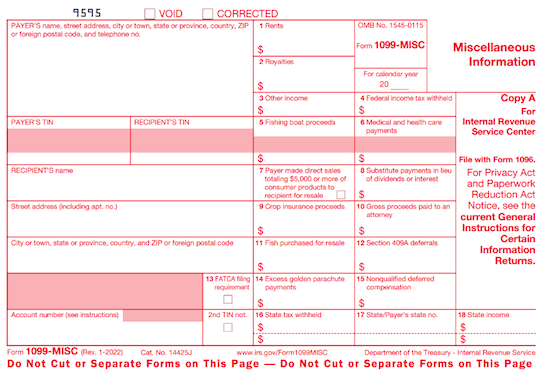
Now that this form no longer covers income for freelances and independent contractors, it’s truly more “miscellaneous.” Seriously, it’s the junk drawer of tax forms!
It’s used to report payment of royalties, broker payments, certain rents, prizes and awards, fishing boat proceeds (yes, really!), crop insurance proceeds, and some payments to attorneys that wouldn’t be reported on a 1099-NEC, like if you received a settlement and had to pay an attorney a portion of it. In general, once people get used to the 1099-NEC, you’ll only get this miscellaneous form to report truly miscellaneous payments.
SSA-1099 (Nobody knows why the numbers and letters are reversed on this one form! It must be done by the same people who label the copies of W-2s and bra sizes!)
If you receive Social Security benefits, you should receive an SSA-1099. (Non-citizens living outside the US, like widows/widowers receiving spousal Social Security benefits, may get a SSA-1042.) The 1099-SSA tends to come on a long form, folded and sealed such that it makes its own envelope. It may look like junk mail, so watch out and replace it, if necessary!
A 1099 doesn’t always indicate that you were literally paid money. For example, a 1099-C indicates that someone forgave a debt, like a mortgage or a credit card balance. You may owe tax on forgiven debts, and the 1099-C alerts the IRS that since you didn’t pay money owed, and got to keep it in your pocket, it’s as if you received money.
1099s sometimes hide in plain sight. Sometimes, instead of sending a 1099 in a separate envelope, a bank or brokerage house may include a 1099 form in the same envelope — sometimes perforated at the bottom of a quarterly or end-of-year financial statement. Be sure to check all that boring-looking official mail. Brokerage houses often sent multiple forms as a “combined 1099,” scrolling across multiple pages. Check the reverse sides of forms, in case you’re missing one.
MONEY YOU PAID
1098 (Mortgage Interest)
A 1098 is not a 1099 with low-self-esteem. The vanilla, no-frills 1098 reflects the interest you paid on your mortgage, which is generally deductible on your federal taxes. Renters don’t get 1098s; neither do homeowners who’ve paid off their mortgages.
There are also sub-types of 1098s for things other than interest on property loans:
- 1098-T indicates tuition you paid; you’ll get this from a college or training school.
- 1098-E shows you’ve paid interest on a student loan and will come from your lender.
- 1098-C indicates the donation value of a car, boat or airplane by fancy-pants, monocle-wearing Mr. and Mrs. Thurston Howell.

Photo by Diego F. Parra from Pexels
1095-A (Health Insurance Statement)
The 1095-A is also called the Health Insurance Marketplace Statement. If you purchased coverage through a state or federal exchange, this helps you determine whether you are able to receive an additional premium tax credit or have to pay some back.
Related forms include the 1095-B (supplied by companies with fewer than 50 employees), detailing the the type of coverage you had, the period of coverage, and your number of dependents, so you can prove you had the Minimum Essential Coverage (MEC) required by law. A 1095-C is similar, but for employers with more than 50 employees.
SPECIAL 1040 FORM FOR SENIORS
Are you a senior? If you are over 65, instead of filing the standard 1040 form, you can file the 1040-SR. The main benefit is that this form, when printed, uses a larger font and provides easier readability.
FINAL THOUGHTS
If you receive a mysterious form, or have questions about how to use a form, the IRS has a surprisingly easy Forms, Instructions and Publications Search. Again, I am a Certified Professional Organizer, not an accountant, so please address any concerns to a tax specialist.
Making sure you have all of the necessary forms in hand will make it much easier to prepare your tax return. Once you file your taxes, make a list of all the forms you received this year, and tuck that list into your tickler file for next January. Check off each form as it arrives, and you’ll have a better sense of when you’ll be ready to start working on your 2024 taxes in 2025.
Slam the Scam! Organize to Protect Against Scams
Being organized and productive depends on having systems in place. The problem is that sometimes things happen that throw all of our carefully curated systems out the window. Things like getting the flu, having your car break down (or get stolen), your computer crashing — or getting scammed.
It’s shockingly easy to fall for a scam, and frustratingly difficult to recover financially and legally after being a victim. It may require time, money, the services of specialists (like attorneys) and more. The best thing you can do is to organize yourself to protect against being victimized.
SCAMMERS PREY ON EVERYONE
You may have heard about a recent viral article in The Cut by Charlotte Cowles, the online magazine’s financial advice columnist. You wouldn’t have expected someone with that professional identity to write a column entitled, The Day I Put $50,000 in a Shoe Box and Handed It to a Stranger. But she fell for a scam, and she fell hard. And now, risking public and professional embarrassment, she has spoken out.
For weeks, there’s been debate online regarding what happened to Cowles. Many people can’t imagine that a grown woman with a professional background in financial writing could have been fooled by the ring of scammers who convinced Cowles that they were representatives of Amazon, of the Federal Trade Commission, and of the CIA.
But scams are real, they are everywhere, and we need to organize ourselves (and warn our loved ones) to be vigilant. Gallup found that 15% of American households were victims of financial scams just last year.
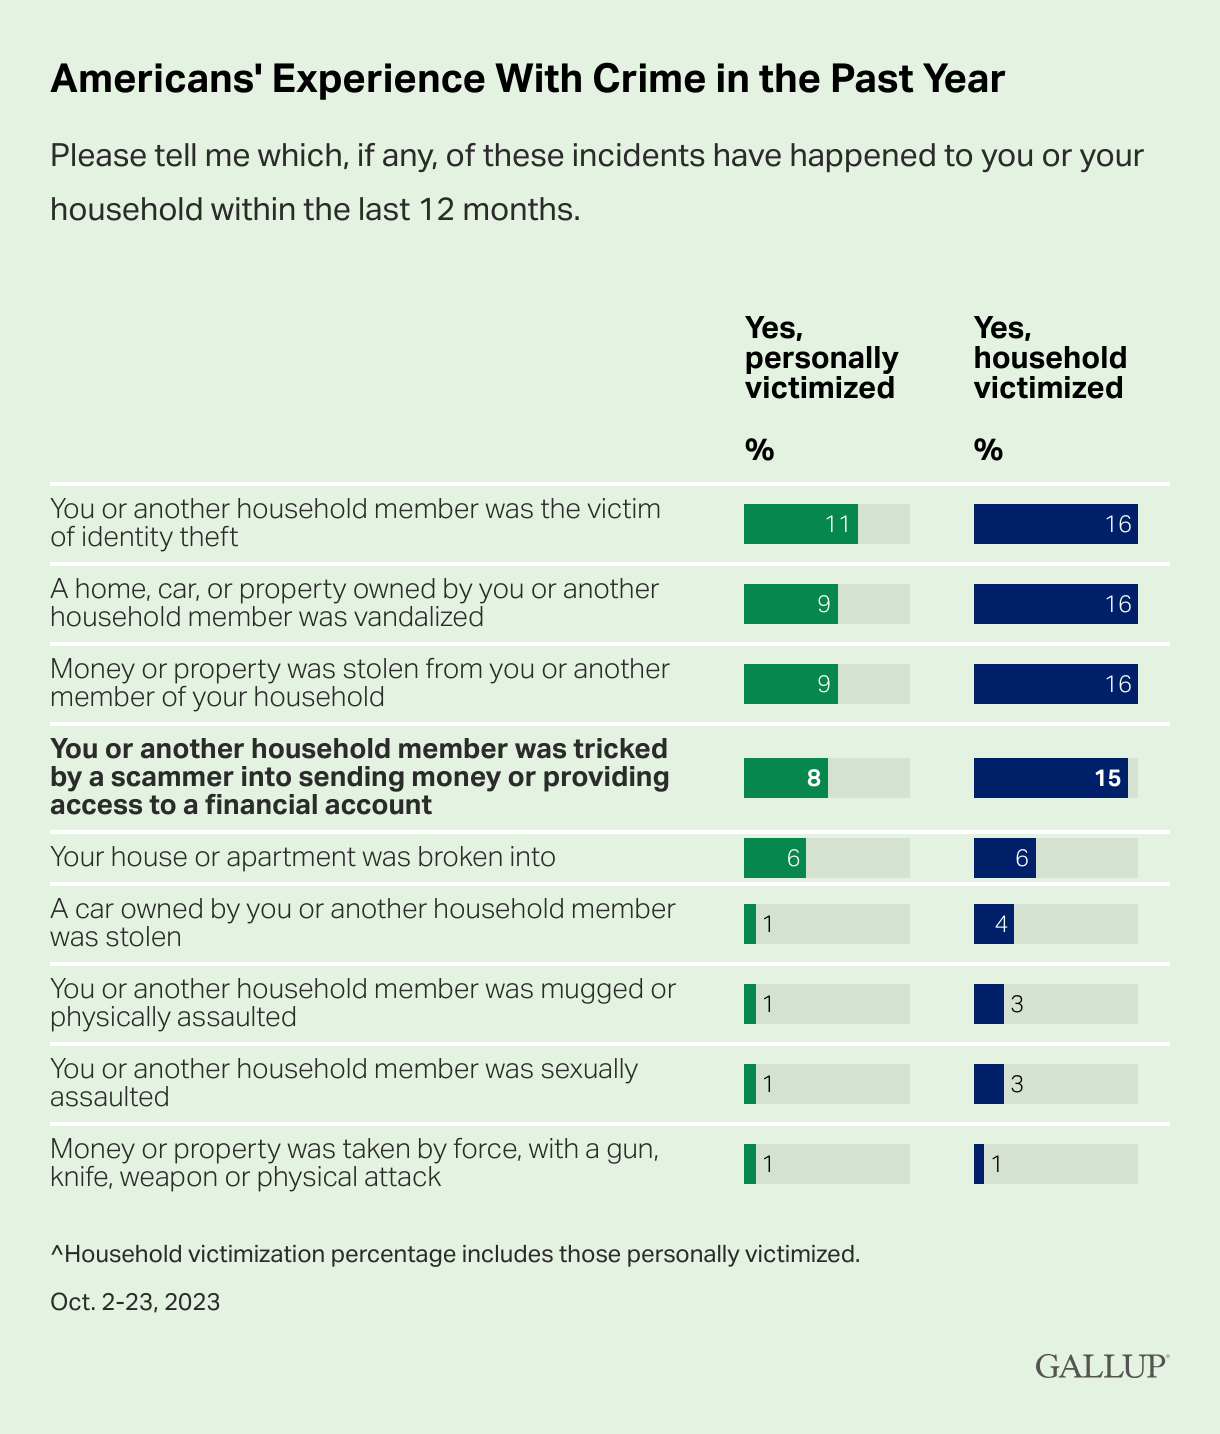
Graph provided by Gallup
And, while we tend to think of victims as being older, every demographic group is at risk. In fact, younger adults (like Gen Z and the youngest Millennials) are overrepresented as victims of scamming (at 22%); meanwhile Gen Xers like Paper Doll and Baby Boomers are somewhat less likely to be scammed, at 9% and 14%, respectively.
The rate of victimization is lower among adults without a college education and with lower incomes than those who have college educations and who earn at least $50,000 per year. One might surmise that both of the latter groups have more opportunity to be warned and prepared to identify elements of scams.
But people with education, experience, savvy, and money can also be scammed. Last month, author Cory Doctorow wrote How I Got Scammed, explaining how a Christmas holiday travel week, a failed ATM transaction, and the post Alaska Air 737 Max door-plug disaster created a perfect storm for him being taken advantage by a phone-phishing fraudster pretending to be from his credit union.
Sometimes, a scam is obvious. Out of nowhere, you’ll be cooking or watching TV and the phone will ring. A mysterious and heavily accented speaker will say that there is “something seriously wrong with your Microsoft computer.” It doesn’t matter if you actually have a Mac, or if you don’t even have a computer. They’ll use that wearily patient voice so identifiable as IT customer support.
You immediately know it’s fake; but would your grandparents? Would your teenager?
Other scams are less obvious because they come wrapped in the kind of tech-related language we see every day. In just the 24 hours prior to writing this post, Paper Doll and Paper Mommy experience attempted scams.
I received an email claiming that I’d purchased $500+ in services, and if had not made those purchases, I should immediately click to be connected with the company’s fraud department. Of course, merely hovering my cursor over the return email address (displayed as the company’s name) showed it was actually sent by gibberishletters@Yahoo.com. Real companies don’t use Yahoo addresses; in theory, they shouldn’t even use Gmail addresses. Dependable companies have their own domains.
Meanwhile, Paper Mommy got the all-too-common email advising her to click because her iCloud was full. [Be assured, her iCloud was not full. It has a backup of her iPad and probably a few dozen photos and not much more.] Paper Mommy may be 87, but she is one smart cookie, and even if she hadn’t received one of these same phishing attempts previously, she knows enough to verify such things.
However, it’s common enough to get random notification texts, popups, and emails claiming that something is awry. One of the immediate clues is bad spelling, grammar, or punctuation, something that older generations are more likely to take seriously; a 50- or 70-year-old is more likely to immediately realize that a poor command of English (in an email sent, ostensibly, by an American company to an American customer) is a sign of a scam. Thus, given the propensity of younger people for text-speak and a lesser reliance on standard usage, younger adults might be more easily tripped up.
Still other scams prey on the inclination of individuals to be good natured. One popular scam comes in the guise of a text regarding a sick or injured dog. The sender addresses you by the wrong name and says that they’re at the vet; their dog won’t eat and is whimpering, and they’re waiting for assistance. I “fell” for such a scam a few months ago, in that I replied and said, “Sorry, you have the wrong person. I hope everything turns out OK for you and the dog.”

Sad Doggie Photo by Bruno Cervera at Pexels
I thought nothing more of it until the person kept texting and trying to inveigle me in conversation, asserting that I must be a dog lover, too. (Readers, while I’d hate for you to think I’m a Disney villainess, I’m not fond of animals in person, though I do love monkeys, puppies, kittens, and penguins, as long as they’re on my device screens and nowhere near me.)
I Googled, and immediately found that this is a long-running scam to convince text recipients to get emotionally enmeshed in the condition of the dog, and end up giving money. One can understand how Congressman George Santos managed to set up fake Go Fund Me accounts for animal care and steal the proceeds. People are softies and want to be kind.
We’re also inclined to be law-abiding. There have been a number of jury duty scams where recipients get calls or texts saying that there’s a bench warrant for them to be arrested because they have not shown up for jury duty. Sometimes, recipients are warned that deputies are on the way to arrest them unless they pay a fee over the phone, or buy gift cards and send them to the caller.
Government agencies don’t text you out of the blue. In most cases, none but teeny, hyper-local government offices will even email. They certainly don’t take payment in gift cards.
Scams are designed to prey on your lack of experience or information, your good nature, and your fear of getting in trouble (as with Cowles’ example). Do not let scammers waste your time, ruin your productivity, or take advantage of your goodwill.
SOCIAL SECURITY: SLAM THE SCAM DAY
The Social Security Administration has declared this Thursday, March 7, 2024 Slam the Scam Day!
On National Slam the Scam Day and throughout the year, the SSA provides tools to help seniors and others recognize scams related to Social Security and prevent scammers from stealing both funds and personal information.
Social Security and Paper Doll want you to protect yourself, your loved ones, and people in your community this Slam the Scam Day by educating everyone about government imposter scams. Discuss the issue and let people in your life know they shouldn’t be embarrassed to report if they shared personal information or suffered a financial loss. It’s important to report scams as quickly as possible, both to aid recovery and identify the culprits.
The Social Security Administration encourages us to share their Scam Alert fact sheet to help educate others about how to protect themselves. Report Social Security-related scams to the Social Security Office of the Inspector General (OIG).
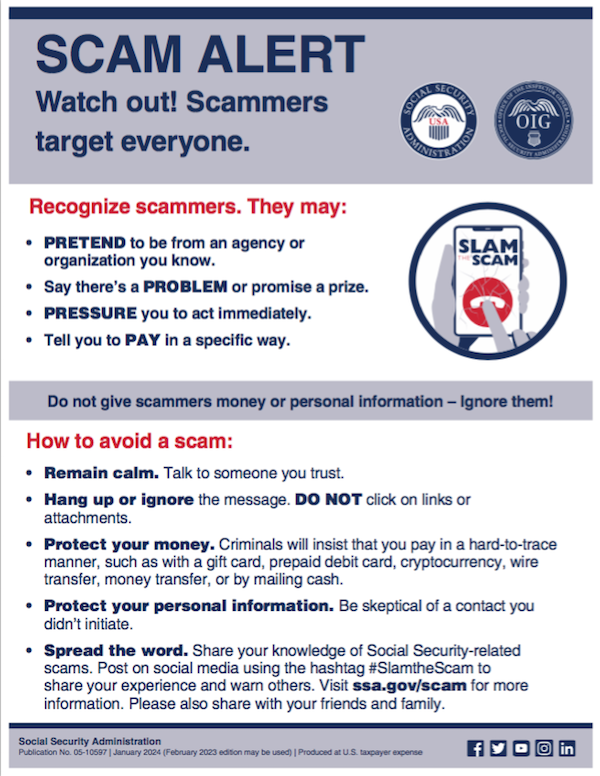
If you do encounter scammers in any way related to Social Security, report the scam online with as much information as you have regarding the characteristics of their claims.
Social Security encourages you to visit www.ssa.gov/scam for more information and follow the SSA OIG accounts on Facebook, Twitter, and LinkedIn. Those accounts aren’t going to share the newest viral dances or memes, but will keep you informed of the latest nasty tactics. Please consider sharing this post with the #SlamtheScam hashtag on your social media platforms.
OTHER SCAMS TARGETING SENIORS
Scams targeting seniors aren’t limited to those involving Social Security.
The “Grandma, I’m in Jail!” scam has been prevalent for more than a decade. Your phone rings and you hear a young person’s distraught voice begging for help. The caller, ostensibly your grandchild, has somehow accidentally run afoul of the law and is in jail. “Please send bail money but don’t tell Mom and Dad,” the caller begs, providing a phone number and case number; you call as directed and the faux police officer verifies the case number and takes your money. These scams assume Grandma doesn’t hear your voice often enough to recognize it on the phone.
Help your grandparents not fall for such scams by 1) explaining how they work and 2) calling them more often so that they recognize your voice!

Photo by RepentAndSeekChristJesus on Unsplash
Elders are often the victims of medical scams designed to impersonate legitimate agencies related to Medicare, diabetes supplies, medical equipment, hospice, and more. Romance scams, which prey on lonely people of all ages, but especially tender-hearted seniors, are also on the rise.
The American Association of Retired Persons (AARP) is great resource for keeping on top of scams targeting the elderly. Bookmark AARP’s Scams and Fraud page to learn about new schemes as they become known.
KNOW THE SCAMMERS’ TRICKS
Similar to “Grandma, I’m in Jail” is “Dad, I’ve had a car accident!” There’s loud traffic noise (and perhaps sirens) in the background and the faux-distraught caller is saying that they’ve caused an accident and that the police say they need to pay a fine right away. Don’t fall for it.
Remember how I said that government agencies won’t ask for payment in gift cards? Neither will your boss. The Do Me a Favor scam shows up via email or text, when your boss (or maybe the CEO of your company) sends a message asking you to purchase gift cards for a work-related charity promotion, promising to pay you back after he receives them.
Yeah, no. The email or text may look like it’s coming from your work contact, your church leader, or your Facebook friend, but it’s almost certainly not.
Similarly, your friends aren’t going to be at the Paris Olympics and lose their wallets and ask you to send them money via Facebook.
The best way to organize yourself against scams is to stay informed of what scams are popular. When you know what to expect, it’s easier to identify scammers and avoid engaging.
- 5 Financial Scams To Avoid in 2024 as Expert Warns Fraud Has Reached ‘Crisis Level’ (NASDAQ)
- 6 Top Scams to Watch Out for in 2024 (AARP)
- 10 Scams You Should Know About in 2024 (Express VPN)
- 17 Facebook Marketplace scams to avoid in 2024 (Lifelock)
- Credit Card Scams to Know in 2024 (and How to Avoid Them) (Time Magazine)
- Five Biggest Frauds To Watch Out for in 2024 (Kiplinger)
- The Latest Scams You Need to Be Aware of in 2024 (Experian)
- No Love for Romance Scammers in 2024 (IRS)
DON’Ts AND DOs TO KEEP YOURSELF SAFE FROM SCAMMERS
DON’T CLICK — If you receive an email or text with links to your bank or other financial account, go instead to the official website and log in from there. If you don’t know the URL, look it up on the back of your bank or credit card or on your statements. And, as you’ve been told since the dawn of email, do not click on attachments from somebody you don’t know.
DON’T TRUST — The Caller ID may say that the inbound call is coming from your bank or the IRS, but it’s ridiculously easy to “spoof” (that is, fake) the identity of a caller. Consider not answering; scammers rarely leave voicemail.
Don’t assume that the caller having the last four digits of your Social Security number or even all of the digits of your account number is on the up-and-up; there’s just too much of our private information on the dark web. Instead, hang up and call the official number for your financial institution and request to be connected to the fraud department.
DON’T DIVULGE — If a stranger claiming to be from your bank or credit card’s fraud department contacts you, ask for a case number. Do not give out your personal information. Do not give out your PIN.
DON’T SAY YES — Do not answer questions in the affirmative. That is, if they ask, “Is this Jane Smith?” don’t say yes; if you must say something, reply, “What is this regarding?” Your voice could be recorded and cloned for AI-related scams. The less you say, the better.
DON’T RUSH (OR BE RUSHED) — It’s the nature of scammers, like the stereotypical used car salesman, to use the pressure of time to get you act against your best interest. Don’t be fooled into making a decision or taking action quickly. Check with advisors, whether more technologically savvy friends or relatives, your accountant or financial advisor, your attorney, or the police.
DO READ UP — The American Bankers Association has a nifty website called BankersNeverAskThat.com. The site explains what to watch out for in terms of email, text, phone, and payment app scams, and also has a great eight-question quiz where you can walk through the situations (on your own, or as part of coaching with a loved one) to identify whether something is a scam or legitimate.
For reference, I did pretty well, but I dithered on the question regarding payment app alerts; if you’ve only recently begun using apps like Zelle, Venmo, or other peer-to-peer payment services, you might find the example sneaky, too, so read (and share) AARP’s How to Avoid Scams on Zelle, Venmo and Other P2P Apps.
The site offers a goofy “retro” scam-themed video game and a series of lighthearted videos to drive the point home.
>
DO HAVE FAMILY PASSWORDS — Schools have security that was non-existent when I was a kid; there are lists of who is allowed to pick up little Johnny or Janey from school to ensure not only that there’s no Stranger Danger but that wackadoodle exes and pushy in-laws don’t insert themselves between you and your kids. Modern parenting includes having family passwords so that if someone says, “Hi, your mommy told me to come pick you up from soccer practice today,” even if the child recognizes Mommy’s best friend as Auntie Karen, the kids know to wait for the official password.
This concept should be applied to families at all ages. Have a communication password designed so that if Grandma or Dad or College Kid gets a call purporting to be from one of the others and is in in need of emergency funds, there’s a level of security involved. (But, y’know, if Grandma calls from jail too often, maybe let her think about the consequences of her actions for a little while.)
DO TELL THE AUTHORITIES — No matter how embarrassing it is to have been scammed, it’s important to report suspected and actual scams.
- Notify your bank, credit card company, brokerage, or other financial institution immediately. If scammers have actually taken your money via credit card, the company should be able to flag the transaction as fraud and reverse it immediately; other financial institutions may also be able to freeze the transaction and save your money. Take screenshots of texts or emails, and don’t delete the original messages in case law enforcement wants to dig more deeply into the source code.
- Contact the police, and file a police report. Do not be dissuaded if the police officer seems blasé about the crime.
My credit card company once notified me that someone had used my card number to buy an inordinate amount of mail order men’s underwear and stereo equipment. Algorithms had already flagged the purchases as fraud, but they asked me to file a police report. The police officer who took the report at my workplace could not have looked more bored if I’d asked him to watch paint dry. It doesn’t matter. Report!
- File reports with applicable state and federal agencies. Whether the case involves the Social Security Administration, Medicare, or other federal crimes, report scams to the applicable agencies. The Federal Bureau of Investigation (FBI) and the Federal Trade Commission (FTC), as well as your state’s bureau of investigation all have fraud departments. Learn more at the FTC’s Reportfraud.ftc.gov and the FBI’s Internet Crime Complaint Center at IC3.gov.
THE FUTURE OF SCAMS
Scams — and scammers — aren’t going away. There will always be scammers who take advantage of anyone more easily duped because they have less information, less experience, and fewer people watching out for them. But, as I alluded to earlier, there are higher tech scams on the horizon.
Artificial intelligence is scary. I bet you’ve heard about deepfakes, video imitations made to sound and look like a real person is saying something they never actually said.
Voiceprints and voice cloning constitute the audio version of deepfakes. A scammer can record you — or take your teenager’s Instagram or TikTok video — and create a completely new message using words and expressions that were never actually said, and then create an “emergency” where it’s believable that money or your Social Security number or other private information is requested. If your college-age kid still hasn’t memorized his Social Security number, you might be tempted to believe it if “he” calls from a spoofed number that looked like his and says he’s filling out a form at school and needed his (or your) digits.
Voice cloning is already being used. Scammy deepfake videos could just as easily be to sent via Facetime or text video. Be careful.
FUNNY THINGS (NOT) TO DO TO SCAMMERS
You shouldn’t engage with scammers, so don’t emulate Paper Mommy or her friend in the stories below. Still, it’s fun to imagine retribution against bad guys.
When I was a teen, my mother was visiting a friend, a suburban woman of (shall we say) means. A phone scammer interrupted their visit and was urgently pushing some sort of financial scheme. Mom’s friend told the caller that she was sorry, but he’d have to wait, that her husband busy shoveling the cow s***.
Later, my mother spoke of her friend’s response with a twinkle in her eye.
Paper Mommy, as longtime readers know, is a hoot. After a friend briefly fell prey to the “Grandma, I’m in jail!” scam (until she learned that her teen grandson was fast asleep in his own bed), Paper Mommy began plotting her revenge on scammers. A few years ago, she called me with delight to report that the day she’d been anticipating had finally arrived.
“Grandma, I need your help!” the voice implored. The scammer had already made a tactical error; much to Paper Mommy‘s chagrin, neither my sister nor I have made her a grandmother. My mom tut-tutted as the scammer wove his tale, offering periodic, “Oh, no, darling! … Oh, you poor thing? … You need me to send you money?”
She kept him on the line for eons, repeatedly leading the evil-doer to believe she was prepared to turn over her credit card number to secure grandson’s release. Oh, she just had to find her purse. Oh, fiddlesticks, where was her wallet? Just when his frustration led him to almost crack and he implored, “Grandma, aren’t you going to help me?” my mom uttered her Oscar-worthy line:
“No, Sweetheart. I never really liked you that much.” Click.
#SlamTheScam
Reference Files Master Class (Part 2) — Financial and Legal Papers

As we move through Get Organized & Be Productive (GO) Month, the annual initiative sponsored by the National Association of Productivity & Organizing Professionals (NAPO), it’s the perfect time to revisit classic posts and essential concepts in paper organizing.
Two weeks ago, we looked at Paper Doll Shares 12 Kinds of Paper To Declutter Now, and while the items listed there aren’t the only papers you can purge, they’re a great start for lessening the clutter so you can see what you own, need, and must organize.
Last week, we began our modern refresh of the basics with Reference Files Master Class (Part 1) — The Essentials of Paper Filing. You can sort and purge papers without those filing resources, but having them allows you to create a system that can grow and expand as your needs change. Even somewhat orderly stacks and piles are better than disarray, but a good filing system assures you that everything won’t be sent into chaos when the kids and pets (or spouses behaving like kids and pets) chase one another through the house.
As I’ve been teaching my professional organizing clients for 22 years, all reference papers can fall into one of five categories. Today, we’ll be reviewing the first two:
- Financial
- Legal
- Medical
- Household
- Personal
FINANCIAL FILES
In almost any household, whether you’re a family of one or 10 (and I mean, geez, even the Brady Bunch, with Alice, only had nine!), financial paperwork makes up the bulk of almost any personal or family filing system.
It’s the nature of living in a Western, capitalist society in the 21st-century — everything centers around whatever represents having or owing little green pieces of paper. At least our Canadian readers have much more colorful currency.

Canadian Frontier Banknotes @2006 Bank of Canada
Your financial files keep track of money coming in (in Yoda-speak, quite literally, in-come), money going out for expenses, money we are investing and (hopefully) growing for future use, and everything related to money we give governments to run things. (If we don’t have the focus and energy to organize our financial paperwork, how would we ever deal with having to raise our own armies and fill our own potholes?!)
Let’s look at each of these categories, in turn.
Transitional Money
Most of your files will relate to money that’s coming to you or paid (or at least owed) by you. But all that money tends to funnel through a few central locations that serve as receiving and funding sources. Generally, these are bank (or credit union) accounts and brokerage accounts.
Bank/credit union statements reflect the monthly status of checking, savings, and trust accounts. These represent collections of funds that are in transition, basically at a weigh-station until you determine where the money is going. Accounts may accrue interest or have fees associated with them, and some (like certificates of deposit) act like investment accounts, but are still basically interest-bearing accounts. Take time each month to make sure these accounts reflect what you think they should.

Brokerage statements reflect investments. Separate these by investment type, like retirement, college savings, goal-related (vacation funds, Christmas Club accounts, etc.), first, and then sub-categorize (and alphabetize) by company. So, in the Retirement hanging folder, you might have interior folders for your 401(k), an old 403(b), IRAs with Fidelity and Vanguard, and so on. Each account should have its own folder.
Clearly label folders with the financial body (bank, brokerage, etc.) and account type; if you have more than one account of the same type at the same institution, put the last four digits of the account number on the file label.
Income
However many people in your household have a job (or jobs), income is likely reflected by pay stubs from employment. In ye olden days, they were truly stubs from checks received from employers. Nowadays, almost everyone gets paid electronically by direct deposit, but often receives printed pay “stubs” showing not merely what was earned, but any deductions from the paycheck. Common deductions include:
- FICA (payroll tax, which goes to Social Security and Medicare)
- Other income tax (federal/state/local)
- Insurance premiums for health, life, and disability coverage
- Retirement contributions (which may or may not be matched by employer contributions)
- Charitable contributions (also called payroll giving) like United Way
- Wage garnishments for child support or other
- Union dues
(If your income is derived from your own business, keep business files separated from personal files.)
While employment is the main category, it’s not the only type of income. You may also receive paperwork reflecting receipt of alimony or child support, Social Security income, disability payments, IRA disbursements, personal loans repaid to you, stock-dividends (outside of a dividend reimbursement plan) and lottery or gambling winnings.
This leaves aside illegal proceeds; Tony Soprano isn’t likely to give you a 1099 for the bribe he paid you. (Tony Soprano also didn’t give me a lot of options for clean language, even when I found a really applicable filing-related, if potty-mouthed, clip.)
Whether you regularly receive money or get a one-time lump sum, keep records for tax and other legal reasons (like divorce and child support proceedings, Medicaid evaluations, etc.)
Maintain an interior folder for each type of income you usually receive to make it easy to check your 1099s against when preparing your taxes. If you have multiple sources of income within one type (and get lots of paperwork for each), label a folder with the name of each high-volume payer.
Outgoing Money (Expenses)
In business, they’re called Accounts Payable. These are your regular (monthly, quarterly, annual, etc.) plus occasional (unexpected) lump-sum payments, reflected by bills or statements, like:
- Monthly/periodic personal/household bills — rent or mortgage, utilities, auto or health insurance, etc.
- Credit cards statements
- Loans — personal, auto, college, home equity, etc.
- Medical bills — these may be one-time or part of an ongoing payment plan
- Tuition —
- Miscellaneous invoices or payment records reflecting anything for or which you wish to keep careful records, like tutoring, music lessons, tuition, professional organizer, fitness trainer, etc.
If your bills are paid by automatic withdrawal, verify that the proper amount was removed from your bank account or charged to your credit card, and then file the papers away. (For now, we’re assuming paper files; we’ll cover scanning and digital filing in the future.)
You may not enjoy the paperwork, but ignoring money issues won’t make them go away. If you struggle with keeping track of finances, learning to manage them in paper form makes money feel tangible, builds financial management skills, and increases financial awareness.
Ignoring money issues won't make them go away. If you struggle with keeping track of finances, managing them in paper form makes money feel tangible and 'real,' builds financial management skills, and increases financial awareness. Share on XIf you receive paper bills but pay each individually online, write the confirmation number and date of payment on the statement. If you still pay by check, tear off the stub to mail back with your payment (assuming you’re not doing online bill-pay), note the check number and date of payment on the larger, non-stub portion of the statement.
Create an interior (manila) folder for each account you hold. It doesn’t matter if you use generic terms (cable, power, water) or company-specific (Spectrum, ConEdison, Springfield Water). The key is to create labels that reflect the way you think. Keep it simple — the more complicated the system, the more friction will prevent you from filing things away.
If you have multiple accounts for the same company — for example, one water bill for your city penthouse and one for your summer cottage (or more likely, one bill for each of several student loans), label folders to differentiate between the two. (So: “Water — Park Avenue” vs. “Water — Park Avenue”; “College Loan — 1st National” vs. “College Loan — Fred’s Bank.”)
For credit cards, if you have more than one card from any one issuing lender, put the last four digits of the card number on the label (AmEx – 4321, AmEx – 9876) to help you file or access papers quickly.
Label a hanging folder for each sub-category. If you have more than one hanging folder’s worth of interior folders, just label the first in the sequence. It will be obvious from the interior labels that you’re still in that same sub-category.
Taxes
Create at least one tax-prep folder, or have one for medical expense records, one for charitable donation records and a third for “other” tax issues. Each January, when you start receiving W-2s and 1099s, pop them in your Tax Prep [Year] file folders. Once your taxes are completed, create an interior folder for a copy of your filed return and all supporting documentation.
As an alternative to collecting active tax filing year documents in file folders, you may want to sequester them in a portable tax according file, whether pre-made like the Smead All-in-One Income Tax Organizer.

Be consistent with labeling; don’t write Tax Stuff 2023 and 2024 Taxes. I recommend Taxes [Year] and if necessary, append a clarifying note for further folders, like Taxes [Year] Amended or Taxes [Year] Audit.
While you must maintain careful tax records and supporting information, you only need to keep the most recent year or two in your active family/personal files. If you’re short on space, everything else can go into easily-accessed file archives, such as in a banker’s box.
Simulated Money
You may have things that aren’t money, but represent (or are the equivalent of) money.
For informational records, like quarterly or annual statements reflecting either employee benefit plans (like if you’re vested employee-ownership stock program), it’s easiest to file these as if they were investments. Just label them consistently and clearly.
However, don’t keep stock certificates, Bearer Bonds, or other valuable paperwork in your family files. Keep papers of significant value in your safe deposit box (see Ask Paper Doll: Do I Really Need A Safe Deposit Box? or in a fire-proof safe![]() .
.
You may also want to create a folder for simulated money with value, like gift cards, gift certificates and store credits owed to you. To keep from forgetting about them, set a monthly reminder on your phone to check the folder and spend your play money!
Financial History
For financial peace of mind and to maintain control over your financial and credit history:
Download your free credit reports from Equifax, Experian and Trans-Union, the three major credit bureaus, on an annual basis at AnnualCreditReport.com. You can just keep the PDF on your computer, but may find it easier to check for errors and compare year-to-year if you maintain a printout in a folder called, simply, Credit History.
For each of these financial categories and sub-categories, within each internal folder, I advise filing paper in reverse chronological order. You’re more likely to need to quickly access something that’s recently been filed.
LEGAL FILES

Gavel: Creative Commons/U.S. Air Force photo by Airman 1st Class Aspen Reid/af.milvv
Longtime Paper Doll readers, may think I overrepresent legal documents in my posts. Yes, you handle financial issues weekly, if not daily, but may not feel like you ever deal with legal documents. If so, you’re lucky; you’re also probably young —but don’t feel so flattered yet — because the older you get, the more important legal documents become. Not having your essential legal and legal-adjacent records when you need them is a headache!
Whether you need to prove that you own land to convincing your daughter that your son was only teasing when he said she was left on the doorstep by elves and not really family, having vital files at the ready ranges from helpful to essential. Beyond the VIPs, the the type and number of your documents will vary depending on your lifestyle, but having a system will make it easy for you to know where to put a new set of documents or find something when you need to retrieve or verify something.
VIPs (Very Important Papers)
VIPs prove you are you who and what you say you are. Each person in the family should have a VIP folder, including (as applicable):
- Birth certificates — prove identity and age
- Adoption records — prove identity, age, and legal status
- Marriage certificates — prove relationships in order to collect insurance and benefits
- Divorce and Annulment decrees and — prove you qualify for remarriage
- Military records — prove legal status and qualifications to collect medical, education, and other benefits
- Citizenship/Naturalization papers — prove identity and that you qualify to vote and hold certain jobs and elected offices
- Death certificates — to allow others to collect benefits and settle estates; to cancel certain accounts and debts
- Passports — to prove identity for travel
- Social Security cards — to qualify for benefits
- Medicare cards — to obtain your medical benefits
Guard your Social Security card/number as if it were worth millions of dollars; identity theft is a nightmare, and the value of safeguarding your SSN is incalculable.
When possible, keep the originals in a safe deposit box; failing that, use a fireproof safe, and maintain photocopies in your family/personal files.
For information on finding and/or creating these documents, revisit:
- How to Replace and Organize 7 Essential Government Documents
- How to Create, Organize, and Safeguard 5 Essential Legal and Estate Documents
- The Professor and Mary Ann: 8 Other Essential Documents You Need To Create
Estate and End of Life Documents
Yes, this hanging file category isn’t “fun.” Nobody wants to think about the end of life. But even if you think you don’t have enough assets to bother, not having estate documents means making life much more complicated and difficult for your loved ones after you are gone. Use the three posts just above as guidelines, then speak to an attorney to get help creating these documents.

The reading of the will in Monseiur Verdoux (1947), in the public domain
Keep the originals in your safe deposit box or fireproof safe; your will will likely be kept on file with your attorney and/or the county in which you live. Additionally, clearly label and maintain a file folder for photocopies of each of the following so that you can quickly check information and know if you need to make updates or revisions.
- Wills — Contrary to popular belief, it’s important to have a will even if you do not have extensive financial holdings. Without a will, literally all of your assets will be frozen during a protracted probate period, potentially creating a years-long nightmare for loved ones.
- Trusts
- Funeral Plans and Instructions
- Advanced Health Care Directive (also known as a Living Will)
- Power of Attorney documents for financial and medical decisions
- Ethical Will — This relatively newer document, sometimes called a legacy letter, allows you to create a message to your loved ones after you’re gone. It may reflect life lessons learned, apologies, and hopes.
Make an additional set of photocopies for relevant family members or anyone you’ve named as your “agent” (that is, your Power of Attorney for financial decisions or your healthcare proxy).
I am not a lawyer. And while I might rock a stunning pant suit while playing one on television, I am not your lawyer. Nothing in this post should be considered legal advice. It is organizing advice.
Titles of Ownership
You went to all the expense and effort to buy something Big Ticket, so make sure you can prove you own it. The most obvious sub-categories are for real estate (buildings and land) and methods of transportation:
Real estate
Create a folder for each piece of real estate you own and label it with the key information, like the address; if there’s no address, be succinct but descriptive.
Keep copies of the deeds and mortgage paperwork for any house, building, or piece of land (whether it’s a the Hess Triangle — the tiniest piece of real estate in New York City — or your own private island).
Hess Triangle photo by David Gallagher — CC BY-NC-SA 2.0 Deed
Note the exact transaction date of purchase/sale, the gross price, and the cost of any legal fees. You’ll need this data for tax prep when you eventually sell any property. Keep track of easements and liens here, as well.
If you own a lot of real estate, create one folder for your primary residence and keep that in front of all of the others. Then create hanging folders for properties divided by state.
Methods of transportation
Whatever you own, whether they’re cars, trucks, motorcycles, RVs, ATVs, snowmobiles, jet skis, boats, or even aircrafts, maintain a folder for each and keep the title and bill of sale for each. If you happen to have stumbled onto this post from RichieRich.com and have many of each, consider making a hanging folder for each of three categories: land, water, and air.
Note: proof of ownership is a LEGAL subcategory; insurance policies are legal (contract-adjacent) and go in the Insurance sub-category; payments for real estate and transportation will go in the expense sub-category of the FINANCIAL. Finally, maintenance records will go in the HOUSEHOLD records (to be covered in a few weeks.)
Contracts
For minor contracts like for your cell phone provider, just keeping a PDF on your computer may suffice. However, you’ll want any major legally-binding contracts accessible. These may include employment contracts (your own, and anyone who works for your household — remember, business paperwork isn’t part of the Family File system), ongoing agreements for services to be rendered, and promissory notes (like loans to or from you).
Insurance
Yes, your insurance agent can look up your coverage, but as I learned when my car was stolen last summer, your agent isn’t always sitting at her desk, waiting for your call.
There are a variety of insurance policies you may have, including:
- Auto (and motorcycle, boat, plane, blimp, rocketship, etc.)
- Homeowners
- Renters
- Health (including medical, dental, vision, other condition-specific policies)
- Life
- Umbrella
- Disability
- Life
- Long-term Care
Create a file folder for each policy, clearly labeled with the policy type (and optionally, the insurer). If you have multiple policies of the same type, label with the policy type, then the insurer, like “Health Ins. — Blue Cross” and “Health Ins. — Unum.”
Consider reviewing the following posts to make sure you understand the elements of your policies:
Paper Doll Explains Your Health Insurance Explanation of Benefits
Organize for an Accident: Don’t Crash Your Car Insurance Paperwork [UPDATED]
In addition to filing your policy documents, always keep your most current health insurance card accessible, either in your wallet or your phone’s digital wallet. Your auto insurer probably provides you with two insurance cards; keep one in the glove compartment (it may be a law in your state to do so) and one in your tangible or digital wallet.
Department of Motor Vehicles
A DMV folder is a great catch-all for everything from photocopies your driver’s license and auto registration to records of parking and speeding tickets, court summonses, proof of attendance at traffic court and traffic school, etc. Keep one folder for each driver.
Divorce or Custody Proceedings
I’ve seen with numerous clients that if you have to get legal authorities involved in custody situations or property division after a divorce, the ability to quickly access paperwork helps resolve things more quickly in your favor.

File divorce and custody paperwork in reverse chronological order in your internal files; keep a digital copy in cloud storage.
Orders of Protection
If you have an order of protection (also known as a restraining order) against someone, create a folder and make multiple copies of the order to keep in it, as you may have to give a copy to a police officer and might not get the original back. Maintain a copy in cloud storage, and have a trusted friend keep a copy in case you are unable to return to your home or access your phone.
Each individual and family is unique, as are your legal and financial situations. If something arises not covered by the above, create a folder and match it to the closest related financial or legal sub-category, and make your labels clear and specific.
Hopefully, this has given you ideas for the financial and legal documents paperwork and the categories into which you can group them for easier filing and accessibility. (Remember, we’ll talk about digital filing later on.) Next week, we’ll continue with the medical paperwork category.)
For reference, the entire series can be found at the following links:
- Paper Doll Shares 12 Kinds of Paper To Declutter Now
- Reference Files Master Class (Part 1) — The Essentials of Paper Filing
- Reference Files Master Class (Part 2) — Financial and Legal Papers
- Reference Files Master Class (Part 3) — Medical Papers
- Reference Files Master Class (Part 4) — Household and Personal Papers

Follow Me