Archive for ‘Digital’ Category
The Password for Your Passwords: Understanding ID.me and Login.gov
Are you over it? Do you feel like you’re all prepared, password-wise?
Two weeks ago, in Not Your Mama’s Passwords: Passphrases, Passkeys, and the Future of Logging In, we did a deep dive, examining:
- how the characteristics of a good password have changed over the years
- what it means to have strong passwords nowadays
- all the elements to consider when picking your login credentials (Did I at least convince you that having capital I and lowercase L (I vs. l), and zeros and O’s (0 vs. O vs. o) might be confuse your eyeballs as you age?)
- the advantages of a passphrase over a traditional password
- how to fix weak, compromised, and re-used passwords
- the advent of passkeys and the many reasons why they’re advantageous (and getting more popular)
- what the difference is between 2-Factor Authentication (2FA) and Multi-Factor Authentication (MFA) and how you can use those methods to the advantage of your digital security.
Then last week, in Paper Doll’s Guide to Managing Passwords for the 21st Century, we had a bit of a reality check as to how we can no longer hope to remember our passwords and why keeping them on sticky notes isn’t (and was never) a good idea. We looked at:
- the advantages and disadvantages of analog password management and whom they are likely to serve best
- the advantages and disadvantages of digital password managers (the solution that’s best for most of us)
- the most built-in digital password managers you may already have
- the most popular third-party digital password managers (plus their features and costs)
- essential features of digital password managers, and some bonus features you might want to check out
- resources for learning more about digital password management.
So, I’d get it if you think you know everything there is to know about organizing your passwords for a more orderly digital life.
Except…maybe not quite yet?
Having access to your login credentials and using your fingerprint or FaceID to prove to a website that you have the right to access your digital stuff should be enough. <sigh> But as we go along, for some sites, that’s still not enough.
The question for this point in the 21st-century is: How do you prove that you are really you?
WHAT IS DIGITAL IDENTITY VERIFICATION?
If you’ve tried to log in to Social Security, EFTPS, the Veterans Administration or any of a number of government websites in the last few years, you may already know that having a password isn’t enough. Because of this, in recent years, new kinds of digital identity verification platforms have been developed.
In the simplest of terms, digital identity verification is the process by which you can prove that your identity is real — that you are really you — without necessarily having to interact in person. Instead of a company making you come in for in-person identification — like how you have to go to an airport to interview for TSA Pre-Check — government agencies, organizations, and businesses can now outsource the collection of that biographical and biometric data digitally, remotely, and match it against trusted, verifiable sources.
These outsourced sites require you to jump through some reasonable hoops to sign up and prove your identity so that when you go to log in to your actual destination (like the Social Security Administration), it’s like there’s a drawbridge with a guard asking you to prove that you are who you say you are before you can go any further.
You just have to have the right answers.
The two best-known sites for digital identity verification, particularly for use federal and state agencies, are ID.me and Login.gov.
ID.me
ID.me was started in 2010 by two U.S. Army Ranger veterans. It’s a secure digital identity verification service that has been described as acting “like a driver’s license for the internet.”
Once you prove who you are to ID.me, it won’t help you buy alcohol or get you on an airplane, but it will unlock access to your accounts with government agencies and programs, healthcare portals, and online store discounts that are dependent on you having a particular kind of status.
How to Get Validated By ID.me
To get validated by ID.me, there’s a one-time set-up where you create a single, unique set of login credentials and confirm the sign-up via email, then choose a multi-factor authentication method. (You also get to create a VERY complex recovery code you can use in case you ever lose your device and/or phone number.)
And, of course, you have to verify your identity.
On the plus side, you won’t have to answer those pesky security questions like you used to have to do to get your credit score. (This is a boon to anyone who no longer recalls their address when they were twelve or the lending company for their first car loan.) But you will need the following basic identifying information:
- your email address — Select one that you check frequently and that you can access during the sign-up process. (So, don’t use your work email if you can’t access it from home, or vice versa.)
- your Social Security number — Alternatively, if you do not have an SSN but do have an Individual Taxpayer Identification Number (ITIN), use that.
- your valid state or federal ID, like a driver’s license, passport book or passport card
- a reliable multi-factor authentication (MFA) method — This may be the ability to receive a security code via text message, an authentication app (like Google Authenticator), a security key, or backup code.
- your phone, tablet, or computer with a camera — You will be asked to take photos of your ID and of your face to verify your identity. You may not want to do this at 2 a.m. after you’ve rubbed off half your eye makeup or mussed your hair to the point that you’re no longer recognizable, so consider this before starting the process.
Once you have everything in hand and provide your identifying information, you will be prompted to either take a brand-new selfie or join a brief video call in order to prove that the photo on your driver’s license matches the photo of your face. I hope, for your sake, your driver’s license photo doesn’t look like Nick Nolte’s famous mug shot.
Be ready to create your ID.me password. Yes, you need a password for the site that let’s you log in to other sites with passwords you already have. And yes, I recognize how ridiculous that sounds.
And, of course, you’ll have to abide by wisdom we’ve previously discussed regarding letters, numbers, special characters, randomization, length, etc.
The process is only slightly laborious, fairly painless, and free, and you will only ever have to do it once.
Where Can You Use ID.me?
More than 21 federal agencies and at least 45 state government agencies in the United States use ID.me as a trusted credential service provider to allow you to safely access information, manage your benefits, and help stop fraud. Government agencies using ID.me include:
- Internal Revenue Service (IRS)
- Social Security Administration (SSA)
- U.S. Department of Veterans Affairs (VA)
- Centers for Medicare & Medicaid Services (CMS)
- U.S. Department of the Treasury
- U.S. Department of Commerce
- U.S. Department of Health and Human Services (HHS)
- Patent and Trademark Office
Various individual states use ID.me for their Departments of Labor or Unemployment, Departments of Revenue/Taxation, and Health & Human Services programs, like state Medicaid and SNAP. You can access a list of all federal and state agencies using ID.me at https://www.id.me/government.
But it’s not just the government that wants to verify your identity. Various businesses offer discounts based on status, and that status is built into your provable identity with ID.me. For example, if you go to ID.me and select Shop instead of Government at the top of the screen, you can use your ID.me Wallet to prove your status as a:
- current member of the military
- veteran
- nurse (or other medical professional)
- first responder
- teacher
- student
- government employee
and access a variety of discounts on product categories including clothing and accessories, health and beauty, sports and outdoor equipment, travel and entertainment, lifestyle items ranging from publications to meal delivery to toys, technology and office equipment, home and auto supplies, pet supplies, and delivery services.
Two Ways to Log On Using ID.me
In order to log in using ID.me, there are two main methods. The first represents my own experience, because I like to jump through hoops.
I pay quarterly estimated taxes for my business through the Electronic Federal Tax Payment System (EFTPS). When I first signed up, more than a decade ago, I had to submit an application and then wait for the government to send me a PIN and an enrollment number in the mail. Only once I received it could I create a password, after which, every time I logged into EFTPS to pay my taxes, I would have to provide my email address and password, as well as that PIN.
Then, several years ago, I was prompted to sign up for either Login.gov, ID.me, or a third verification platform that no longer exists. At the time, ID.me seemed the easiest, so that’s what I picked. Now, when I go to EFTPS and start to log in, I’m immediately sent to ID.me, where I log in, and it then takes me back to EFTPS, to use my agency-specific login credentials.
It’s a lot, but it protects me from someone else logging in and paying my taxes for me. (Wait. Tell me again why that would be bad?)
There’s a second method. Because ID.me is considered single sign-on (SSO), an identification method allowing users to log into multiple independent apps and websites using a single set of credentials, you can get to all of the various government agencies (and the aforementioned shops) directly from the ID.me website.
Once logged in there, your ID.me wallet can take you to any federal or state government agency or shop that’s part of the program.
How ID.me Ensures Safety and Privacy
ID.me follows strict federal security rules for consumer authentication set by U.S. Department of Commerce and is approved by the National Institute of Standards and Technology (NIST) as a NIST 800-63-3 IAL2 / AAL2 credential service provider per the Kantara Initiative. (If you think that sounds like something out of Star Trek, well, we’re on the same page.)
ID.me is a private company, not operated by the government. So how does it make money?
ID.me states it does not sell your personal data to advertisers. Rather, ID.me stays afloat by:
- Charging software subscription and verification fees to government agencies and businesses — Government agencies pay ID.me for Identity as a Service (IDaaS) while enterprise-level companies pay ongoing subscription fees or per-verification fees to securely verify their users and prevent fraud.
- Charging individual retailers transaction fees to verify customer groups (like military members, or teachers) so they can securely offer discounts to identity/status-linked audiences.
- Receiving affiliate commissions on anything users purchase through the ID.me Shop.
However, because people have now experienced signing up with ID.me, leading to trust in the name, you can be sure bad guys are pretending to be ID.me.
As always, watch out for fake emails and text messages purporting to be ID.me in order to purloin your data. Every time you use ID.me, check the URL and security padlock icon (the one that Paper Mommy thinks it looks like a purse), and make sure you’re on the real website before typing any personal information.
LOGIN.GOV
Login.gov is a secure, single sign-on service managed by the U.S. General Services Administration, an independent federal agency.
Login.gov allows you to use one username, password, and multi-factor authentication (MFA) method to access participating federal and state government websites. Unlike ID.me, Login.gov is only for accessing government sites, not retail shops or other types of sites.
How to Create Your Login.gov Account
In addition to all the same bulleted items (above) that you would need to set up an ID.me account, Login.gov also requires that you have a US-based telephone number on a plan that’s in your name.
So, if you’re on a family account that doesn’t list your name or your cell phone is owned by your employer, that can be a sticking point, which is why some people prefer ID.me.
Signing up for Login.gov works much the same way as ID.me, although in addition to using the same standard personal information and matching your ID to a photo or doing video check, Login.gov also matches your identity to your credit history and checks government databases.
There’s one more twist. If any part of the verification process for matching your selfie to your face via Login.gov is problematic, you can go to a United States Post Office location in person, smile that 1000-watt smile of yours, and prove your identity to a human being in order to complete the process.
Your Login.gov credentials will allow you to access many of the same government websites as ID.me, including the IRS, the U.S. Department of the Treasury, and the VA, as well as various sites in the Trusted Traveler Programs (like TSA PreCheck application management, Global Entry, NEXUS, SENTRI, and FAST).
SO, WHAT’S ARE THE DIFFERENCES BETWEEN ID.me AND LOGIN.GOV
Login.gov and ID.me are both official secure single sign-on services used by the United States government to access official websites. So, you may be wondering, what are the differences between Login.gov and ID.me?
The main differences are that Login.gov was built and is managed by the federal government to access only government sites, while ID.me is run by a private company that also contracts with private businesses.
Both meet strict federal security rules, but they handle setup and verification differently.
As mentioned, ID.me requires uploading photos of your ID, like a driver’s license or passport, and uses biometric checks like a selfie scan via your device’s webcam or a live video chat with a support agent.
Login.gov is similar in that it uses the same personal information, and biometric scans, but also digs into what the government already knows about you (whatever is in those sneaky government databases and credit bureaus) to check you out. And again, you’ve got an out if your selfie skills are abysmal — just head to the post office.
So, which should you choose?
The answer may be you-specific, or situation-specific.
ID.me is the more flexible choice if you are currently living outside of the United States, don’t have a Social Security number, don’t have a phone plan in your own name, or need specialized verification via video call.
Additionally, ID.me is often required for specific tasks, like if you want to use the IRS tool to get an Identity Protection PIN.
And if you fit one of those special identity/status categories as a current member of the military or veteran nurse (or other medical professional), first responder, teacher, student, government employee, you may want to use ID.me’s Shop to get discounts. (That said, always shop around to make sure that the price of what you’re buying can’t be found for less elsewhere.)
However, there are times when Login.gov might be better. If you’d prefer to avoid facial recognition software or biometric uploads and would rather visit your local post office, Login.gov might be your cup of tea.
But guess what? You might not have to choose. Assuming you live in the U.S., have a Social Security number and U.S.-based phone in your own name, there’s no reason (aside from annoyance at having to use either one at all), that you can’t sign up for both.
But in all likelihood, you will eventually have to sign up for at least one, as an increasing number of government agencies are requiring one of these two forms of identity validation.
SEE ID.ME AND LOGIN.GOV AT WORK
So, let’s say you want to create your brand-spanking-new online Social Security account.
Before 2026, you’d go to SSA.gov and answer a long list of questions about your childhood addresses, cars you used to own, and financial information in your name, just to prove your identity.
Now, when you click to log in, the site will prompt you to either sign in or create an account with either ID.me or Login.gov. You select which you plan to use and then follow the prompts for whichever you choose. For example, ID.me:
or Login.gov:
Once your account is set up, on future visits, you’ll be able to log in by choosing either “Sign in with ID.me” or “Sign in with Login.gov” from the Social Security website and authenticating your identity with your selected MFA method.
It works the same way with any other site (governmental or otherwise) that prompts you to use one of these verification systems.
HOW ABOUT CANADALOGIN, EH?
Are you reading Paper Doll from above the 49th parallel? Welcome, Canadian readers! Did you know that you will soon have your own, nifty single sign-on and identify verification program similar to ID.me and Login.gov?
CanadaLogin provides a simple, reliable, and secure way for Canadians (and those residing in Canada or needing to avail themselves of Canadian governmental agency services) to sign in to the websites for various programs and services of the Canadian government.
It’s designed to “prioritize security, convenience, and usability.” As such, it’s not just a matter of being able to verify identity, but make it easier for people to access the 270+ online services offered by the government of Canada. (And remember, Canada is bilingual! Everything has to be available in English and French!) Apparently, there are more than 60 different access points for these services. So, Canada is moving toward streamlining everything!
Eventually, all Government of Canada online services will connect to a single entry point through CanadaLogin. This will eliminate the need to remember (or even have) a bazillion sets of login credentials. (Paper Doll apologizes for not knowing if there is a metric conversion for bazillion.)
So far, users can only start setting up CanadaLogin credentials with two-step verification through one of three MFA methods:
- a one time code sent as a text message or by voice call,
- a passkey, or
- a security key
Soon, though, CanadaLogin will start adding more kinds of 2FA/MFA methods and other ways to log in and recover login credentials, including through Interac sign-in partners. For readers unfamiliar with Interac, here’s a cheatsheet:
And eventually, Canadians will be getting the same kinds of secure, online identity confirmation options as Login.gov and ID.me, but likely with a charming, polite, Canadian approach.
Currently, Canadians do have access to a mix of identity verification options, including eID-Me, an encrypted digital ID on one’s cell phone. It offers a secure digital wallet, almost-instantaneous identity verification, password-free logins, and high security and privacy. To register for eID-Me, you need a valid Canadian or U.S. passport as well as a Canadian driver’s license or photo ID card.
Canadian residents can also get verified to access identity/status-based (first responders, teachers, etc.) Canadian Shop ID.me discounts.
THE FUTURE OF IDENTITY VERIFICATION
The first post in this series looked at the question, “How do I prove something (an account) is mine?” and found solutions in developing passwords, passphrases, passkeys, etc.
The second post examined, “How do I manage it all security to keep organized and productive?”
And today, we’re answering, “How do I prove that I am who I say I am?” so that, again, we can productively access our online stuff.
It’s not going to stop here.
Just last week, I was asked by the brokerage company for my IRA to set up a digital voice print identifier so that when I call in, there will be an additional level of security.
On the one hand, the process was easy and interesting. I was asked to stand in the middle of a room and turn 360° as I described various things I could see in a long and rambling discourse. (Paper Doll is very good at delivering a long and rambling discourse.)
On the other hand, given what I’ve learned about AI and the ability to spoof our voices and our faces for scams, I can’t say I’m comforted. Of course, when fingerprint identification for phones came out, I have to admit I was a little queasy, imagining thieves stealing iPhones and cutting off people’s fingers, and as far as I know, that never came to pass.
The only thing we know for sure about the future of login credentials, identity verification, management of all of it is that it will continue to evolve, which means we will have to keep monitoring the changes to protect our identities and access credentials with more and more care. Our ability to stay productive online will depend on embracing these methods, even while familiarizing ourselves with the methods will initially slow us down. ‘Twas ever thus.
Do you already have accounts with ID.met or Login.gov? Do you have a preference?
Paper Doll’s Guide to Managing Passwords for the 21st Century
Last week, in Not Your Mama’s Passwords: Passphrases, Passkeys, and the Future of Logging In, we saw how much has changed since we all made our first online passwords. Now, creating a strong password requires more characters, more variety, and more possibilities for making them secure, memorable, and useful. We also looked at passkeys, those secure digital handshakes that are even more powerful than passwords, and we got a greater understanding of what goes into multi-factor authentication.
So now we’ve got these big, strong, hunky passwords, passphrases, and passkeys, what do we do with them once they’re created? Organize them, of course!
HOW SHOULD YOU ORGANIZE YOUR PASSWORDS?
Having something and not being able to find it is just as bad as never having had it in the first place.
Have you ever lost or forgotten a password you really needed?
So, let’s start with a different question: how shouldn’t you organize your passwords?
- Don’t count on your memory! — When a password is first created, everyone thinks they’ll remember it, but time and disuse (as well as stress) can make the memory of a password foggy. One too many half-remembered attempts can lock you out altogether.
- Don’t re-use the same password for everything in order to lessen the likelihood that you’ll forget. — As we saw last week, a re-used password is an invitation to ne’er-do-wells.
- Don’t leave passwords on sticky notes around your desk for others to see (or for tiny humans or furry friends to accidentally carry off) — The security of where you keep your passwords can be just as important as the security around their creation.
The main ways to organize your passwords are either analog or digital.
ANALOG PASSWORD MANAGEMENT
You can use a password notebook or even an address book to log your passwords as you create them, alphabetically by the website’s name or URL.
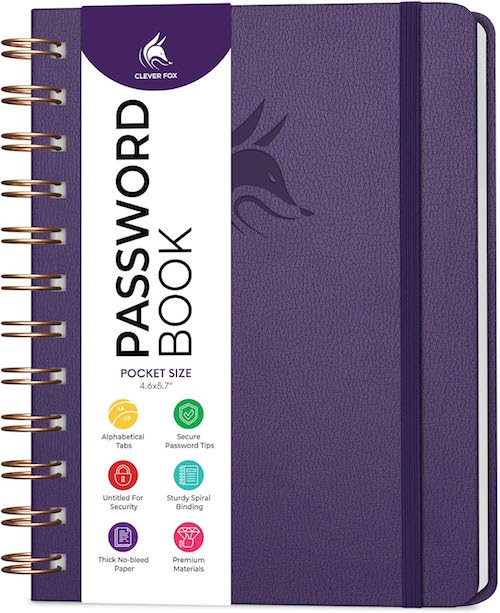
A simple, nondescript option can hide in plain sight. For example, this faux leather, hardcover Clever Fox Password Spiral Book with alphabetical tabs, measures 4.7″ x 5.7″ and comes in more than a dozen colors. There’s a pocket for loose notes and an elastic band to keep it from accidentally opening to view.
Each entry block has spaces for the website/URL, user name, password, and a hints or clues.
Importantly, the cover (once the label is removed) does not betray the contents and the average onlooker would likely mistake it for a journal. This one costs about $15 at Amazon.
There are a variety of similar options. What you really don’t want is a novelty version with a cute phrase or design that lets on that it contains passwords.
Even if you normally only used a password notebook at home, the minute you need or want your passwords to be as portable as your phone (such as when you’re traveling), if your notebook can’t go incognito, the information within will be at risk.
Advantages of an Analog Password Notebook
The main advantage of a notebook for storing and organizing your login credentials is that you already know how to use one.
Every time you create a new password, you just reach for your password notebook and write it down. You don’t need any technical skills, just diligence.
Disadvantages of an Analog Password Notebook
And there’s the first drawback. It requires diligence. How often have you been prompted to make a new password while in a hurry? You think you’ll remember it and do nothing, or you write it on the nearest piece of paper. Either way, you’ve got trouble.
There are other drawbacks of a tangible, analog password notebook:
- It has no backup — If you lose your password notebook, spill coffee on it, drop it down a subway grate, leave it on the hood of your car as you drive away, or otherwise destroy it, you’re stuck clicking “forgot my password” for the next several months (or years) until you recreate every password for every site you visit. Worse, if you’re traveling, not being able to log into your accounts to access reservations or financial sites could put a serious crimp in your plans.
- It’s not secure — If you do lose your password book (or if it’s stolen), someone has access to your entire financial and personal life. It’s not that big deal if someone logs into your Netflix account, watches to their heart’s content, and messes up your algorithm. But if someone can log into your bank, investment, and shopping accounts (especially the ones in which you have a credit card on file), you’ll be in a world of hurt.
- It’s not really searchable — Yes, you can use the alphabetical tabs, in general, so Apple and Amazon will stay in the A’s, but you don’t live your life in alphabetical order. You don’t encounter websites in alphabetical order, either, so whatever you add later will be out of order, making it harder to find what you seek.
- It runs out of space — Password notebooks have limited pages, so when you run out, you’ll need a second (and then a third) notebook. The additional cost of one notebook every several years isn’t a huge barrier, but not knowing whether the right password is in the first book or the second (and so on) is inconvenient, and again, having to take two notebooks any time you travel from home or office doubles your chances of loss.
- It’s hard to keep organized when you need to update passwords — You should update passwords every so often; some sites require it. The problem? If you use a pen, you need to cross out the prior password and squish the new password into the space. If you’ve run out of space in that entry, you could cross everything out and write the login credentials in a different entry box, but now you’re not only going to be out of alphabetical order, but if you don’t do a good enough job crossing out the old information, you may someday stop at the first entry and think it’s valid. (If you use pencil instead of pen, you may struggle with legibility, and eventually, with erasing a hole through the paper!)
You could create a spreadsheet with all of this information to make it digital, adding lines and then using the sorting function to keep the websites/apps in alphabetical order. However, printing the document (which may get unwieldy the more passwords you add) yields the same problems regarding security.
I won’t tell you that an analog password notebook is never a good choice. Some seniors and many people averse to technology will find it easier to commit to using an analog tool.
While it’s better than no system at all, an analog password notebook lacks the nuance and robust resources of a digital version.
DIGITAL PASSWORD MANAGEMENT
A digital password manager is simply a piece of software; on your mobile device, it works as an app. On your computer, it’s a free-standing program that generally integrates with your web browser. Its job is to sit and wait until you need to create or access login credentials.
Advantages of Digital Password Managers
There are more advantages to digital password managers than most people realize. A modern, sophisticated password manager can:
- Remember thousands of passwords so that you don’t need to do it.
- Generate strong, unique passwords automatically — Most can generate options based on the requirements of the site for which you’re creating a password and your preferences.
So, if BlahBlah.com requires 16 characters, capital and lowercase letters, a number, a special symbol, and a dash of fairy dust, but you also prefer passwords that don’t include capital “I” or lowercase “l” because they look the same to you (just in case you ever need to actually read the password), you can make an adjustment.
If you tell it to generate a password with all of the site requirements, but you want it to look more like a passphrase, not only can a digital password manager do so, but if one of the words reminds you of a horrible ex-boyfriend, you can “regenerate” the password with a click of an on-screen button. Next!
But digital password managers can do so much more, like:
- Store more than just passwords, including passkeys, Wi-Fi credentials, credit cards, secure notes, software license keys, recovery codes, and passport/ID information.
- Warn you of weak, re-used, or compromised passwords (as we discussed last week).
- Prevent the reuse of passwords across multiple websites and apps during the creation/generation stage.
- Auto-fill usernames, passwords, passkeys, and payment information so you can minimize the time you spend typing and optimize your productivity.
- Sync securely across all of your digital devices, including computers, phones, and tablets.
- Provide safe sharing capabilities with spouses, family members, co-workers, or trusted advisors.
- Save time by reducing password re-sets due to lost or misread passwords.
In summary, digital password manager can organize your digital life by helping you create, maintain, and access your login credentials (and more) in one secure, searchable system across all of your devices.
Disadvantages of Digital Password Managers
I’m not going to tell you that digital password management is perfect. As with any system, there are some demerits and hiccups, and each person has to weigh the costs and benefits. The imperfections of digital password managers can include:
- Learning curves — If you’re constantly online, this is barely a blip; you’ll either intuit or learn whatever you need to in order to start using it immediately. However, for folks who find computers and mobile devices a source of frustration, the concept of digital management, if not any one password manager’s functions, may cause more annoyance than it helps.
- Temporary inconvenience — While creating/entering new passwords is easy, importing all of your passwords from a different digital password manager or from analog lists may not be instantaneous.
- Single point of failure — Digital password managers depend on a master password, known only to you. There’s no clickable “forgot my password” for the key to your keys, and though there are recovery methods, you actually have to put them in place for them to be available. Without your master password or recovery methods arranged, it’ll be difficult or impossible to access your vault.
- Browser auto-fill isn’t always 100% successful — Every once in a while, particularly on mobile, you may encounter a situation where you have to manually copy-and-paste (or view-and-type) your username and password from the digital password manager into the website login section.
- Cost — While most digital password managers have free tiers, you will likely have to pay for all the bells and whistles.
- Subscription fatigue — Most software-as-a-service entities have moved from one-time payments to subscription models. If you’re the type of person who wants to pay once and never again, this may be a mindset hurdle.
- Trust — You’re giving the keys to the kingdom to a piece of software. When you’re trusting a third party with all of your highly sensitive information, it’s vital that you choose a reputable company whose security is undeniable.
While any/all of these can be drawbacks, they are almost certainly outweighed by the advantages of digital password management.
THE MOST POPULAR DIGITAL PASSWORD MANAGERS
You have a variety of choices when it comes to digital password management.
Built-In Password Managers
Let’s start with the digital password managers you already have.
Apple Passwords (Part of iCloud Keychain)
Apple’s Passwords is built in to all Apple devices, interacting with iOS apps, Mac apps, and the Safari browser. I’m a fan, especially because it’s free and works like a charm, but I’m the first to admit it’s not feature-full in the way many third party apps are.
Contrary to popular belief, Passwords can work in Chrome and on Windows computers, but it’s not turnkey. You have to download the official Apple extension to sync your passwords and autofill logins.
- On a Windows PC, download the iCloud for Windows app from the Microsoft Store, turn on “Passwords,” and install the iCloud Passwords Chrome Extension.
- On a Mac, install the same iCloud Passwords Chrome Extension from the Chrome Web Store.
- On an iPhone/iPad, go Settings > Passwords > Password Options and turn on AutoFill Passwords to select Chrome as a trusted autofill provider.
You’ll still need an Apple ID to authenticate yourself with a verification code when you set it up.
Google Password Manager
Google Password Manager is built in to the Chrome browser on all desktop and mobile platforms and every Android app.
One problem I’ve noticed is that it’s not uncommon to have more than one Google identity, and that can cause frustration. If you created a Google account in 1999 and built a life for yourself as ILikePuppies1959@gmail.com, but created ProfessionalLeader@gmail.com in 2010, you may have different accounts linked to each Google identity.
You may use Chrome and want to log in to Website A, only to find that Google Password Manager’s login for Website A is associated with your other Google account. On the plus side, Google won’t make you log out; just click on your little avatar and log in as the appropriate profile.
Third-Party Digital Password Managers
One benefit of a third-party digital password over a built-in one is easier cross-platform compatibility without dealing with QR codes or fiddly Apple vs. Android/PC fussing.
But the truth is, every digital password manager, including the ones from Apple and Google, have trade-offs: personal aesthetic preference, user user convenience, cost, styles and methods of security protections, backup/synchronization and preferred features.
Bitwarden

Bitwarden has a very generous free plan, making it a budget-friendly option. The Personal Premium plan is $19.80/year and includes premium features like an integrated authenticator, secure password and file attachment sharing, emergency access for trusted contacts, security reports, and the ability to share vault items with one other user. Families get up to six premium accounts, unlimited sharing, unlimited collections, and a shared vault for $47.88/year.
Bitwarden is open source, so anything you do decide to pay goes toward further development and not lining the pockets of evil billionaires.
Some users feel the interface isn’t as polished as some of its competitors, and that the family and sharing tools aren’t always intuitive. Additionally, there are complaints that if you update a password, it may create a new entry instead of modifying a pre-existing one, leaving both the correct and outdated passwords in place.)
1Password
1Password has a 14-day free trial, after which it’s $36/year for individuals and about $60/year for families, with additional team, business, and enterprise-level plans.
1Password is beloved for it’s easy-to-use interface, family and shared-vault features, and a security dashboard that alerts you to weak and reused, and monitors the dark web for compromised passwords. It autofills logins across mobile apps and browsers with biometric unlock via fingerprint, face, or iris.
One standout feature is Quick Access, which can be used to search for anything you’ve saved in 1Password, including medical records and software license keys. Quick Access automatically identifies the app or website you have open and suggests relevant items from your vaults, providing a fast and convenient way to sign in to your accounts.
Unfortunately, there’s no free version and it’s slightly more expensive than its (un-discounted) competitors. (Also, while the software is user-friendly, the website a bit intimidating.)
Proton Pass

Proton Pass has a strong privacy focus and is part of the Proton ecosystem. Like Bitwarden, it’s open source.
On top of the basic password generator, the feature-rich free plan works in the browser, on mobile, and in desktop apps, and includes unlimited logins, notes and credit cards, unlimited devices, 10 hide-my-email aliases, passkey support, alerts for weak and reused passwords, and an easy password import function.
Pass Plus, at $2.99/month or $35.88/year, also includes unlimited hide-my-email aliases, a built-in 2FA authenticator, secure vault and link sharing, dark web monitoring, file attachments, emergency access for trusted contacts, a custom domain and additional inboxes for aliases, and command-line interface. Pass Family is $59.88/year includes everything in Pass Plus for up to 6 accounts, plus an admin panel for your family. There’s also Proton Unlimited, which gives you Proton Pass, Proton Mail, Proton Calendar, Proton VPN, and Proton Drive, all for $119.88/year.
Keeper

Keeper is one of the more expensive options at $42.99/year for a personal plan with unlimited storage, sync, and devices, unlimited identity and payment storage, fingerprint and FaceID login, web app and browser storage, and 24/7 support.
A family plan is $91.99/year for up to five users, providing the same features as a personal plan, plus shared passwords for WiFi and streaming services, unlimited shared folders, records and permissions, 10GB of secure file storage, and emergency access for estate planning. (Note: family members cannot access each other’s vaults.) In addition, there are also student plans at 50% off, and personal and family military plans with separate pricing options.
Keeper has a strong security reputation and rich business features, but a regular plan does not include dark web monitoring or secure storage, which require add-ons at extra cost.
For casual users, Keeper can be a little feature-heavy.
Dashlane

Dashlane has a very polished interface and is beginner-friendly, but it no longer offers a free plan (though there is a 14-day free trial). The usual Premium price is about $65/year, though a current 40% discount brings it to $39.12/year.
In addition to unlimited devices, dark web monitoring, and the usual password generation and monitoring tools, the Premium plan includes passwordless instant login (without typing), securely shared access, a built-in virtual private network (VPN) for when you’re on public Wi-Fi, and live AI-powered scam protection.
The Friends & Family plan covers 10 users and has a family dashboard.
NordPass

NordPass, from the makers of NordVPN, starts with a free lifetime plan with essential features like password generation, autosave, autofill, biometric/MFA access, password import capability, secure storage, and 24/7 support, but if you want access on multiple devices, a password health dashboard, a data breach scanner, file attachments, and the NordPass authenticator, you’ll have to upgrade to Premium (usually $35.88/year, but currently $19.08/year for the first 12 months, a 46% savings).
The “Family” Plan (good for friends and family) has all of the same features as premium for up to six users for $35.88/year (usually $71.88). Both the Premium and Family plans have a 30-day money back guarantee and both 1- and 2-year plans.
Other well-known options like Roboform and Aura may be worthy of your consideration, too. This post was a survey of options, not recommendations.
Fancy Words: Zero Knowledge Architecture and Encryption
Digital password manager marketers talk about these two features.
Zero knowledge architecture means that your data is encrypted and decrypted exclusively on your local device, ensuring only you can access it. But guess what? All six of these third-party password managers has it, as should every leading password manager. But because these companies can’t access your information, it’s vital that you always know and remember (and never re-use) your master password!
Oh, and encryption? They all tout having AES-256 encryption, except for NordPass, which uses XChaCha20 (yes, I’m serious) encryption, which is a newer, highly regarded encryption algorithm.
Essential Digital Password Manager Features
- Intuitive user interface — Because if you don’t get it, you won’t use it.
- Strong encryption — Duh!
- Multi-factor (including biometric) authentication for your vault/master login
- Strong password generation according to your specifications
- Passkey support
- Cross platform support — If it doesn’t sync across all of your devices, something is going to fall through the cracks.
- Browser extension for auto-fill, so the minute a login screen pops up, your browser should detect the need for credentials and fill them in, awaiting only your approval by click.
- Easy search and organization tools
- Mobile app
- Secure backup and recovery options
- Import/Export Tools — Because the last thing you need is for your passwords to be spread across multiple digital password managers
Bonus Features
- Security alerts and/or a password health dashboard for compromised or reused passwords
- Secure sharing capabilities to let family members (or team members at work)
- Emergency access login for trusted contacts
- Secure notes
- Document storage with high (or no) limits
- Dark web monitoring
- VPN included in subscription
- 24/7 Customer Support
And of course, consider the costs — look for a free trial (or better yet, a free tier) to make sure you find it intuitive. Whatever you pick, don’t just think in terms of a monthly cost, but also the annual cost and total cost over a “lifetime” of use.
A digital password manager means that you no longer have hundreds of login credentials and related information on sticky notes and in notebooks, un-synced browsers, and spreadsheets. And definitely not in your memory.
Instead, everything can live in one organized, searchable, encrypted repository.
Keep Your Digital Password Managers Organized and Maintained
As discussed last week, dealing with the backlog of weak, compromised, and reused passwords will take a while. Once all your strong passwords are migrated into your new system, block time to periodically check (and update) compromised passwords and delete outdated, unnecessary ones.
MORE RESOURCES
For more on helping you select a digital password manager, try these resources.
Cyb3R_Sm@rT!: Use a Password Manager to Create and “Remember” Strong Passwords (CISA.gov)
Trusting the Tech: Using Password Managers and Passkeys to Help You Stay Secure Online (National Cyber Security Centre, UK)
The Best Password Managers of 2026 (Security.org)
The Best Password Managers for 2026 (PC Magazine)
Best Password Managers for Android 2026 (ZDNet)
The Best Password Managers (Wirecutter)
Just don’t let analysis paralysis keep you from getting started. Any reputable password manager that you use consistently will improve your security more than whatever you were doing before.
In the first post in this series, we focused on creating better passwords and passphrases, because what made a good login credential in 1997 (or even 2017) just doesn’t work today.
Today, we looked at password management systems for these new and improved security credentials.
Next time, we’ll examine how we prove who we are online with the new digital identity platforms increasingly used by federal governments.
Not Your Mama’s Passwords: Passphrases, Passkeys, and the Future of Logging In
Those of us of a certain age remember the first time we had to create a password, and for many years, lots of people used the same password for everything. As we edged from the 20th century into the 21st, we got “smart” about using smart passwords so they’d be harder to crack.
This short video from comedian Michael McIntyre may reflect your early password experiences.
Have you found that it’s become even more frustrating in recent years?
You don’t just need a password. There are passwords, passkeys, two-factor authentication, multi-factor authentication, facial and thumbprint recognition, and so much more. You may think you know everything there is to know about passwords; but even if you do, are you actually doing what you know you ought? And are there people in your life (like teens, grandparents, or technophobes) who could use a little support?
Today, we’re going to look at all the things you need to know and the various actions to consider taking to make sure your vital data is organized, safe, and protected.
Let’s start with the classic, the good old password.
HOW TO MAKE A GOOD PASSWORD
Do you know what makes up a solid password?
A Good Password is Strong
A good password is a strong password, one with serious muscle, one that’s hard to break or crack. The experts say that a strong password should have the following characteristics
- Sufficient Length — A strong password should be 16 characters. (I remember fondly when they asked for eight; then 12 characters were recommended. Sigh.) The shorter your password, the chance of a hacker figuring it out increases exponentially.
- Complex Makeup — Generally, it’s recommended that a strong password should be a mix of both uppercase and lowercase letters, numbers, and symbols that you can type from the keyboard. (Don’t use emoji.)
- Randomization — It’s a lot harder to guess 1dK5d8P91e65nNwf82et than PaperDoll123456.
- Uniqueness — Never reuse passwords across different accounts. Yeah, I know. We are all guilty of it, but the easier it is for a bad guy to hack one of your passwords, the easier it is to get into your others. If you must re-use passwords, aim to only do so on with sites that have no real impact on your life.
The problem with this recipe for strong passwords is that we are human. We’re lazy. We don’t want to keep creating new passwords. And complex, random passwords are hard to remember. But do you know what’s harder? Dealing with a hacked bank, investment, or Amazon account.
Instead of creating a random block of letters, numbers, and characters, you can keep the randomization but make the password a little easier to remember.
Create a Passphrase Instead of a Password
Instead of one block of letters or numbers, develop a sequence of unrelated words.
For example, WinterWonderland, while possessing 16 characters, would not be a great passphrase because the words are thematically related. GrotesqueBroccoli, while reflecting my feelings about a particular vegetable, aren’t commonly used together. Even better would be something even longer, more bizarre, and unrelated, like YuckySweaterRodentNoise.
One advantage of a passphrase is that if you’re hand-copying it (from a password notebook, or typing on a computer but retrieving it from an app on your phone), it’s much easier to see and parse a string of words than il7-0oO-nmn-MWN, especially if you’ve got eyes that were in their prime in the 1980s.
Think about the characters you choose.
The above example prompts a tip that the experts never mention. Because various letters and numbers, like a capital “I” (as in “I am”) and a lowercase “l” (as in “login”) are indistinguishable from one another in some fonts, as can be the number 1 and an exclamation point.
Capital “O” (as in “order”) and “0” (zero) can be confused for one another, and some lowercase letters, like “r,” “n,” and “m,” and uppercase letters like “M,” “N,” and “W” can also be hard to differentiate.
Avoid predictable password information.
First, don’t use common dictionary words like “password” or keyboard sequences like qwertyiop. Duh!
Similarly, don’t use your personal information. Your password shouldn’t have your birthdate, phone numbers associated with you, names of your pets or the street on which you live.
If you need to be able to remember a password and won’t be safeguarding it in a digital password manager, an alternative method might be to pick information that’s personal to someone unassociated with you. Everyone knows I’m a fan of Jane Austen, so someone trying to hack me would find it easy to pick obvious things like Pemberley or Rosings, but if you have a favorite book or movie character that wouldn’t be easy for someone on the internet (or an evil ex) to suss out, consider stealing their fictional personal information.
Consider combining the above tips with a foreign language.
While I am only fluent in English, I have studied Italian, French, and Spanish, and know a smattering of Yiddish. Picking words from another language to come up with a lengthy but easy-to-read/remember passphrase might help you more easily read and remember it to safeguard access to your data.
Let a digital password manager do the heavy lifting for you.
Often, you can designate the features you want, so that if it needs (or you want) the number of characters to be even more than 16, or you prefer a readable passphrase over one with garbled numbers and letters, it will accomplish that for you.
Hacker Reality Check
The longer and more complex your passwords, the harder it will be to crack them. Hive Systems annually creates a table of the characteristics that increase your chances at organizing and preserving your dat privacy. Here’s their most recent table.
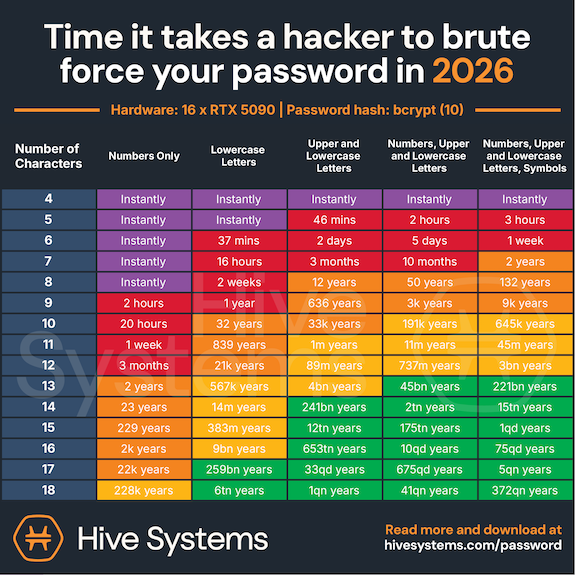
Courtesy of Hive Systems
This table confirms what we know: “Fluffy” and “123cookie” just aren’t going to cut it.
HOW TO FIX THE PROBLEMATIC PASSWORDS YOU ALREADY HAVE
If you have a digital password manager, it may prompt you with warnings regarding some of your passwords because they are:
- Weak — Such passwords are likely not long, complex, or random enough to be effective.
- Compromised — This status indicates that passwords have shown up on the dark web in a hack, likely one of a large corporation, like a retailer or insurance system (like the Change Healthcare cyberattack in 2024).
- Reused — An internal scan of passwords shows your app that you’ve used the same password repeatedly.
While working with a client recently, we saw that her iPhone’s Passwords app listed 610 passwords with a scary exclamation point on a red background indicating that 236 passwords had a security concern. Of those, about 122 were shouting “COMPROMISED PASSWORD” in red letters, with another 100 or so listed as “reused password.”
(Again, it’s not a huge problem to reuse passwords solely for sites you’re merely using to gain access to articles; but if such a site allows comments on articles, would you want to risk a hacker making you look like a fool or scammer by commenting with your identity?)
Closing your eyes to this problem isn’t a solution. In this case, the only way out is through.
Schedule a date with yourself — perhaps weekly, to deal with the backlog, and then perhaps quarterly for maintenance — to address your password hygiene. Treat it the same way you do (or should do) to periodically update your operating system and apps, clean your desktop, pare down your inbox, etc.
Again, consider letting a digital password manager create replacements for you. It will be faster and easier than trying to come up up with something unique for any/many of your passwords.
WHAT IS A PASSKEY AND WHY IS EVERY SITE ASKING ME FOR ONE?
Have you noticed in the last year or so that every time you log into a web site, it asks you if you want to set up a passkey? Are you ever prone to thinking, “I just logged in with my password. Isn’t that already a passkey? What’s the difference?”
A password is your super-secret word or phrase that you create and then memorize (or write down, somewhere). It’s like the secret password that might have gotten you into a speakeasy in the 1920s.
(Trust me, this is worth watching for a laugh, especially if this whole topic stresses you out.)
But there’s the problem. You, a flawed (but adorable, I’m sure) human, must come up with the secret password and then protect it. This makes it vulnerable — to memory loss, password loss, phishing, hacking, and data breaches.
A passkey is different. It’s an un-phishable digital credential that’s tied directly to your device. Instead of typing a word, phrase, or string of gobbledygook, you unlock your account through a handshake between your device and the website, usually through some kind of biometric scan on your device (like FaceID on your phone, or thumbprint/TouchID on your device or keyboard), or a device/screen PIN. If you’re already logged into your computer or phone, you may be all set!
Passkeys differ from passwords in several ways.
Passkeys Are More Secure than Passwords
With a password, you’re sharing a secret with the server for whatever site you’r trying to log into. The thing is, secrets like these get revealed or betrayed all the time, either on our side, by our faulty memories or poor record-keeping, or on the server’s side, by getting hacked. Either way, access to your account is either lost or exposed.
Passkeys, however, use what’s called public-key cryptography. That’s a fancy way of saying that rather than having one key (your password) that fits in a lock on the other side, it’s more like in an old movie, where they’d go into a bank vault and the customer and the banker would each have a key for the safe deposit box.
Your private key is always securely locked inside the security chip of your device, while only the public key, which is totally useless-to-hackers, is maintained by the website.
Passkeys are More Resistant to Phishing Attempts
Have you ever been tricked (or almost tricked) into typing your password into a fake website, one made to look like the one you really want? Passkeys link your login effort to only a legitimate app or website, so if you try to log in to a faked website, your device will say, “No way, José!” and refuse to authenticate.
No handshake. Do not pass GO, and the phishers will not get $200 dollars.
Passkeys Are More Convenient than Passwords
Aren’t you tired of having to REMEMBER passwords?
Aren’t you tired of typing passwords?
Well, with a passkey, you don’t have to. If you’re already logged in to your device, access feels like magic. If not, logging in is limited to a simple scan of your beautiful face or a tap of your finger or thumb. It’s quick, and your face or thumbprint can’t make a typo, so your success rate will be higher.
Passkeys Are Unique
We’ve already established that people reuse their passwords, which means that if you reuse the same password on ten shopping sites and a hacker gets your password once, they can probably guess it on a lot of other major sites.
Conversely, each passkey gets generated uniquely for whatever individual account at which it’s being set up.
Passkeys Are Loss-Proof
If you lose your phone, get a new computer, or your toddler puts your iPad in the dishwasher, you’re not out of luck.
Passkeys are synced across cloud services, like your Google Password Manager or your iCloud Passwords app, so access can be restored by setting up a passkey to the new device.
Passkeys (Usually) Eliminate the Need for Multi-Factor Authentication
I don’t know about you, but I’m so tired of having to check my email and/or my phone for a email or text code that I then have to type in. With a passkey, two-factor authentication is built-in, so you’re all set.
Passkeys Bypass Password Fatigue
Have you ever just given up and done something else because you can’t bear to type in another password? (If you have a digital password manager and your passwords are organized and frequently pruned, probably not, but if you’re go the analog route 100% of the time or you’ve let your password management go rogue, this may sound familiar.)
So, the next time a website asks, “Would you like to set up a passkey?” you can feel confident in saying, “Why yes, thank you. I would very much like to set up a passkey! How nice of you to ask.”
A NOTE ABOUT AUTHENTICATION AND DIGITAL IDENTITY PLATFORMS
In addition to passwords and passkeys, you may have found websites asking you to use additional forms of identity authentication.
Authentication
Do you cringe when you hear people talking about two-factor authentication? You know it has something to do with security, but maybe you’re having trouble wrapping your head around it? Just like you don’t need to know how to rebuild a carburetor to be a good driver, you only need to know a little to make this aspect of security feel accessible.
For example, you’re almost certainly used to providing a security code, usually a series of numbers, that gets sent as a text or email.
This process is an example of two-factor authentication or multi-factor authentication. We’re not going to get too deeply into the weeds on this, but very basically:
- Two-Factor Authentication (2FA) requires exactly two authentication steps, like using login credentials (a user name and password combo) plus that security code texted to you.
- Multi-Factor Authentication (MFA) requires two or more authentication steps.
So, 2FA is a type of MFA, but not all MFA is 2FA.
In order to classify a method as Two-Factor Authentication or Multi-Factor Authentication, the “factors” have to come from different categories. For example:
- Knowledge — In order to log in, you have to provide something that you know, like a password, passphrase, code, or PIN, which means you have to keep your password information organized.
- Possession — This step involves something that you have, like your mobile device, your computer, or a hardware security key. (Again, not to get too geeky, but that’s a physical device used for MFA or password-less logins. If you actually want to know more about hardware security keys, you can read PC Magazine’s The Best Hardware Security Keys for 2026.) The key proves your identity using advanced cryptography when you:
- insert it into a USB port in your computer
- tap it wirelessly via near-field communication (NFC) against your phone or tablet
- connect via Bluetooth (for devices that don’t have USB ports or aren’t NFC-capable)
- Inherence — This fancy word means something that you are, or that is inherent to you and nobody else. This is where FaceID or a fingerprint scan on your phone or your keyboard come in handy, because only you have your face or your fingerprints. Well, mostly. Per Apple, identical twins can sometimes unlock one another’s FaceID!
Digital Identity Platforms
As technology gets more advanced, the bad guys avail themselves of more technology. This means that modern authentication needs to get more advanced, too. Just as the Michael McIntyre video of the top of the post made the point about our old-timey passwords requiring us to add capital letters, then numbers, then symbols, so too are we facing more complex requirements beyond simple passwords and multi-factor authentication.
Because of this, there’s a whole honking sub-category of authentication through digital identity platforms.
In two weeks, we will look at two very special kinds of login credentials we need to set up in the United States to help ease our access to federal government websites in order to pay our taxes, check our benefits, and travel. We’ll also look at a companion platform in Canada. But first…
COMING ATTRACTIONS
While long passwords are good, long blog posts on complex (and sometimes scary) technology topics are not. So, this week’s post is shorter than usual. (Really! It it’s 20% shorter!)
Next week, we’ll explore how to organize your passwords to make them accessible (to you) so you need never worry about forgetting them or making your kids crazy trying to figure them out.
We’ll cover:
- Analog methods for tracking your passwords
- The built-in digital password managers you already own
- The most popular third-party digital password managers and what makes each stand out
- The advantages and disadvantages of digital password managers
- The key features every digital password manager should have — and some bonus features you might not know about
We’ll also explore how to safely share your passwords with family members and trusted advisors.
And the week after that, we’ll end July with the aforementioned look at those digital identity platforms, which I’ve come to think of as “the password for your passwords.”
Until next time, please feel free to share any unique tricks or strategies you have for creating passwords, and any thoughts you have about this strange world of passwords, passphrases, and passkeys.
How do you feel about your password security?
How to Send Large Files the Organized Way — Simple, Stress-Free Solutions
In the olden days, if you wanted to send an important message, you could send it in the mail, and it might go by steamboat, stagecoach, or train to get to your recipient. Hopefully, your Pony Express rider wouldn’t lose it in a saloon. Perhaps if you were from a family of means (the Bridgertons, for example?), you might entrust your very urgent message to your ladies maid, who would give it to the hall boy, who would run through the streets to deliver your a note.
The telegraph was invented in 1837 and by the second half of the 19th century, it was widely used for messaging. But priced by the word, it was essential to limit what you wanted to say to the fewest number of words. As a classic Borsht Belt joke ran, “Start worrying. Details to follow.”
And for those of us of a certain age who recall pay phones, you could place a collect call for “Mom, I need you to pick me up at the mall” or “I arrived safely” and the operator looked the other way. Or, there’s this classic:
HOW TO SHARE SMALL AND MEDIUM FILES
At this point in the 21st century, things are much the same. The truth is that when you have a (relatively) small piece of information, it’s “no big whoop” to transfer that kernel of knowledge inexpensively and easily. The bigger the slab of data (what we’ll generally call “a file,”) the more expensive and complicated things are, and the more strategy you need to keep the cost and effort down.
Methods for Sending Small and Medium Files
For small files, like photos, PDFs, a resume, or a quick video, you can relay information by:
- Text — Whether you use iMessage, SMS, Whatsapp, or Slack, you can quickly relay information or and attach to those texts.
- Email attachments — As long as when you say “attached, please find,” you actually attach the file you intend to share, you’re good to go.
- AirDrop — This works as long as you’e in the same room or area as your recipient and are using an iOS device (or, as of late 2025, are able to duplicate the process on Android using QuickShare).
- Physical media — While tangible media method isn’t as convenient or as quick as a digital transfer, if you have lots of files, it can be helpful to download your files to a USB drive, external hard drive, or SD card, and then carry it to someone in a different location or even ship it to them.
The advantages of these non-tangible methods are that they are generally fast, and there’s little to no set-up needed. You just find the file, click a few buttons or drag-and-drop the file, and you don’t need to be particularly tech savvy as a sender or recipient. If you’re using tangible media, no internet is required, you have total control over the physical file, and it will work anywhere you’ve got the hardware into which to plug it.
The main disadvantage of the first three of these methods are that you’re limited as to the size of whatever file you wish to use, particular to share via text or email.
For example, last week, I had a funny experience when a client had a pregnant pig at her house. The pig had lived at her barn, with horses and chickens, but during a recent cold snap a few weeks prior, the client made a safe, cozy space in her home for the mommy-to-be.

With my client’s permission, I shared a photo in a group text thread with colleagues, and someone said they wanted to see a video! My client provided an adorable video of the pig’s first day in her new space; we were both using iOS, and there was no problem texting it. However, when I went to send the same video to our group thread, I got the message that because it was a mixed iOS/Android group thread, the video was too long to share. Harrumph.
In addition to size limits for file text/email/AirDrop filing sharing, you (or the post office) could lose a thumb drive, hard drive, or SD card in transit, or your recipient could lose it between plucking it from the mailbox and the moment they intend to use it. And none of these methods are particularly useful if you want to ensure that a file is backed up or easy to collaborate upon.
And what you if do you have a BIG file? Certainly text and email are out, as is AirDrop.
For bigger files, the two main methods to get important information from one location (yours) to another (theirs) will be through cloud storage or file transfer platforms.
SHARE FILES IN THE CLOUD
You probably upload files to the cloud (or create them in the cloud in the first place) all the time. This method works best for families and friends sharing documents and photos, professionals sharing client work, ongoing personal and work projects, and providing long-term access to content. As long as you don’t remove the file from the cloud, recipient(s) can re-access it as many times as they like.
How File-Sharing in the Cloud Works
This method involves the following steps:
- Upload a file to your cloud account.
- Set the permissions for the file. Sometimes, you just want the recipient to be able to view a file; other times, the permissions might allow them to edit and even share it with others.
- Share the link with the people or teams who need access. This could be photos of the baby so Great-Grandpa can see how much junior’s smile is like his, or the latest TPS report your staff needs before the next Monday meeting.
- Your recipient then views and/or downloads the file.
The advantages of sharing files in the clouds are:
- Large file support — Cloud storage means that you can upload multi-gigabyte files. Sharing videos, folders of files, and project archives is easy-peasy lemon squeezy.
- Easy sharing — File attachments can be a sticky wicket. If you attach five files to an email, and someone downloads them but then can’t figure out whether the files have ended up in their attachment folder, their desktop, or the most recent folder to which they moved something, it’s a headache. But if you’re just sending someone a link, it’s just a matter of one click to get what they need.
- Ongoing security — With cloud sharing, you can change the permissions at any time. So, if you don’t want your now-insignificant other to access that photo, or your mother-in-law can’t be trusted to not post photos of your little angel to social media per your stated boundaries, or your former employee is “former” for a reason, one quick click denies access to files you no longer what them to have.
- Backup as a perk — When you upload files to the cloud to enable sharing, those files stay conveniently stored until you decide that you don’t want them there anymore. You never have to worry about a crashed hard drive or an accidental local deletion.
- Collaboration made easy — When you upload a file, multiple people can access it (if you wish) and you can keep track of version history, which is great at work or if you’re collaborating with others on a screenplay or story.
Of course, there are drawbacks to the cloud method of sharing files.
- Storage limits — The free tiers for storage sites can fill up fast, so if you do a lot of file sharing and never purge your account, you’ll hit your free limit quickly and need to upgrade to a paid plan. Free tiers with enough storage space will let you upload content, but watch to see if there’s an upload limit on individual files.
- Account registration requirements — Yes, I heard you groan. Nowadays, almost everyone has too many accounts and too many passwords. It may not be a big deal to you (because if you’re uploading, you probably already have a cloud or two that belongs to you), but if your recipients don’t have cloud accounts, they’ll usually have to register to gain access. Note: some accounts will allow recipients to view files without accounts, but not edit or share.
- Learning curves for setup — Unfortunately, the less tech-savvy recipients might be frustrated if they aren’t accustomed to navigating a cloud space. Additionally, some users are inexperienced at setting up permissions, so it’s important to pay attention to the difference in permissions between view, edit, and share.
- Privacy depends on settings — With some cloud accounts, you can create public links for file sharing. That’s great if you want everyone in your neighborhood to have access to a file, but if you meant for only the members of “I hate the dude who leaves his Christmas lights up all year” club to view the link but it’s available for public consumption, it’ll make the next block party a bit awkward.
The Main Players in Cloud Sharing of Files
You’re likely already familiar with the big names in the cloud arena for sharing files, even if you’ve never used them for file sharing.
Google Drive — Every Google user has 15GB of free storage; beyond that, there are different file upload limits at different paid tiers. Just upload your file to your Google Drive, get a link to share, and provide the link to your recipient.
However, there’s also a nice mix of the “attach” method I mentioned for small files and the cloud method.
As a Gmail user, if you start a new message with an attached file that’s over the 25MB limit for an individual file, Google automatically creates a link to that file in your Google Drive. When you go to send the email (the one you mean to attach), Gmail will ask you to grant your email recipient access to that file and prompt you to set the permission (view or edit). The default setting, wisely, is just to allow them to view your file. However, your recipient will need to have a Google/Gmail account.
iCloud — You automatically get 5 GB of iCloud storage for free, but an upgrade of just $0.99/month yields 50GB; $2.99/month provides 200GB; and for $9.99/month, you get a whopping 2TB! Store your files, share the link, and you’re all set.
However, as with Google Drive and Gmail, if you use Apple’s Mail, try the Mail Drop feature to send large files up to 5 GB via iCloud Mail on Mac, iPhone, or iCloud.com, without it counting against your storage quota. Read more about Mail Drop.
It will generate a secure download link that lasts for 30 days. Just attach a large file in Mail, and it will automatically offer to send it via Mail Drop if the file exceeds standard email limits.
Dropbox — You probably know Dropbox for its cloud storage with file syncing and collaboration tools. Their plans range from a free 2GB storage option up through premium business plans 15-freaking-terrabytes of storage. But that 2GB lower end storage limit for free accounts (with a 2GB file upload limit, isn’t going to win any beauty pageants. However, in addition to the storage
(In addition to the basic cloud storage method, Dropbox also has it’s own File Transfer protocol for large files.)
Microsoft OneDrive — Upload your file to your OneDrive cloud account; granting access to others is straightforward. OneDrive allows individual file uploads and downloads of up to 250 GB for both personal and business accounts, and while there isn’t a strict total data transfer limit, syncing oodles (like 300,000+ files can cause performance issues). They recommend using the OneDrive desktop app to accomplish large transfers rather than using browser uploads.
Note, Microsoft does something similar to Google and Apple, in that if you use Outlook 365 and try to send a too-large file as an attachment, you’ll be prompted to upload the file to your OneDrive and share a link to it in your Outlook email (rather than attaching the file, itself). You’ll just use the “Upload and Share as a OneDrive Personal Link” option. Recipients can click to open the file and view it from your OneDrive.
SHARE FILES USING FILE TRANSFER SERVICES
I like to think of this approach as a “send it and forget it” method. It’s great for when you want to send videos to family members or the tour group friends you made on your last cruise vacation, submit creative files to a client or virtual assistant, send one-time deliveries of a massive file — or if you know the person getting your file is a bit of a grumpus about dealing with tech.
Fewer people will be familiar with file transfer service method than the methods I described above, but it’s really efficient for the one-and-done file transfers, plus it’s surprisingly easy for the sender and the recipient.
Upload a file, then enter the email address of the person or people you want to receive it (or, alternatively, you can get a link to put in your own email, text, newsletter, blog, etc.). That’s it.
From there, it’s up to the recipient to click on the link, which takes them to the file transfer site. They click a link, and the file downloads to their computer, where it waits for them to open and use it. The best part is that the file auto-expires after a set period (like a week), so you don’t have to clean up after yourself or purge files or worry that someone you later part ways with could still have access.
I have a friend from high school who was always the most in-the-know person about music. Four decades later and he’s a professional in the music industry, but he still makes mix tapes, or at least the high-tech version. For years, he’s been sending his own little funnily-named, curated “albums” of music for his personal email list to enjoy. Only instead of a fiddly cassette requiring us to have a pencil at the ready to fix it when everything unspools (hello, 1983!), he sends a big MP3 file every month or so.
My music industry friend was my introduction to the file transfer service option, but certainly not my only experience. A few years ago, when I had to create a video presentation an online summit, my colleague had me submit my video via a file transfer service, and I was delighted with how easily it worked.
The advantages of file transfer services are:
- No account (generally) is necessary — Just like you don’t need a UPS account to have UPS deliver a package to your door, file transfer services deliver the sender’s file to anyone.
- Low-friction transfer — Remember how I said that some people can be overwhelmed by having to navigate cloud accounts to find a file? That doesn’t happen with file transfer services. My musical friend sends me to a big, splashy webpage with a big, obvious button to click to start the file download.
- Big-file friendly — These services were designed to tackle large transfers. Did you write the Great American Novel? Produce your own album? Make a movie? Share it easily.
- Automated file cleanup — Because the file auto-expires, once you tell the file transfer service to send to your recipients (or you’ve sent them the link or published access to it), you’re done.
There are a few potential drawbacks to file transfer services, though:
- This is temporary storage — For those who prefer cloud storage to warehouse their files, it’s important to recognize that what’s a boon to some (the automated expiration of the files) means file transfer services do not store your files indefinitely.
- You have limited control of your file — Because there are few (if any) options for permissions with a file transfer service, once you send that file, it’s out in the wild. Someone has it and can copy it, share it, change it and then share it, wear it as a hat, etc. Don’t provide access to your file to someone you don’t trust to have that access. Duh.
- It’s not ideal for super-sensitive data — File transfer services are secure-ish. They use varying methods of encryptions, so if you need ultra-encryption or password-protection, don’t send your super-secret spycraft through a platform that doesn’t offer that. OK? OK!
- Consider the money, honey! — As with everything in the era of late-stage capitalism, you get what you pay for. Free platform tiers work, but if you want bells and whistles, like password protection, longer-termed storage, and higher size limits, you’ll have to shell out the money.
The Big Names in File Transfer Services
There are a variety of file transfer platforms. As a professional organizer, I am not an expert in the technology, and none of these should be considered recommendations. Rather, they are a starting point for your own research into the right file sharing solution for you.
We Transfer — This is the platform my musical friend uses, and it’s the one that seems to be the best known.
Share and receive up to 3 GB/month (10 transfers/month) for free, with transfers expiring after three days. With a paid subscription ($25/month), you get unlimited transfers, unlimited file sizes, no expiration of (uploaded) files, custom branding, and automatic malware scanning.
FileMail — Send large files, up to 5GB, for free, to up to three recipients, with up to ten downloads per transfer. Just drag-and-drop the file from your desktop onto the website. Of note, they impose no restrictions on commercial usage. There are multiple FileMail tiers: Beyond the free Basic plan, there are paid personal ($6/month), professional ($14/month), and business ($24/month) account levels, with each level offering increased file size, storage capacity, and customization.
Smash — The free tier lets you send an unlimited-sized file, has no upload limits (vs. 2 per 24 hours for FileMail), offers password protection, and files are stored for seven days. At the paid tiers, $4.90/month for Pro and $12/month for ten users, 1TB and 2TB of storage, respectively, for 30 days of file storage. (I also think the platform has a more user-friendly experience than FileMail, but your mileage may vary.)
Drop Send — At the free level, send files up to 2GB, up to two files per week, and get 250 GB online storage. At the paid levels ($5/month for basic, $9/month for standard, and $19/month for professional) you get faster transfer speeds, can send 50GB files, increasing numbers of sent files per month and increased amounts of online storage.
Other popular options include:
My Air Bridge — This European platform is best for professionals and teams. Their service is free for individual transfers up to 20 GB in size, with multiple paid plans.
Wormhole — Right now, this is a free services. They note: “For files up to 5 GB, Wormhole stores files on their servers for 24 hours. For files larger than 5 GB, Wormhole uses peer-to-peer transfer to send your files directly from your browser to the recipient. So you’ll need to keep the page open until the recipient downloads the files.”
Send Anywhere — At the free level, send a file up to 50GB; the Lite tier is $5.99/month and the Standard tier is $9.99/month, with additional perks related to downloading, speed, and link management.
BEST PRACTICES FOR ORGANIZING YOUR LARGE FILES FOR SHARING
Before you send your files, consider some tactics for keeping the whole experience organized.
Name your files clearly — If you’re sending a photo, change it from IMG15678 to “Baby’s First Ice Cream.” If it’s a file for work, consider the nomenclature rules and best practices/guidelines your company generally uses for documents. If you’re a solopreneur, this is a great time to develop rules for how to organize and label files so that you know WHAT they are and WHEN they were created. “2026 1Q Earnings Report” tells your recipients at a glance what they’re getting.
Use folders when sending multiple files — Don’t send 3 (or 33) files all higgledy-piggledy. Group them in a folder with a clear name.
Check to make sure you’ve removed duplicates or changed the names — If your recipients are poking around in a cloud folder you’ve created and to which you’ve linked them, and you’ve got 16 iterations of ClientProposal.Final.Final.Final, that’s going to cause confusion.
Add a README file — If your recipients need to know more details about what they’re getting in files or folder, tell them what it’s all about.
Consider file compression — If your files are too big to send as-is for free, consider zipping those large files (or folders) so in order to reduce the size before you send it. Save money by putting your files on a diet, but only if your recipients are tech-savvy enough to know to double-click on a file to unzip them.
What do you do when you have a massive file and need to get it to someone quickly, efficiently, and safely? Have I omitted your favorite method? Please share your thoughts in the comments.
26 Ways to Celebrate GO Month to Get More Organized and Productive
Happy New Year! Happy GO Month!
Each January is Get Organized & Be Productive (GO) Month. Back in 2005, NAPO (then called the National Association of Professional Organizers) proclaimed the first Get Organized Month, as a national public awareness campaign about organizing and our profession.
A decade later, the month was expanded to incorporate productivity, just two years before we officially became the National Association of Productivity & Organizing Professionals. Our purpose remains the same. All of us — professional organizers, productivity specialists, declutterers, coaches, etc. — celebrate how we improve the lives of our clients by creating environments and developing skills to support productivity, health, and well-being.
Practitioners like Paper Doll are here to help you create systems and skills, improve your homes, workspaces, and attitudes, and live your best, most productive life.
For more great organizing and productivity tips during GO Month, you can also follow NAPO’s Social Media Accounts:
Today’s post offers some 26 ice cream samples of organizing and productivity tactics to make 2026 a little easier.
ORGANIZE YOUR PAPER IN 2026
1) Create a Tax Prep Folder
April 15th will be here before you know it. From now through February, you’ll receive tax documents (1099s, 1098s, W2s) in the mail. You may also get emails reminding you to log in to brokerage and other accounts to download your important tax documents.
Don’t wait until the last minute to gather these items. It’s not just good organizing advice, but helpful financial advice, too, because the sooner you get your important tax documents together, the faster you (or your accountant) can get you your refund, or at worst, let you prepare for the size of your tax bite.
Your tax prep folder doesn’t have to be fancy; a plain tabbed folder kept at the front of your financial files section should suffice. However, if you’re dealing with a lot of documents, you might prefer a dedicated accordion-style folder like the Smead All-in-One Income Tax Organizer.

Organize now so you won’t lose deductions, pay more taxes, or get in trouble with the IRS!
2) Roll Out the Red Carpet for Your VIPs
Make 2026 the year that you get your affairs in order. Estate documents and other essential paperwork must be created, obviously, but also reviewed and updated on a periodic basis.
As I’ve said before, this aspect of organizing may be boring (if you aren’t a professional organizer), but boring is good! If your VIPs are boring, it means that you and your family won’t ever experience any ugly surprises during difficult times, like when someone is in the hospital, when there’s been a death in the family, or even when dealing with the aftermath of a natural disaster.
Start by reading these from-the-vault posts to figure out your next steps.
- How to Replace and Organize 7 Essential Government Documents
- How to Create, Organize, and Safeguard 5 Essential Legal and Estate Documents
- The Professor and Mary Ann: 8 Other Essential Documents You Need To Create
- Paper Doll’s Ultimate Guide to Organizing Yourself to Get a REAL ID
- Paper Doll’s Ultimate Guide to Getting a Document Notarized
- Paper Doll’s Ultimate Guide to Legally Changing Your Name
- A New VIP: A Form You Didn’t Know You Needed
Then list documents you already have (and their locations) and identify what you need to create, and then plan meetings with your family and a trusted advisor to set things in motion.
3) Declutter and Preserve Your Family Photos and Memorabilia
Two years ago, a beloved client passed away, and I’ve been working with his son to go through more than a century of photos, from passed-down black-and-white picures of ancestors on both sides of the family to lighthearted snapshots and travelogues from the gentleman’s young military years. We review prints and slides, as well as delicate (and crumbling) correspondence.
Do you have print photos that would be lost in case of a fire or flood because you don’t have the negatives (or store them with the photos)? Would digital photos on your phone be lost if your phone got smushed or stolen? You need backup!
I’m not suggesting you do this every day in January, but make a plan. What if you spent an hour every Sunday morning sorting through photos? Could you invite a family member or friend to help you consider what to keep and what categories to use?
Contact a NAPO member who specializes in organizing photos, or visit The Photo Managers to find experts who can help you safeguard your photo history.
While I’m on the subject, I absolutely have to recommend, yet again, my colleague Hazel Thornton‘s What’s a Photo Without the Story? How to Create Your Family Legacy.

For more ideas, consider:
- How to Collect, Organize, and Preserve Family Memories and History (Part 1) — The Questions
- How to Collect, Organize, and Preserve Family Memories and History (Part 2) — The Methods
- How to Collect, Organize, and Preserve Family Memories and History (Part 3) — AI & More
4) Know What’s In Your Wallet
Have you looked at what’s in your wallet lately? Would you notice if one of your credit cards went missing? It’s a new year — did you put your new health insurance card in there?
- Pull everything out of your wallet.
- Discard or put away anything that doesn’t belong in there. (Receipts for taxable events, like medical expenses? Keep. The name of a book your friend recommended? Log it in your Notes app or put it on hold at the public library before you forget.)
- Take an inventory of everything in your wallet. Depending on your patience, you have two options:
- Lay two columns of cards (side by side), face-down, on a copy machine. Press “copy” and then flip each card in place to the rear-side, and copy that, two. Repeat the process until everything in your wallet has been secured. Alternatively, you can scan these to your computer and save it all as a multi-page PDF. If you ever lose your wallet, you’ll be happy to have the account numbers, expiration dates, security codes, and contact numbers for your licenses, insurance cards, and credit and debit cards.
- Use your phone to take photos of the front and back of the cards and upload the pictures.
Whichever method you choose, password-protect digital versions of this document in storage or on your phone, and keep the paper copies in your fireproof safe or lockable file drawer.
5) Clean Off Your Desk
Next Monday, January 12, 2026 is National Clean Off Your Desk Day. Celebrate it by making a clean sweep of everything piled up on your desk, de-germify it, and think carefully about what belongs on it.
Read last year’s Paper Doll Celebrates National Clean Off Your Desk Day for step-by-step for making your desk a space for productivity instead of mystery crumbs and mountains of papers.
Then refresh your space with ideas from Organize Your Desktop with Your Perfect Desk Pad: 2025 Update and Paper Doll Explores the Best of Desktop File Boxes.

ORGANIZE YOUR DIGITAL SPACES IN 2026
Digital clutter may not take up physical space, but it wears down our batteries, both in our devices and our personal batteries because of the overwhelm of excess.
6) Declutter Your Phone Apps
The Pareto Principle says that 80% of our success comes from 20% of our efforts. It holds true in many ways; 80% of the time, we wear the same 20% of our wardrobe, kids play with the same 20% of their toys; we use the same 20% of our apps.
It’s why letting things go from the 80% we hardly ever use makes us feel less cluttered and more productive, even though we anticipate we’ll feel anxious about having let them go — that’s why they’re cluttering up our digital spaces in the first place!
- Flip through your home screens and take inventory — What apps did you download and never even try because they required creating a login? What apps did you give up on because they were buggy? Let go of low-hanging fruit.
- Clean up by deleting apps you used the least often (or never). To see the last time you used an app on iOS (for iPhone or iPad), follow this path: Settings>General > iPhone (or iPad) Storage. There are a few different ways to check app usage on Android devices.
- Addicted to your phone? Check your Digital Wellbeing feature on Android or ScreenTime on iOS. Uninstall whatever is obviously distracting you with overuse.
- Move distracting apps that you can’t (or can’t bear to) uninstall to your last home screen page to create more friction and make it less likely you’ll happen upon them when looking for your bank app.
- Fill your first home screen with apps you need and want to use because of the benefits they bring to your well-being.
- Organize the remainder of your apps by dragging-and-dropping them into folders labeled for shopping, dining, social media, productivity apps, etc. Keep them — just make them less convenient.
The point isn’t to get rid of your digital life. Just eliminate what distracts you from what’s important.
7) Clear Out Your Voicemail Inbox
In the olden days, people called you and either you were home and answered, or not home, and never knew you had a call. (If you’re GenZ and reading this: yes, really.) At work, if you weren’t at your desk during working hours, a receptionist took a message. After hours, either the “answering service” took your urgent call, or people waited until you got in on the next business day.
In the 1980s, we got answering machines and our messages lived where our landline phones did.
In the 1990s, we had voicemail, and at the turn of the century, people started calling less and texting more. Now, too many of our messages are spam, and voicemail fills up.
Have you ever called someone — or worse, returned a call — only to hear “This voicemail box is full and is not accepting messages. Please try again later.”
What if your message is important? Do you text? What do you do if it’s a business? On the flip side, if your child’s school, your doctor’s office, or a client needs to reach you, do you want them to suffer this frustration?
Clear up your voicemail box with the following steps:
- On landlines, dial in, listen, and start deleting messages.
- On cell phones, iPhones and most Android phones show transcribed messages. Known contacts should appear by name, making it easy to figure out whether a message is still needed even before you read it. Unknown numbers may be spammers (swipe left!), but may be people you’ve never entered into your contacts. Review those messages, and anything that doesn’t make the cut, delete!
- Save numbers for contacts you may need in the future. — Add a last name and any context necessary. I have a contact saved as First name: MaryBeth, Last name: “Hit my car in the parking lot.”
Until recently, the only “Terri” in my contacts was my hair stylist, but when I was in Portugal and Spain in September, I added my tour-mate to my regular iPhone contacts. Just before my last haircut appointment, I voice-texted, “I’m here, but looking for parking. I’ll see you in a minute.” When I got to her space, she said she hadn’t received my message. A moment later, my tour-mate Terri texted, “You’re here to see me?” with a series of laughing emojis. Doh!
Last names (and context) are important!
- Be ruthless in getting rid of old voicemails. What should make the grade? Messages that you save for:
- work purposes — but confer with your boss or your IT department regarding rules in this regard
- legal purposes (such as when someone is stalking or harassing you, or offering a set of deal points for a contract.
- sentimental purposes — but be judicious. Can you picture yourself sitting in an airport, listening to a loved one’s message over and over?
- Download messages you want to keep permanently. On iPhones, tap the voicemail you wish to save and you’ll see the share icon in the upper right corner; share the resulting MP3 to your photos or notes app, Evernote, social media or wherever else, just as you’d share an article or a picture.
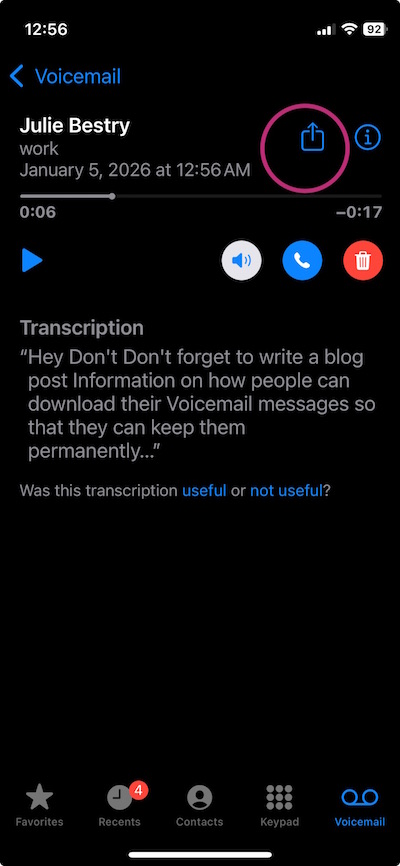
On Android phones, tap on the message to see a list of options. Click one of the save or archive options you prefer and select the storage location. For more voicemail-saving techniques, read Smith AI’s How to Download and Save Important Voicemails.
8) Clear out your email inbox
For years, people have laughed at me, saying that search worked so well and email providers granted so much storage space that it was no longer necessary to clear inboxes. Still, I blithely went on advising my clients to regularly clear their inboxes, and to create a hierarchy based on categories matching their analog filing systems.
Recently, I’ve felt vindicated as Gmail and other email providers have been adding storage limits, and people recognize that search (even AI-assisted search) sometimes takes longer than going to a particular sub-folder with a helpful title.
Email is a headache! According to an analysis by the McKinsey Global Institute, on average, 28% of work time is spent reading or replying to emails. And the average worker — and yes, you’re all above average — checks email 11 times per hour. 84% of us keep email open in the background while working, making it oh-so-easy to “check” our email.
The problem is that we CHECK IT over and over again looking for that dopamine hit, but we often look at emails without doing anything with them, like opening the fridge in hopes that someone has magically made something delicious and put it in there. 
You may think that Inbox Zero is the cure, plowing away at email but getting further behind in important work. James Clear has said, “The most invisible form of wasted time is doing a good job on an unimportant task.” Email clutters our lives like that.
There’s no permanent state of inbox zero (unless you stop sending outbound emails and block all inbound senders), any more than finishing all of the laundry today will create laundry basket zero unless your family plans on becoming very tidy nudists.
There's no permanent state of inbox zero, any more than finishing all of the laundry today will create laundry basket zero unless your family plans on becoming very tidy nudists. Share on XProcessing email isn’t your job, it’s just one method of communication and information acquisition, and it’s not always the right one. Instead:
- Unsubscribe from whatever you never read. (It’s like buying vegetables that you know you should eat but they disappear into the back of the fridge and eventually get slimy.) Take five minutes a day to declutter your future inbox.
- Set up a simple hierarchy of subfolders with names of major projects, client names, or whatever works for you. Having a place for emails to safely, dependably live will encourage you to manually or automatically route necessary ones of your inbox. As with voicemail, don’t feel like you should save everything.
- Learn how to use your email platform’s filters or rules function to automatically sort mailing lists to one sub-folder, anything you’re always CCed on even though you know it’s nothing to do with you to another, and so on.
- If you’re overwhelmed by your huge backlog, move everything from more than a month ago to a folder you call “Archived” and start with a minty-fresh inbox. You can always go into the “Archived” folder and sort if you’re feeling enthusiastic, but at least you’re dealing with something more manageable.
9) Know What You Don’t Know About Your Tech
In Digital Disaster Prep: How to Organize Your Tech Info Before You Need It earlier this year, I walked readers through all sorts of information you need to know before something goes wrong with your tech. Do you know where to find your:
- IP Address
- Network and router information
- ISP contact information
- Device Identifiers
- Operating system license keys
- Software and game activation codes
Your household probably added some hardware and software goodies this holiday season. This is the perfect time for you to read the post and start logging all of your essential tech information.
ORGANIZE YOUR TIME IN 2026
10) Track Your Time to Figure Out Where Your Time Is Going
To improve your productivity, the first thing you must do is get a handle on how you’re spending your time.
Read my How to Use Time Tracking to Improve Your Productivity from last January to understand the benefits of time tracking, including mindfulness and focus, prioritization, data-driven decision making, stress reduction, and accountability. The post also prepares you to face challenges and overcome the obstacles, and offers strategies and resources for tracking your use of time.
Track for just one day, or participate in a weeklong time tracking project such as Laura Vanderkam’s annual event. Register for her 2026 Time Tracking Challenge from January 12-19, 2026. I do it every year!
11) Get a Better Sense of the Passage of Time
For some people, knowing what time really “feels” like takes some effort.
First, put real, analog clocks wherever you tend to get lost in time. Is that your desk (even though you wear a watch and your computer has a clock)? Is that the bathroom, because you lose awareness of time while doing your hair or soaking in the tub? Is it your car, which has a perfectly serviceable clock but the time is always wrong because you never learned how to change it for Daylight Saving Time?
Next, read about all the ways timers can help you get a better sense of your time.
- How to Use Timers for Improved Productivity and Focus — Part 1
- How to Use Timers for Improved Productivity and Focus — Part 2: Picking a Good Timer
- How to Use Timers for Improved Productivity and Focus — Part 3: Tangible Timers
- How to Use Timers for Improved Productivity and Focus — Part 4: Digital Timers
- How to Use Timers for Improved Productivity — Part 5: Hybrid Timers and Bonus Material
12) Time Travel in Your Planner
If you use a paper planner, hopefully you already have one for 2026; if not, that’s step #1. But even if you are 100% digital, this advice goes for you, too.
It’s tempting to just fill in your January pages and figure you’ll adjust as you go along. But even if you’ve had the same meeting every Tuesday for the past 5 years, somehow, some way, you’ll double-book if it’s not in your planner or calendar.
Spread out at your desk or your kitchen table, grab a cup of cocoa or something to soothe you into the new year, and do the following:
- Page through each week of last year’s planner and copy everything that recurs by date (like birthdays and anniversaries).
- Add events that happened in 2025 and are already scheduled to happen again, but not on the same dates (like conferences, work retreats, medical tests and appointments, etc.).
- Use last year’s schedule activities to prompt you to make a list of anything you might need to schedule or add to your long-range tasks, like meeting with your accountant, scheduling annual medical tests/exams.
13) Eliminate What Doesn’t Excite You
I’m a big believer in the concept that whatever isn’t a “Hell, yeah!” is a “Heck, no!” at least in terms of what you can control. (Unlike Marie Kondo, who encourages people to get rid of tangible items that don’t bring joy, I know that you can’t just toss your old tax returns.
Similarly, you can’t strike everything that isn’t joyous off of your calendar. You still have get a dental cleaning at least twice a year, whether you like it or not.
But why not make 2026 the year you step back from volunteer positions that take your time and energy, but don’t give you delight?
How about taking that book club (for which you never like the selected books) off your schedule? You can always agree to meet the people one-on-one without the obligation to read the newest oversized dystopian novel.
Set yourself, and your calendar, free.
14) Pick a Problem-Solving Day
Theming your days can make you more productive because you don’t have to keep switching tasks. Marketing Mondays or Financial Fridays let you schedule a block of similarly-themed tasks so you can focus and get into “flow.”
I encourage clients to pick one day of the week for problem-solving. Block a few hours on a specific day for sitting on the phone and asking, repeatedly, for someone to escalate your call. This is the day you set aside for time to get help on whatever is making your computer do THAT THING.
Knowing that you have a slot firmly in place will allow you to worry less about getting problematic or frustrating things accomplished, and because there’s one place in your schedule for solving problems, you will be able to focus when that day arrives.
ORGANIZE YOUR FINANCES IN 2026
15) Stop Singing “I Owe, I Owe, It’s Off To Work I Go”
Debt creates mental clutter. Knowing is always better than not knowing, so make 2026 the year that you know what you owe and figure out what’s going on with your money and where it’s going.
- Make a list of every credit card, loan, and any other kind of debt you have. Note the creditor, the amount, and the interest rate.
- Next, make a list of every fixed expense you have.
Seeing it all in black and white (and red) may be sobering, but it’s the first step toward figuring what you can do about it.
Maybe you can refinance a car loan or mortgage to lower your monthly costs?
Perhaps you can call your credit card companies and request a reduction in your interest rates. (Nerd Wallet has a great article on How to Get a Lower APR on Your Credit Card.)
Maybe you can cut expenses for things you’re not even using.
16) Go Spelunking for Lost Money
Start with your couch cushions. Whether your loose change is in a jar in the laundry room or at the bottom of your purse, it’s (literally) weighing you down wasting your financial potential. Put on some music and start rolling coins (or bribe your kids to do it) and take the money to the bank. Alternatively, dump it all in a canister and take it to a Coinstar machine or any credit union that accepts and counts coins for free.
To recoup other “lost” money, follow steps in these Paper Doll posts:
- Show Me the Money — A 2025 Guide to Finding Forgotten Funds & Unclaimed Property
- Lost & Found: Recover Unclaimed Money, Property, and Savings Bonds
- How to Track, Lower, or Cancel Your Recurring Subscription-Based Bills
- Organize and Lower Your Medical Bills: Spot Errors, Negotiate Costs, and Save Money
17) Re-Shop Your Auto Insurance
When was the last time you actually shopped for car insurance? If you’ve kept the same insurance for years, you’re almost assuredly overpaying. As with the cable company, this is one of those instances where newer customers are rewarded with the best deals, and loyal customers are not rewarded for loyalty.
It doesn’t cost anything to shop around. Even if you find a better rate, you may be able to return to your agent and say, “Hey, the guys across the street quoted me quite a bit less. Can you match it?”
Note: if you use online pricing comparisons, you’ll be bombarded with emails, so consider creating a new Gmail account just for these replies.
Before you make any calls, though, familiarize yourself with the basics of car insurance with Organize for an Accident: Don’t Crash Your Car Insurance Paperwork [UPDATED]

RECITE THESE ORGANIZING AND PRODUCTIVITY MOTTOS
When you’re having a hard time tackling the clutter or focusing on the work, pick one of these mantras to help point you in the right direction.
18) Don’t put things down; put them away.
19) Declutter first, then contain it. (Don’t acquire clutter to contain your clutter!)
20) Everything should have a home, but not everything has to live with you.
21) Someday is not a day on the calendar.
22) Break every task into its smallest possible step. If you can’t get started, the first step is probably not small enough.
23) Cut yourself slack. Give yourself grace.
24) Progress, not perfection.
25) Albert Einstein said, “Organized people are just too lazy to go looking for what they want.” Be lazy!
Follow Me