Paper Doll
Paper Doll’s 2012 Holiday Gift List: A Compendium of Practical Delights
The Paper Doll 2011 Holiday Gift List was so popular, I wanted to continue the tradition. Of course, I’m still strongly in favor of the experiential gifts of education, entertainment, pampering, adventure, practicality and year-long presents — all items that require no dry-cleaning or dusting. And I still love the standout organizing-themed gift ideas on last year’s list, especially the Grid-It!, The Tote Buddy and The Card Cubby. But today’s list includes a combination of the practical and whimsical to both delight and organize your loved ones (and yourself).
1) The Snapshot Takers. The only area of our lives in which we seem to be approaching a paperless world is photos. People are so busy snapping shots and posting them to Instagram, Twitter and Facebook, that few photos seem to get printed these days. But what about those family photos dating back the eras of poodle skirts or leisure suits?
NAPO-Georgia Associate Members Jennifer “Jiffy” Page of Pixorium and Cathi Nelson of the Association of Personal Photo Organizers recently delivered a presentation on photo organizing strategies, and shared a little secret with attendees: the Flip-Pal Color Mobile Scanner!
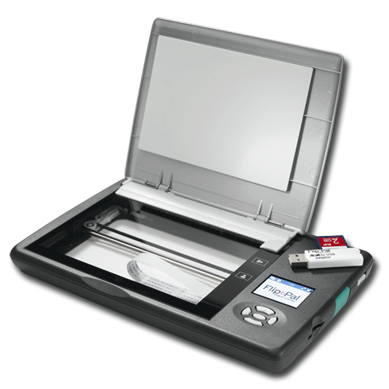
This compact, lightweight mobile scanner is perfect if you’ve got piles of photos and a desire to scan them yourself rather than ship them off to a time-saving photo-scanning service. It’s battery-powered, stores scans on an SD card and requires no computer — just view each scan on the LCD screen.
With one push of a button, scan photos of all sizes for high quality 300 and 600 dpi resolution images. For photos larger than 4″ x 6″, the Flip-Pal’s EasyStitch software lets you scan sections of photos and seamlessly “stitch” the images together. Best, if you have framed photos, you can use Flip-Pal’s patented flip-and-scan technology to scan photos in place — even on the wall. Remove the lid, flip the scanner upside down, and center it over the photo using the see-through window. Cool…and so easy!
2) The Readers In the Dark. Do you read at night but hesitate to wake your significant other with the light? Do you read on nighttime flights or need to follow along on handouts during presentations in dark classrooms or seminar rooms? Sure, an e-reader is fine for when you’re reading electronic content, but for those who prefer traditional books or who have to read documents in dark locations, those itty-bitty, teeny-tiny book lights tend to shed light unevenly and lean at precarious angles.
Enter the LightWedge book lights. Instead of shedding ambient light, this battery-powered LED reading light illuminates the whole page (and little else), creating a clear but diffuse panel of light on the printed page.
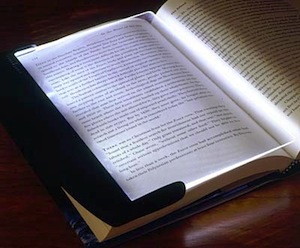
There are three versions — the Original LightWedge (for under $25), the LightWedge Paperback book light (under $25), and the LightWedge Rechargeable 2.0 (for about $32) — available in ten colors, including both opaque and translucent Black, Ocean, Petal, Seaglass and Chocolate. The original measures 6 3/4″ by 9 1/4″ inches and weighs only 8 1/2 ounces (with four AAA batteries installed). The paperback version measures 5 1/4″ x 7 1/4″ and weighs only 6 1/2 ounces (with four AAA batteries installed). Batteries aren’t included. The rechargeable version measures 6 1/2″ x 8 8/9″ and weighs almost eight ounces. The included NiMH battery can be recharged plugging the included USB-to-micro-USB charging cable into your computer.
So, instead of cluttering up the nightstand with piles of books you’ll never get to read because your honey harrumphs about the bright light at bedtime (or instead of complaining that your sweetie clutters the bedroom or keeps you from sleeping), don’t let a wedge come between you. Let the LightWedge bring you closer together.
3) The Hybrid Lovers. A few months ago, we talked about the niftiness of the Evernote Smart Notebook By Moleskine, which combines the on-the-fly creativity of the classically-inspired and colorful Moleskine notebooks with the how-did-I-ever-live-without-it utility of the Evernote suite of productivity tools. Write (or draw) it here; capture it forever, digitally, there. Your high-tech poet and your low-tech doodler will both love you for your the efficiency it brings their way.

Start by selecting the format: a 240-page Large (5″ x 8 1/4″) notebook for $24.95 or the 195-page Pocket (3 1/2″ x 5 1/2″) notebook for $29.95. Both come with black hardcovers, green elastic bands and four sheets of Smart Stickers (tucked into the back pocket).Then choose your paper style: gridded like graph paper or dotted ruled paper.
Since each Evernote Smart Notebook purchase includes a complimentary three-month subscription to Evernote Premium, this is a gift that will keep on giving.
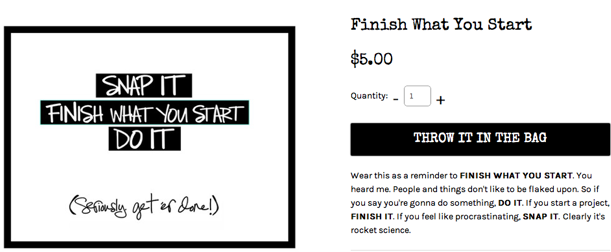
4) The Self-Improvers. Do you have someone on your gift list who really wants to stay upbeat or make a big, positive life change? Snap It Habit Changers from The Habitude know that if you want to organize change in the ways you think and live your life, you need to change the small habits.
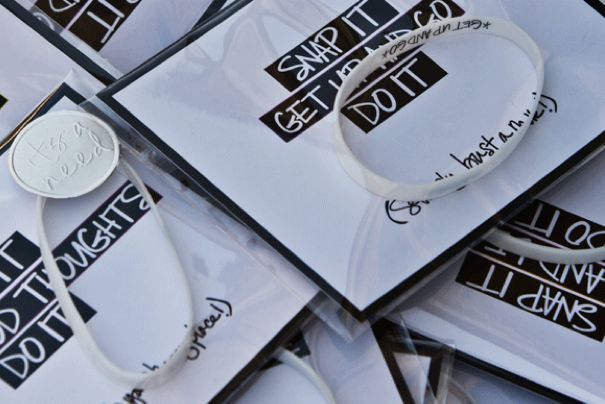
Snap It Habit Changers are bracelets, but not any old baubles. Y’know the old trick of putting a rubber band around your wrist, and when you want to smoke or start dreaming about the lover-who-done-you-wrong, you snap the band? Snap It Habit Changers go that one better. As the site says, “No more negative self-talk. No more ballyboohoo. If you don’t tame your thoughts and actions, they will for sure tame you (eww).”
Bargain priced at $5, these rubbery bracelets have their essential messages printed on the inside, so only you (or your giftee) need know the positive, life-affirming message being reinforced. I have to admit, as a professional organizer, I’m pretty partial to the Finish What You Start version.
5) The Kidlets.
For sprightly novice readers who are starting to realize they want to display their books like the big kids, there’s Dasher!
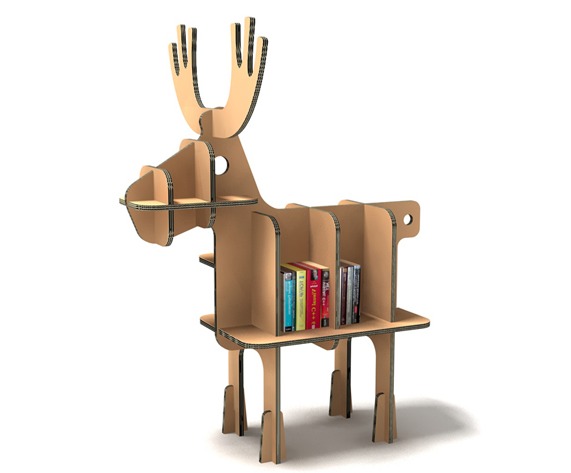
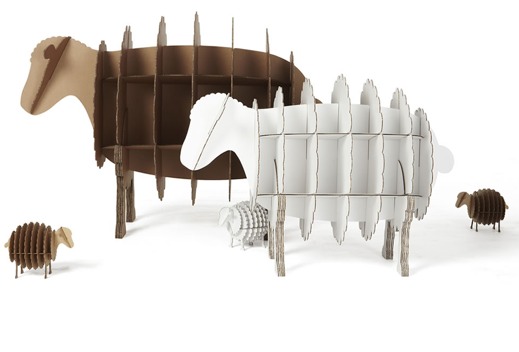
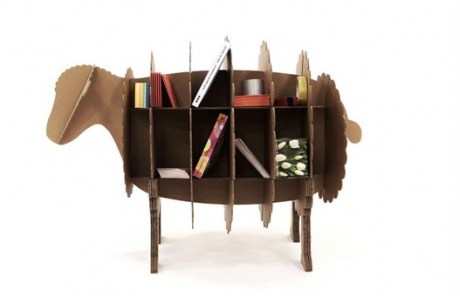
This is just one flat-packed, reinforced fiberboard charmer from the adorable children’s furniture and toy line in the Tsuchinoco Kids collection. Unfortunately, the prices are in Yen and at 14,500 (or about $175), a bit pricey. For a less expensive (if nonetheless international) option, check out the enchanting Karton Barnyard Method Ram, Ewe and Lamb collections we’ve reviewed in this past.
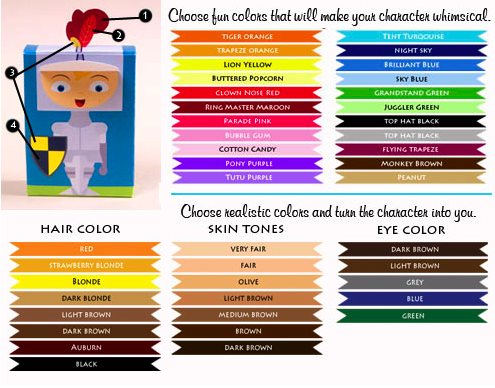
For the tiny squabbling artistes in your family who can’t help tussling over whose crayons are whose, 2012 Entrepreneur.com Indie Merchant winner Cio Prints has the solution — Custom Character Crayons! From Pretty Princess and Knight of Honor to (girl and boy) Superheroes, Prima Ballerina to Moon Martian, Mr. Roboto to kitty, puppy and T-Rex options, you’re not just creating a crayon box, but a character toy and new best buddy.
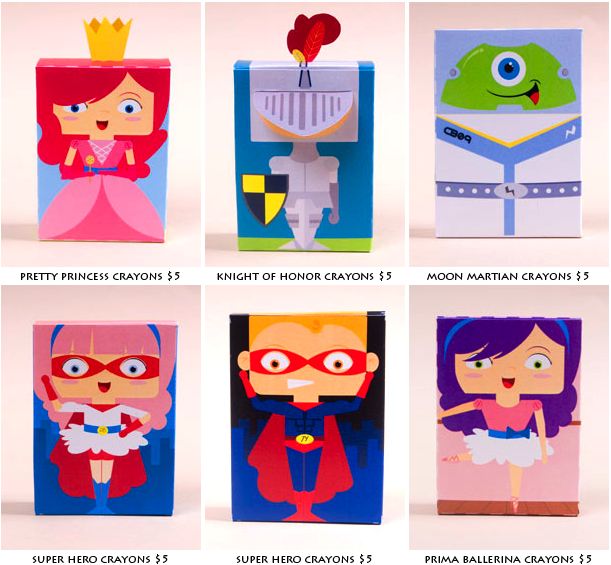
The crayons and their boxes can be customized in three ways:
- The Wrappers — Pick up to three colors (for the child’s name and stripe, the background and for any symbols) among 22 delightfully-named color options.
- The Box — Truly personalize the character selection by picking hair color, eye color, clothing colors and skin tone, to make the character reflect your child (or his or her imaginary pal).
- The Name — Put the child’s actual name, nickname or “secret identity” to make it really feel customized.
No more fights over crayons? Sounds like a gift for Mom and Dad!
For the tiniest tots who tend to scribble on every bit of paper, from vital documents to their older sibling’s homework, there are the Scribblers.
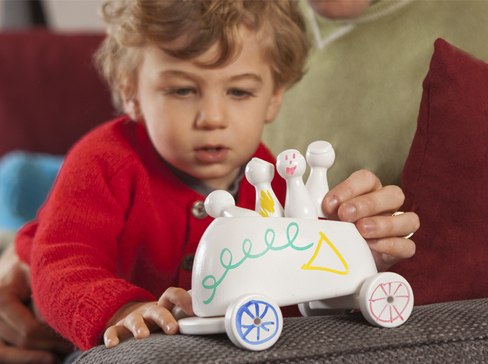
The crowdsourcing inventors at Quirky have created a write-on/wipe-off 3Dtoy for toddlers. This modular kit is bathed in a dry-erase coating, so kids can color and design their toys to their own preferences. The interchangeable pieces can be arranged into three different vehicles (car, plane or boat), and the four little people double as dry-erase markers.

It’s not paper — think of it as pre-paper for the pre-school set. Unfortunately, it’s also pre-available, as the fine folks at Quirky are still crowdsourcing the best way to present this to the marketplace.
6) The Desk Set. Workdays in a cubical can be draining. Brighten up your worker-bee’s space with some fun, fanciful tools.
The Cork Globe from Pat Kim proves that flat is so last decade. If you want to give the world to your favorite office-dweller, consider this handmade, 10″ solid cork sphere atop a powder-coated aluminum base.
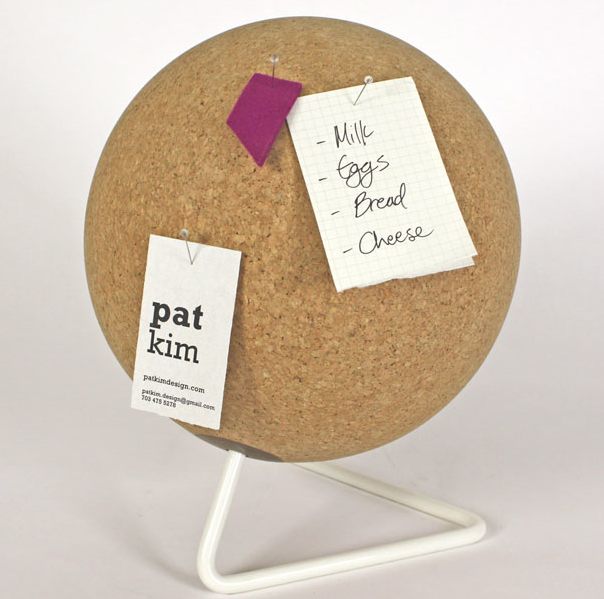
But only get this if you really do think the world of someone, because at $270, this is no mere stocking stuffer! [As of December 2013, this product is no longer listed on Kim’s design page.]
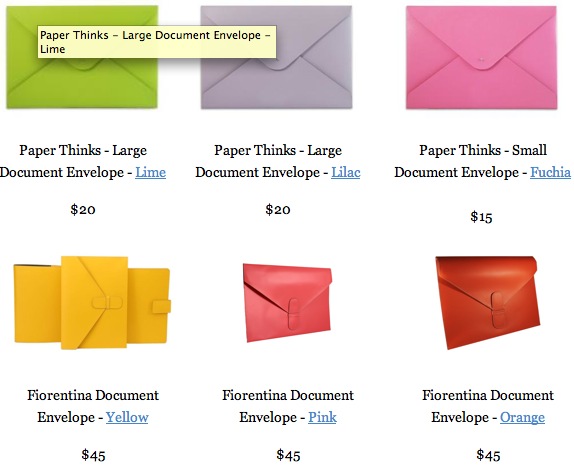
For practical style at a more delicious price, check out Office Candy’s colorful document envelopes — they’re leather!
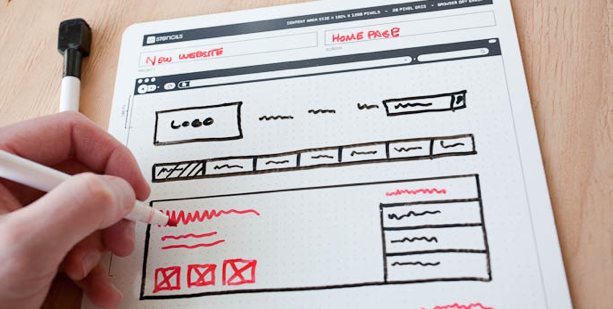
And finally, for anyone who knows and loves a web guru, check out UI Stencils’ Browser Dry-Erase Board. This 9″ x 12″ twenty-pixel grid browser template bridges the gap between brainstorming and web design with a page organizing tool that can be revised with the swipe of a dry-eraser. It’s $26.95 and no batteries or chargers are necessary!
Happy organized shopping!
Paper Doll Organizes Your Many Happy Returns
Shopping days have formal titles now. Black Friday. Cyber Monday. Grey Thursday. (That was the nickname for Thanksgiving because so many stores were open for part of the holiday.) All of those titles are marketing tools to boost retailers’ bottom lines. Depending on your purchasing style, those days either lightened your wallet or helped you stretch your holiday dollar.
I propose that what we actually need is a Return & Exchange Day (or, y’know, Week) where a significant number of the cashiers, registers and customer service departments would be given over to supplying assistance with returns and exchanges. Failing that, let’s look at some simple strategies for taking those gifts that don’t fit (your age, size or lifestyle) and exchanging them for something (financial or tangible) that’s a little more appropriate, without losing value or sanity.
KNOW THE POLICIES
Store return and exchange policies may seem similar, but each has its own twist. Some stores require a receipt for every return or exchange, while Lowe’s won’t ask for a receipt if you use a credit card or provide your phone number when you purchase by check or cash. Some retailers require you to show ID no matter how the gift was originally purchased, and others, like Best Buy, have seasonal return policies that differ from (and are more lenient than) their year-round policies.
From Kohl’s and Nordstrom, which generally let you return just about anything, anytime, to retailers that only allow exchanges of damaged items for the same (but undamaged) thing, to stores that charge restocking fees, and every variation in between, it’s important to know a store’s policy before you buy (or, in the case of gifts you’ve received, before you return or exchange).
In theory, brick-and-mortar stores should have their returns and exchange policies posted near the checkout lines, but this is not always the case. Some stores conveniently print their policies on the reverse of their receipts, but it’s not universal. You might ask a cashier, “if that doesn’t work for us, what’s your return policy?” but seventeen year-old part-time staffers probably aren’t going to have the same sense of diligence that you’d want from someone guiding your financial decision-making.
Caveat emptor. In fact, buyers, don’t just beware, but be prepared. Before you shop (or while shopping, if you’ve got the internet in your pocket), call up a store’s policy by typing the store’s name and “return policy” into your favorite search engine, and take a moment to read the fine print. Think of it as an insurance policy; two minutes now might save $200 later.
To get you started, here are links to some of the more popular stores’ return policies. Please note that many stores have different policies for returning store merchandise vs. online merchandise. For example, Coldwater Creek allows you to return catalog or online purchases at their stores, while Old Navy requires that some merchandise be returned by mail.
Clothing and Department Stores
Chico’s
Coldwater Creek
Kohl’s
Lord & Taylor
Macy’s
Nordstrom
Old Navy
Target
The Gap
Walmart
Specialty Stores
Amazon
Barnes & Noble
Best Buy
Container Store (then search “return promise”)
Toys R Us
Also, be sure to read Consumer Reports‘ 2012 Naughty or Nice List of most the beloved and despised return policies.
RETAIN THOSE RECEIPTS
Paper Doll has talked many times about receipts, from the classic Mom, Why Is There a Receipt Stuff In the Turkey? to What’s Your Receipt Receiver Style? to our recent two-part series on popular and lesser-known digital receipt management tools.
The easiest way to ensure a smooth return or exchange experience is to have the receipt handy, so as you shop this season, keep the following in mind:
1) Ask for a gift receipt before you ring up your purchases, says Professional Organizer and Professional Daily Money Manager Nanette Duffey. If you’re purchasing multiple gifts for multiple people (especially those in different households), request a gift receipt for each item.
Not all stores provide gift receipts, but many do. Mark the name of the person to whom you’re giving the gift on the gift receipt so you know what’s what. (Note: gift receipts generally don’t have the prices on them, so you’re safe tucking them in with whatever you give to the adults on your list. For kids, you might want to hold onto the gift receipts until you can give them to their parents.)
2) Save your holiday receipts for anything returnable. Consider keeping these receipts separate from the receipts you normally save for budgeting purposes, tax deductions or “big ticket” personal purchases.
A few #10 business envelopes or a Smead Tagalong Organizer
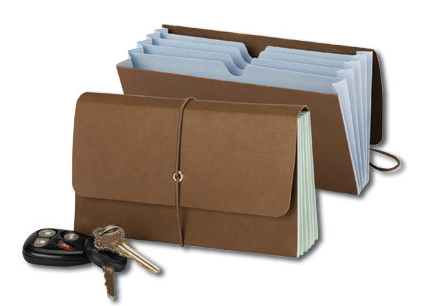
will help you divide up receipts for gifts you bought for your immediate family, your partner’s side of the family, friends, and service providers so that you can find the receipts more easily when necessary.
3) Take note of the return deadlines. Typical policies for returns or exchanges with receipts can be anywhere from 30 to 90 days, with seasonal extensions common. When you get home from shopping, grab your calendar and note the return deadlines on the receipts and gift receipts.
Next, mark your calendar for a week or so before the earliest deadline and schedule a return day for the items you bought for your family. (Later on, when you receive gifts with gift receipts, add them to the pile.) If you’re an efficient holiday bargain shopper, you can probably get it all done in one morning and then reward yourself with brunch. (Mmmmm. Waffles!)
GET A GURU
Paper Doll realizes that not everyone is quite so organized (yet) as to keep track of their return and exchange deadlines on their calendars. But this is one of those times where technology comes to the rescue.

Return Guru is a free app that keeps track of your purchases and returns for you. Just use your iPhone or Windows phone to snap a photo of your receipt, and the app will remind you of upcoming return due dates. Snazzy!
- Sign up for a free account at www.ReturnGuru.com.
- Snap a photo of your receipt or email online receipts to receipts@ReturnGuru.com.
- Receive timely reminders for each thing you purchase according to each individual store’s return policies.
- Skedaddle to the store to return or exchange what you don’t want for what better suits you.
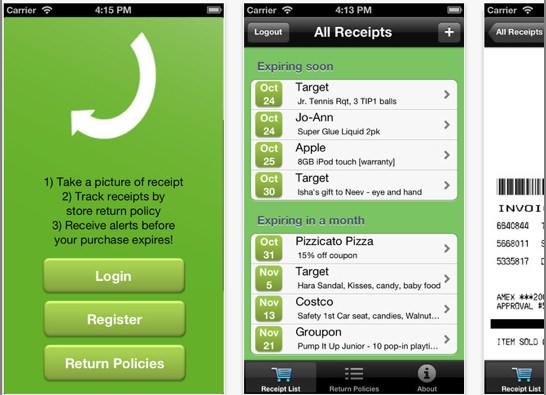
Receipt Guru even has a detailed and handy list of store policies rated by the ease of making a return or exchange. Sort by store name, ease rating, return period, receipt required or policy details. Nordstrom scores a perfect 100%, while Sears, Gamestop and Ross all score failing marks. Tsk.
RETURN/EXCHANGE/RELAX
To make the return process as stress-free as possible, consider these tips:
If you plan to exchange rather than merely return an item, do so as early in the season as possible to avail yourself of the widest array of merchandise.
Sort receipts by store and match the items to be returned. You may want to separate each set of returns into a different canvas bag.
Plan your route. Head to the farthest store or location, first, so that as you make your returns, you’ll work your way back to your car (at the mall) or home (at the end of the day).
Set the stage. Depending on how many returns you have to accomplish for various family members, this could be an all-day affair. Eat a hearty protein-rich meal, just as you did (or should have done) on Black Friday. Wear comfy shoes. Bring your mp3 player or tablet to keep yourself entertained in long lines. Pack a healthy snack.
Smile and be friendly. The cashiers and customer service people have had a long season, and they’re tired and cranky, too. Treat them like human beings and not obstacles to getting out and on your way. The nicer you are, the nicer they’ll be, and the sooner you’ll get the resolution you desire.
Many happy returns!
Paper Doll Wraps Up the Leftovers: Organize Your Totes, Guests and Pin Boards
I hope you had a wonderful Thanksgiving and that your company gobbled up the last of the leftovers so that you have room in your fridge and freezer for all the upcoming holiday treats. I took an extra day to spend a longer holiday weekend with Paper Mommy, so today’s post includes only a few tasty morsels of updates on delicious things we’ve previously discussed.
I FEEL LIKE A WINNER
No, I didn’t win the Power Ball. (Apparently nobody did — can you believe the new estimated jackpot is $425 million? That’s a lot of little green papers!) But I still feel pretty special. A few months ago, I got a lovely note from Stacey Anderson, publisher of Getting Organized Magazine, letting me know I’d won something in the magazine’s 30 Days of Giveaways.
Loyal readers of this blog can imagine my excitement when I learned that I would receive something I’d listed on my 2011 Holiday Gift List: Favorite Things Edition. The prize? An absolutely gorgeous special edition of The Tote Buddy.
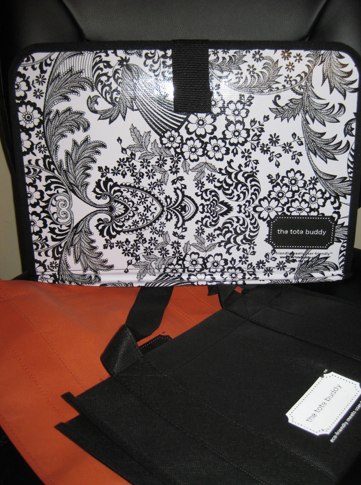
The pattern, a nifty black & white Fleur de Lis, was the envy of Paper Mommy over Thanksgiving weekend, and the interior includes a matching (attached) zipper compartment suitable for coupons, shopping lists, price books, color swatches and the like.

Pretty snazzy, eh? The Tote Buddy portfolios are a great way to avoid saying “paper” or “plastic” so that you can say yes to keeping your canvas bags tidy. As my overstuffed post-holiday car will attest, canvas bags aren’t just for groceries anymore!
HELLO, MY NAME IS…
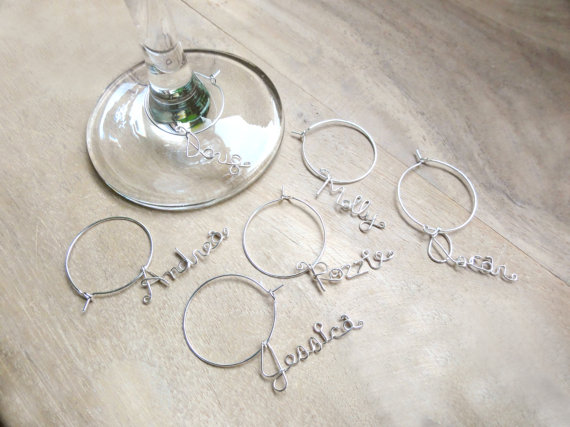
Before I departed for Thanksgiving, two different clients mentioned that they wished they had a way to keep straight whose drinks and plates were whose during the mingling portion of holiday get-togethers.
Sure, for the super-casual crowd, you can just write your own name on your red Solo cup with a Sharpie. (For those who don’t mind the slightly not-safe-for-work Toby Keith song “Red Solo Cup,” be advised there’s a holiday version of the video.)
And, of course, if your entertaining style is a little more upscale, wine charms are all the fashion. You can opt for custom-made silvery baubles
or DIY chalkboard charms

or a variety of other styles to suit your company and your mood.
But last week’s legal pad napkins led me to another keen product from Decor Craft, Inc., something that helps you keep track of your glass or plate and help other party-goers remember your name.
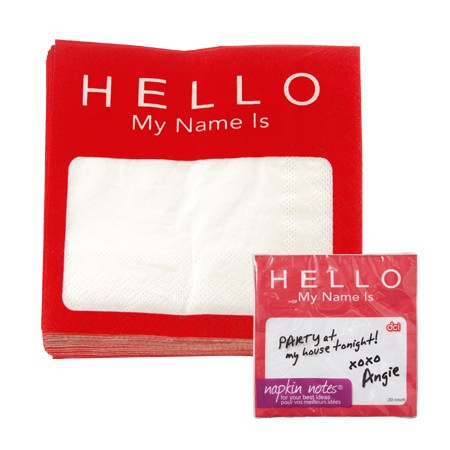
Hello, My Name Is Napkin Notes comes in packs of 20 dinner-sized (7.88″ x 7.88″) napkins for about $10 or cocktail-sized (5″ x 5″) napkins for about $5.
SHHHHHH. IT’S A SECRET!
Last March, when we talked about mainstream pin boards and their specialized siblings (for guys and other pinners), the one pin that seem to stick in everyone’s craw was the severe dearth of private pin boards on Pinterest. How could a site that was at the forefront of social curation fail to recognize that some things might need to be kept private?
What if you wanted to create a secret board for holiday gift ideas for your family members, and wanted to share it only with Santa’s favorite helpers?
What if you were collecting visual material for a blog and wanted to keep the funny, beautiful or delightful images under wraps until the big reveal on your blog?
What if the items you were curating on your boards were actually elements of your competitive advantage in building a soap box derby car or designing your Project Runway creation?
While the social aspect of pinning made Pinterest and its ilk popular, not being able to keep a few items close to the vest was a sticking point for many potential users. But we’re stuck no longer! Pinterest has announced private pin boards.
In fact, one suspects Pinterest didn’t just respond to user demand — it seems more like Pinterest’s leadership watched the new Bond film, Skyfall, just a few too many times. The private boards have been dubbed “Secret.”
Of course, Pinterest hasn’t gone into this willy-nilly. There are rules:
- You can only have three secret boards at any one time, so if you want to create a fourth, you’ll have to take one of your three secret boards public. But note: once you take a board public, you won’t be able to make it private again, and you can’t change any of your currently-public boards to private.
- You can grant access to any Pinterest member so they can see and add to your secret board.
- If you’re given access to a secret board, it won’t count against your three-board limit.
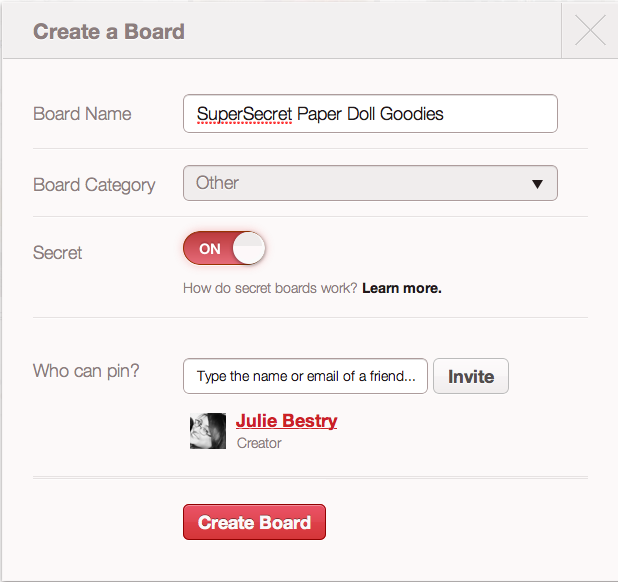
Creating a secret board is easily handled in one of two ways. Click Add+ at the top right of any page and select “Create a Board” as always, but slide the “Secret” toggle from Off to On. (Don’t forget to select anyone to whom you’d like to grant pinning privileges.)
Or, you can scroll to the bottom of your profile — just log into your Pinterest account, select Boards from the drop-down arrow under your name in the top right corner — and you’ll see three blank secret board outlines:
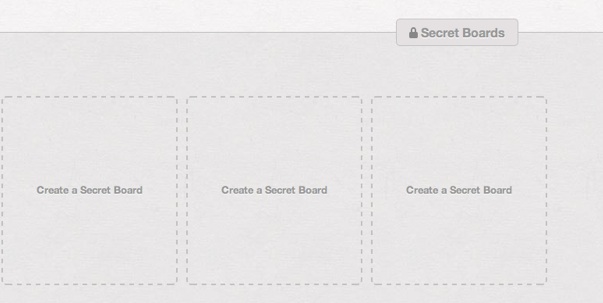
Click on “Create a Secret Board” and follow the usual prompts. Once you’ve created one, two, or three secret boards, you’ll always be able to see them at the bottom of your profile, right below your public boards.
For more on secret Pinterest boards, check out the official Secret Boards 101.
Still not sold on the need for a private board? Check out Pinterest Secret Boards: 10 Reasons To Use This New App Feature to see if any of those situations might apply to you.
That’s all for this week’s Paper Doll leftovers. (As for the last few slices of Paper Mommy‘s peanut butter mousse pie, I’m not sharing!)
Paper Doll Organizing Carnival — Charming Reminders, Library Amnesty, and Disappearing Ink
Last Thursday was National Clean Out Your Fridge Day, and my colleagues (by way of Janet Barclay’s excellent Professional Organizers Blog Carnival) shared their wisdom and advice. With just days to go until Thanksgiving, people all over America have been making meals of ill-matched foods, just to clear space for the elements of the holiday spread. Sometimes, I feel like the Paper Doll Organizing Carnival is a bit like that — dribs and drabs of news and information saved up (or left over), making for a quixotic (if hopefully yummy) bloggish meal. As you head off for your holiday pursuits, I hope you find a morsel here that suits your tastes.
ALWAYS SOMETHING THERE TO REMIND ME
Are you rushing around to get ready for Thanksgiving? Do you need to remember what (or whom) to pick up when (and where)?
![]()
Paper Source, whose motto is “Do Something Creative Every Day” is often the source for enchanting solutions for organizing, and I recently saw two cool alternatives that may come in handy, particularly during the planning-heavy holiday season.
Although professional organizers recommend real calendaring systems (whether paper or digital), sometimes people need something very simple, or an extra, in-your-face reminder. This Color Block Notepad works for either.
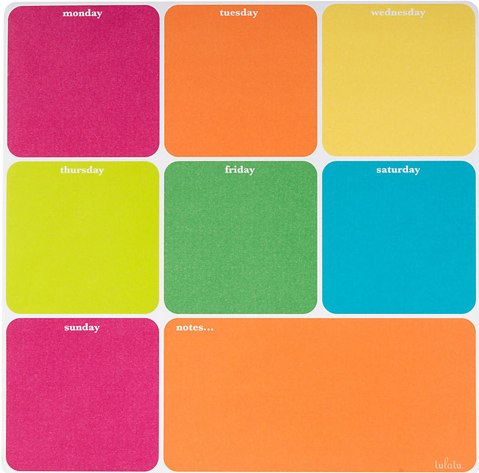
These colorful 50-sheet, 10″ x 10″ day-of-the-week notepads adhere to a wide variety of surfaces, including finished wood, glass, tile, stainless steel, mirrors, and laminates, making them suitable for middle school and high school lockers, college dorm room mirrors or doors, the front of the fridge or the side of your file cabinet in the office.
There’s a colorful cube for each day of the week, plus a double-wide section for notes. Kids can keep track of which days they have gym glass or need to bring their musical instruments for lessons; you can track your workouts or remind yourself which lunch to pack. This won’t replace your calendaring system, but it’s a cheery introduction to time management for younger kids and a keen reminder or tracking system for the special-attention issues in your life.
I also liked the Bamboo Desktop Message Board. This is great for those who prefer a tactile writing experience over digital solutions, at least for simple notes in the kitchen or office, but who don’t like the environmental impact of disposable options or the bland nature of a traditional white board.
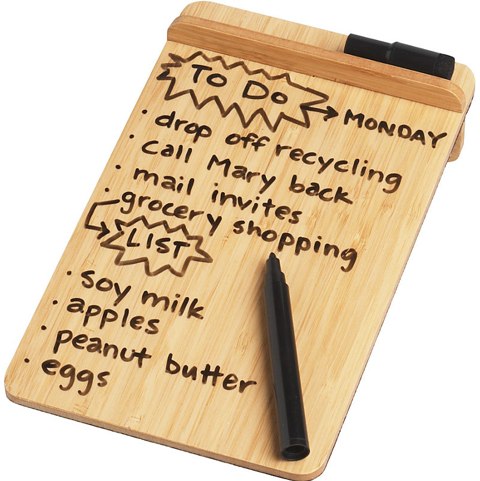
This 5 1/2″ x 9″ x 2″ non-magnetic dry-erase board features a sustainable, patent-pending bamboo surface and allows you to organize quick notes, messages or grocery lists with a swish of the board’s chubby black marker. It’s $14.95.
![]()
If you’d just like to make sure your Thanksgiving-morning breakfast isn’t interrupted by family members jumping up from the table to grab their phones, gadgets or Moleskines to record what they need to do on Black Friday, Decor Craft, Inc. has you covered.
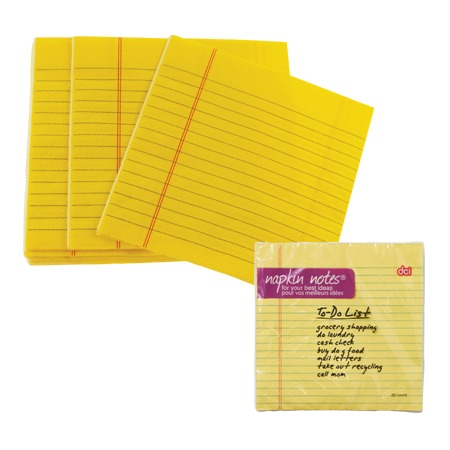
Napkin Notes, designed to look like legal pads, measure 7.88″ x 7.88″ x 0.75″ and come in sets of 20 dinner-size napkins. You can find them at quirky gift, party and stationery retailers, and on Amazon. (Just remember Paper Doll’s feelings about floozies!)
PUBLIC LIBRARY AMNESTY
A recent story about the Chicago Public Library‘s first amnesty program in two decades caught my attention. In 1993, a Chicago woman inherited a copy of The Picture of Dorian Gray by Oscar Wilde when her mother passed away. Except the woman’s mother never actually owned the book; in 1934, the mom’s childhood chum checked out the copy (part of a 14-volume set of Wilde’s work, printed in 1911 — one of only 480 copies ever printed)!
Just as Dorian Gray walked the earth while his portrait became ever more decrepit, the book passed from friend to mother to daughter, while some microfiched ledger was toting up library fines day by day, year after year. The amnesty program allowed the woman to return the 78-years-overdue book without having to go into debtor’s prison. Well, actually, the Chicago Public Library caps fines at $10, but fear of returning such an obviously overdue book apparently had the library patron somewhat apprehensive for close to twenty years.
(While it’s not something one likes to advise, Paper Doll does wonder why the woman didn’t just carefully wrap the book and leave it in the library’s return drop-box at some point over the last two decades.)
Library amnesty programs are a great way to regain valuable items lost from collections by eliminating the twin obstacles of guilt and fear (of fines) that usually prevent return. If you have a habit of delaying return of borrowed library items (either because of disorganization in your home or trouble with time management), call your public library system to find out if there’s an annual or periodic amnesty program. And to keep yourself on the straight and narrow in the future, perhaps you might “borrow” some of these tips on keeping track of your library books in a classic Paper Doll post on how library borrowing can reduce book clutter.
DISAPPEARING INK
I suspect that most people fail to return their library books because they get interrupted while reading and hope to finish reading before (or not long after) the book is due. Buenos Aires publisher Eterna Cadencia has its own twist on increasing readers’ senses of urgency. They’ve released El Libro que No Puede Esperar, which translates as The Book that Cannot Wait – an anthology of new works of fiction printed in ink that disappears two months after the book is opened!
Does this bring to mind a reversal of the grade-school science project where the ink is made of lemon juice and made visible by holding it over a light bulb? To be clear, the book doesn’t disappear sixty days after it’s printed; rather, each newly printed book is enclosed in a plastic wrapper. Once the book is purchased and the wrapper is removed, the ink begins to rapidly age, just like in the “Deadly Years” episode of Star Trek. If you buy a copy today, by New Year’s Eve, The Book That Cannot Wait will be nothing but blank pages.
As this video explains, it’s a high-tech method and a bold publishing move:
It’s a novel (if you’ll pardon the pun) approach. For many readers, this might be exactly the impetus they need to devote time to a reading list; for others, the prospect of “failing” (to read the book) and losing the monetary investment might make them shy away. And, of course, as serious readers know, when you love a book, you want to share it and sometimes reread it on multiple occasions, options which this seriously limits. It’s a cute publicity stunt, but Paper Doll can’t recommend any option which sets the more organizationally-challenged up for anxiety.
What do you think? Would you race to read and buy a book you knew would disappear off the page? Some people would — the first edition sold out in one day!
PAPER WRAPS ROCK, BEATS (PRACTICALLY) EVERYTHING ELSE
I know I said last week that I wouldn’t be including anything on the future of paper in this week’s post, but I’d be remiss if I didn’t call attention to Time Management Ninja’s 5 Ways Paper Beats Your Tech. TMN’s Craig Jarrow spells out just a few of the purposes (brainstorming, note-taking) and the attributes (simplicity, reliability and the gosh-darn satisfaction of manually crossing something off your list) that make paper essential for organizing thoughts and information.
Future generations may accomplish everything on glass and metal pads (just like on Star Trek), but Paper Doll still considers putting pen to paper to be the ultimate no-tech solution to many problems, and until it isn’t, I’ll be back with more ways to organize your paper (and paper alternatives), post after post.
And for this, I am truly thankful.
Happy Thanksgiving to all Paper Doll readers. May you travel safely, eat well, and enjoy your time, however you spend it. (And for you Canadian readers who celebrated your Thanksgiving last month, I’m sure you’ll enjoy the south-of-the-border peace and quiet brought on by our collective turkey-induced stupors.)
Paper Doll Contemplates the Future of Paper: Art, Music and Medicine
Our periodical forays into the future of paper are usually part of the Paper Doll Organizing Carnivals, but I’ve got so many goodies lined up for next week (a time when Thanksgiving travel and preparations will already be dividing everyone’s attention) that it seemed better to focus on the future today, and shiny, happy organizing delights next time.
A MUSEUM FOR PAPER
Just a few days ago, the culture section of the UK newspaper The Guardian ran a thoughtful piece entitled, “Can Paper Survive the Digital Age?” (We should pause a moment pause to recognize the absurdity of a blog — a piece of digital real estate — referencing a newspaper’s digital site, opining on the dubious future of paper. Moving on now.)
The columnist Ian Sansom, author of Paper: An Elegy, is known for reflecting on the paradoxical qualities of paper. After all, it’s both durable (historically) and vulnerable (to the elements and to growing user disinterest). Sansom discusses the role of paper in art, from Matisse to Miro to the modern paper art of Gordon Matta Clark, then digresses into other artistic ventures, including Pixar film creations like A Bug’s Life and Ratatouille. Architecture and literature do not escape his gaze in the evaluation of the future of paper, either.
Various bloggers were uncomfortable with Sansom’s approach, particular his notion that to prove the ongoing relevance of paper, a national or international museum, on the pattern of The British Museum, should be created in homage to paper. Of course, there are already museums for paper, from the Robert C. Williams Paper Museum in Atlanta to Japan’s Paper Museum to the Paper Discovery Center in Appleton, Wisconsin.
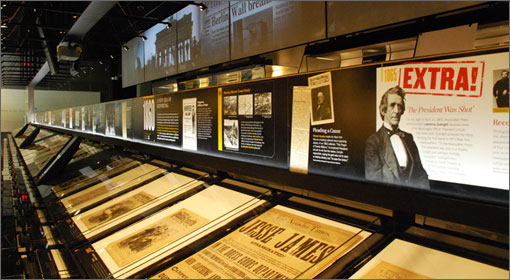
The problem, of course, is that for many, museums stultify. They entomb. The bore. To ensure paper the respected role it deserves in international appreciation, something more lively than a standard museum would be needed. Perhaps something along the lines of the remarkable and interactive Newseum in Washington, DC, a living tribute to journalism (including daily newspapers), would be appropriate.
The irony, of course, is that museums grow and strengthen their reach by expanding from the confines of their physical locations via far-flung visitors’ digital explorations.
Finally, I was still captivated by Sansom’s statement that:
We consume more paper, pound for pound, than any other product, food included. We are paper omnivores. We devour it: any kind, from anywhere.
As a professional organizer who specializes in paper, this description prompts me to see the piles of papers that haunt my clients’ spaces in a new light. It’s as though they were culinary masterpieces and sad leftovers, meals in progress and barely-chewed bits hidden in crumpled napkins. It’s vivid, apt and a bit prone to causing indigestion.
PAPER AND MUSIC
Although I love organizing paper, I’m happy for every digital solution that improves upon paper standards. So, I was delighted to read that the Brussels Philharmonic orchestra will be going paperless. The orchestra is replacing traditional sheet music with 100 individual Samsung Galaxy Note 10.1 tablet computers loaded with NeoScores music software.
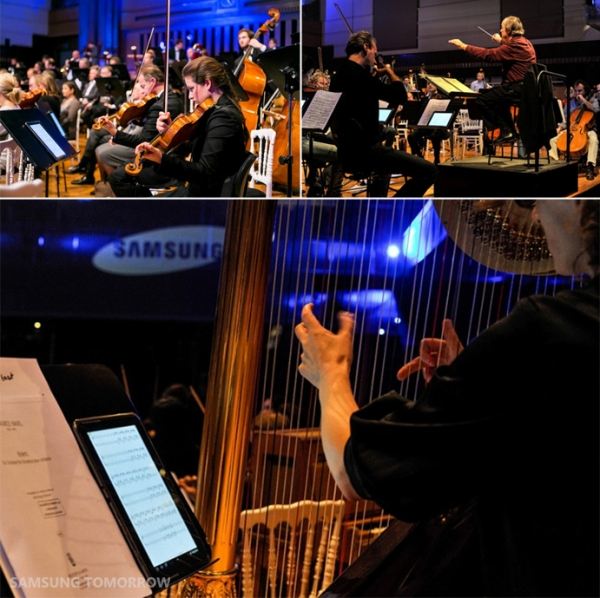
Functionally, musicians can note the music director’s or conductor’s instructions and changes, record personal notes and highlight pertinent information, save the notations and share them with other musicians. No more fine erasure crumbles or illegible scribblings. No more coffee-stained music sheets that curl at the edges or blow off the music stand.
For anyone who has ever been a musician (or loved one), you know that page-turning carries with it the potential for fumbles or catastrophes. But the Galaxy Note has a special concert mode that is likened to “flight mode” on cell phones. The feature allows musicians to program a setting which lets them securely swipe pages without accidentally skipping ahead in the musical piece.
Organizationally, this all means that the orchestra can reduce storage space and costs. And, from a financial perspective, the change from sheet music to digital will save the orchestra close to €25,000, or $35,528.
Of course, I wouldn’t expect your nearest middle school orchestra to jump on the bandwagon. Samsung donated these one hundred Galaxy Notes to the Brussels Philharmonic, which is certainly good marketing for both of them. I imagine getting enough of these for all the seventh-grade tuba-players, violinists and flautists will require more than a few bake sales, so I’m fairly confident that sheet music will be around for a while.
MEDICAL ADVANCES…ON PAPER
In medical circles, the big issue these days is EMR, or electronic medical records. Last December, at the mHealth Summit, U.S. Department of Health & Human Services Secretary Kathleen Sebelius provided a clear-headed understanding for the need to bring medical practices into the 21st century. So now, doctors who have happily (or grumpily) scribbled notes on paper charts or even dictated their charting wisdom for the benefit of medical transcriptionists are coping with the learning curve required to modernize their electronic charting skills. As the The Washington Post wrote last week,
Technology has changed most industries in recent years, but many doctors’ offices still run as they have for decades, with receptionists requesting faxed paperwork and physicians leafing through thick manila folders with years of scrawled medical history stapled inside. Medical students may now be accessing textbooks on their iPads, but much of “health care has stubbornly held onto its cabinet and hanging files,” as Health and Human Services Secretary Kathleen Sebelius remarked at a conference last year.
Some physicians have jumped at the chance, installing computers in treatment rooms — the best of the touch-typists are able to maintain eye contact with patients as they cursor around the screens, selecting short-hand diagnostic codes and text-expanding pre-created phrases. Other medical practitioners have taken to using tablet computers to keep up with their charting, adding notations as they move from room to room.
However, as the New York Times reported last month, the very issues described in “The Ups and Downs of Electronic Medical Records” are making for a shaky transition. Some of it is surely whining — just as white-color executives in the late 1980s and 1990s bemoaned the loss of secretaries and the obligation to master word processing and spreadsheets on their own, I’m sure some doctors would rather focus more on healing and less on trying to figure out why they’re repeatedly directed to click F7 to resume what they were doing in the first place.
Beyond cranky resistance to change, learning curves take time, and doctors seem to have less and less time these day. And certainly there must be some concern from a medical perspective. Computers, and especially text-expanders, macros and short-cut codes save time, but human error via “fat fingers” are more likely to cause errors that are less likely to be caught than if a physician had to hand-write a long diagnostic explanation in Latin. And, of course, there are, as with anything digital, concerns about privacy.
All this said, Paper Doll has faith that the digitization of medical records will improve medical care and organization of medical information, and decrease health care costs…eventually. Until then, I’m pleased to see paper making new and unusual strides in the medical realm.
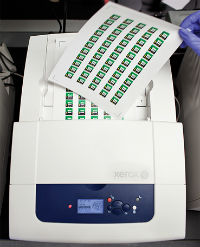
Just a few days, ago, David Hill at SingularityHub wrote about the use of an inexpensive, paper-based diagnostic test that can assess liver health in only 15 minutes from a single drop of blood. The test measures the presence of liver enzymes without requiring a lab or medical instruments.
It seems almost amazing that all that is needed is an ink-jet printer loaded with wax ink, which prints a specialized pattern on two sheets of paper. The reagents that react with liver enzymes are printed on one sheet; the other receives dyes that change color if a reaction occurs. Then, the two pieces of paper are heated and fused together, creating “channels” that work like mini test tubes in which the reactions occur. Finally, a plasma filter is added and everything is laminated together and cut into squares.
Once a blood drop is added, the color change can be viewed by the naked eye or scanned into a smart phone for improved accuracy and analysis. Liver damage or disease can be diagnosed or ruled out in a quarter of an hour!
Harvard Professor George Whitesides developed this system, and supported by the Bill and Melinda Gates Foundation, created the non-profit Diagnostics for All to provide “low-cost, easy-to-use, point-of-care diagnostic devices designed specifically for the developing world.” Among Diagnostics for All’s innovations is a paper-based microfluidic diagnostics kit enabling screening for preeclampsia, anemia, and abnormal glucose levels for the detection of high-risk pregnancies.
These are just some of the many paper-based medical diagnostic advances. The approach started with an older format made from nitrocellulose, where an adhesive plasticky membrane has been used by all kinds of medical researchers to detect antibodies, proteins, and DNA — it’s the basis for store-bought pregnancy tests.
But tech blog Futurity.org explains that there’s a way to coat common paper, the same kind sold at office supply stores and probably sitting in your printer right now, so that while it’s smooth to the touch, it would actually be “sticky” to medically-related chemicals. Daniel Ratner, assistant professor of bioengineering at the University of Washington, developed the method for using an inexpensive industrial solvent, divinyl sulfone, to make paper adhere to “medically interesting molecules.” It’s expected that this new method might be able to inexpensively text for diabetes, influenza, malaria and other medical conditions and diseases.
And there are more breakthroughs in paper medicine. Earlier this year, chemical researchers at the University of Texas developed a 3-D paper sensor that can be printed on a standard office printer, folded, and used to test for things like malaria and HIV…for about ten cents per printout!
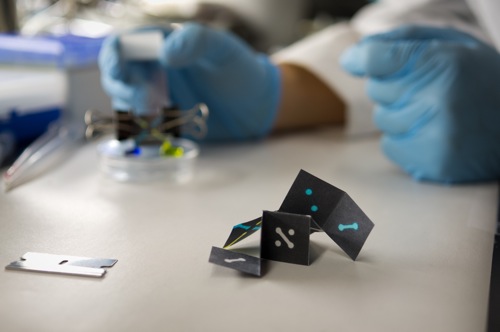
2012 Alex Wang
Unlike the pregnancy tests on nitrocellulose described above, these 3-D sensors — created from the simple origami-like folding of the papers — can test for a larger number of chemical substances over a smaller surface area and thus provide results for more complex kinds of medical tests.
While these paper advances would be used primarily in developing nations where hospitals and medical labs are few and far between, the implications are impressive and immeasurable. Without the need for the “clutter” of materials for expensive lab tests, diagnoses will be made more quickly, treatment plans clarified and more lives saved — something that would have been science fiction just a few years ago.
What a cool future for paper!
Follow Me