Archive for ‘Digital’ Category
How to Create Your Apple & Google Legacy Contacts
RECAPPING DIGITAL SOCIAL LEGACY ACTIVITY
Last week, in Paper Doll Explains Digital Social Legacy Account Management, we talked about the importance of your digital social legacy, and all the social, emotional, financial, and other reasons why you might want to set an official legacy contact or make sure your digital executor (or digital heir, representative, or designee) can access your digital content and preserve your legacy.
We also saw that most social media platforms have disappointing digital social legacy management tools. Facebook has an official legacy contact, but the instructions are out of date and wonky. Facebook owns Instagram, but there’s no Instagram legacy contact option.
Further, even though Facebook and Instagram, as well as LinkedIn (which also has no legacy contact) will allow you to memorialize your account, only Facebook allows you to name someone to access your data, share it with your family, or preserve your content anywhere other than on the social media platform. And Twitter (X) and TikTok don’t have any policies for memorialization.
Basically, with the exception of Facebook, unless you provide your login credentials to a loved one (which may be considered a violation of terms of service on some platforms, like LinkedIn), there’s no completely kosher way to ensure that your digital social legacy is preserved.
Luckily, Apple and Google are far more prepared to help you and your loved ones secure your digital legacy. Today’s post provides the lowdown on what you need to do to lock everything down now so that your preferred designee can access and distribute your digital assets the way you want.
Designating Your Digital Legacy Contact
Last week, we looked at your best bets for putting your digital legacy in the good hands of your digital executor (or digital heir, representative, or designee). I wrote:
-
- Whom do you trust to carry out your wishes, or anticipate your preferences if you leave no instructions?
- With whom will you still be in close contact by the time a digital social legacy has to be managed?
- To whom are you comfortable giving access to private conversations?
- Which of your friends is likely to stay current enough with technology to be able to handle your digital legacy?
So, yes, you have to trust that the person you pick will follow your wishes, just as a traditional executor of a will. By the time of your demise, you’ll still want them to be close to you.
Whereas social media content is already pretty public to begin with, your digital executor must be someone in whom you’re secure granting access to your whole portfolio of digital assets. Things get much more complicated when we’re also considering your photos, emails, text messages, documents, apps and pretty much anything you access by using your Apple ID or Google credentials (including any small business venture you run)
Finally, with regard to last week’s criteria, your pick has to have more specific technological savvy. If your digital executor has lived in a 100% Android world, will they find it frustrating to amble through your all-Apple neighborhood? On the other side, while most people have some experience with Google products, Apple folks may get stuck on Android mobile quirks.
Technology Confusion via GIPHY
CREATE AN APPLE LEGACY CONTACT
Simply put, an Apple Legacy Contact is the person you designate to have official access to your Apple ID/account after your death. This is not merely someone having your login credentials. Rather, it’s a secure method for giving your trusted contact access to the data stored in your Apple account once you’ve passed away.
Remember, your data covers more than pictures and notes; it’s literally everything associated with your Apple ID, from the content of your cloud accounts to backups and current materials on your Apple devices, whether via iOS, MacOS, or iPadOS.
Prepare to Add Your Apple Legacy Contact
My foregoing suggestions notwithstanding, your Apple Legacy Contact can be (almost) anyone you want. They don’t have to own an Apple device! They don’t even have to have their own Apple ID. (Though they will be assigned a special one later, but not until you make your untimely departure.)
However, your Legacy Contact does have to be at least 13 years old in North America. (Other nations have different age requirements, the same as those for being able to create an Apple account, ranging from 14-16).
In addition to picking your Legacy Contact, you’ll need to make sure that you:
- Are signed into an Apple device (running at least either iOS 15.2, iPadOS 15.2, or macOS Monterey 12.1) with your Apple ID.
- Have enabled and turned on two-factor authentication for your Apple ID.
How to Add Your Apple Legacy Contact
Now that you’re properly logged in, set up your Apple Legacy Contact using the following methods, depending on what kind of device you’re using.
On a Mac:
- Click on the Apple menu in the upper left corner of your screen and select System Preferences. Click on your Apple ID.
- Click on Password & Security and select Legacy Contact.
- Click Add Legacy Contact and follow the prompts.
Be ready to authenticate your access with Touch ID (finger on your keyboard) or by entering your Mac login password.
On iPhones and iPads:
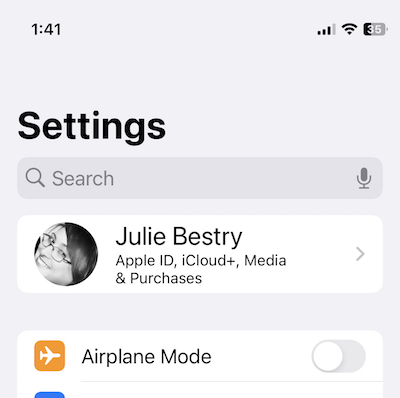
- Go to the Settings app and tap on your name. (You’ll likely see your face to the left of your name, “Apple ID, iCloud+, Media & Purchases” just below your name, and “>” to the right of your name.)
- Tap Password & Security. On the resulting screen, scroll down almost to the end and tap Legacy Contact.
- Tap Add Legacy Contact. After a resulting info page, you’ll be taken to your mobile device’s contact page. Just tap the preferred contact’s name.
Be prepared to authenticate with Face ID, Touch ID, or passcode for your device.
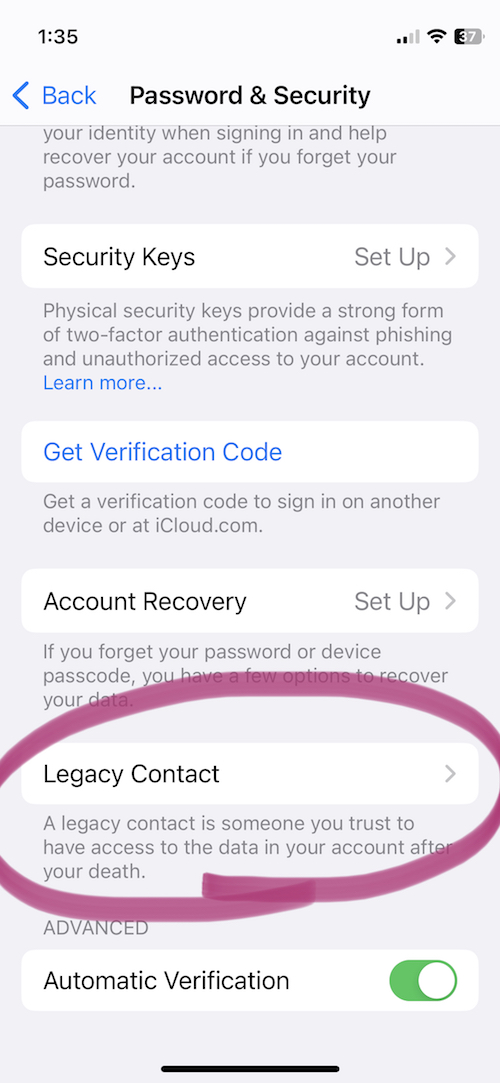
If you’ve ever used this process before to set up a Legacy Contact, once you get to step 2 (on any device), you’ll see the name/face for the person you’ve already selected. At that point, in step 3, you can add an additional Legacy Contact (you can have two or more) or tap on the name/face of your current Legacy Contact to see more info.
If you’ve just set up Taylor Swift as your Legacy Contact for the first time, or even if she was already there, the resulting page will say:
Legacy Contact:
Taylor Swift can inherit your data and use your Apple devices after you have passed away. To request access to your account, Taylor will need to provide the access key shared by you and a copy of your death certificate.
Then you’ll see two options:
- View Access Key — This will give you a screen entitled “Legacy Contact Access Key” with a QR code and a multi-line series of letters and numbers. The screen has an option to print a copy for your records or your contact. (See below for informating your Legacy Contact.)
- Remove Contact — If you click this, the contact will be removed.
If you want to remove a contact (for example, if you get a divorce from your former contact, or you have a “bad bestie breakup” with Taylor), be sure to assign a new Legacy Contact.
No matter which device you use, Apple will send you an email confirmation when a Legacy Contact is added or removed.
Inform Your Legacy Contact
The next step is to let your Legacy Contact know what’s up. (Most people would not consider this assignment a fun surprise after they’ve lost someone as dear as you!)
Print a paper copy to keep with your estate papers and/or will (perhaps in your safe deposit box) if the executor of your will and your Legacy Contact are the same person.
Alternatively, consider creating a PDF to keep on a secure flash drive with other instructions for your Legacy Contact. I gave a digital copy to my Appple Legacy Contact, but you might want to arrange for delivery only after your demise.
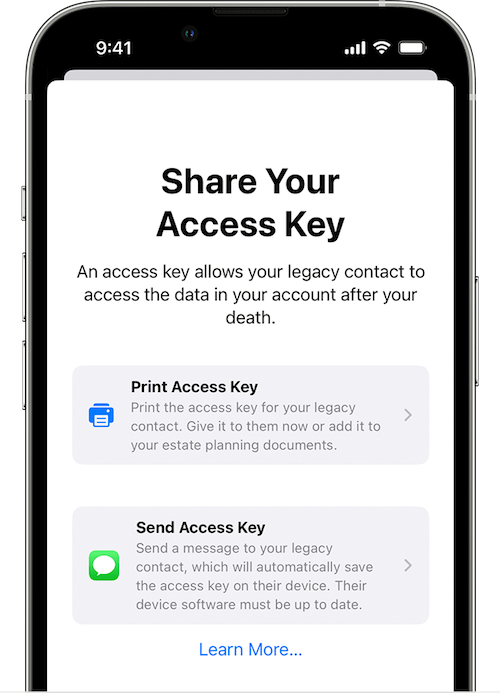
Upon creating your Legacy Contact, Apple gives you the option to print the access key or send a message. However, to send the access key via Apple Messages, your contact has to be using at least iOS 15.2, iPadOS 15.2, or macOS Monterey 12.1 or later. If they accept responsibility, their device will automatically store a copy of the access key in their Apple ID settings. Conversely, if they decline your Legacy Contact request, you’ll be notified that they noped out and you’ll be able to choose someone else.
If your Legacy Contact is using older versions of the Apple software, they’ll be prompted to update and then you can use the send a message option.
If they don’t use Apple devices at all, your only option is to give them the printed version or PDF of the access key.
What Your Apple Legacy Contact Needs to Do
Sometime, long (long, long) in the future, you will eventually pass away peacefully in your sleep. At a respectful point after that, your Apple Legacy contact will need to file an access request. They’ll need:
- A copy of your death certificate. Because of this, you’ll want to make sure your Apple Legacy Contact is, if not also the executor of your will, then someone who has at least an amicable relationship with them. (In other words, if your bestie is otherwise ideal as your Apple Legacy Contact but can’t be in the same room as your spouse or executor without everyone resorting to fisticuffs, it will likely be hard for them to access a copy of your death certificate and set things in motion.
- The Apple access key (paper or digital) you generated when you chose them as your official Apple Legacy Contact.
If they accepted the role as Legacy Contact when you shared it digitally, it’s listed under their own Apple ID. They’ll follow the same prompts as above for creating a Legacy Contact, but once they get to the Legacy Contact screen, they’ll see your name/face and will be able to tap to get further details, view the access key, and start an access request.
Your Apple Legacy Contact will use the access key to request access. Apple will review the request, verify all of the information, and (assuming everything is A-OK) give them access to your Apple account data.
“How?” you wonder?
Your Legacy Contact will be granted a special Apple ID (separate from your own Apple ID and theirs) that they must set up to access your account. Note: your own Apple ID and password combination won’t work anymore.
Your Apple Legacy Contact will only have access to your data for three years from when the legacy account request is approved. Whether they start accessing the account right away or not until months or years later, the approval date starts the three-year clock! After three years, your Apple account will be permanently deleted.
What Can Your Apple Legacy Contact Access?
First, be aware that if you have have more than one Legacy Contact, any one of them can independently access your account, make decisions about your data, and even permanently delete data (before the three-year mark when Apple will do it). So think critically before assigning two or more Legacy Contacts.
What what can your Apple Legacy Contact access? Just about anything stored in iCloud or a device’s iCloud backup. You can’t pick and choose and say your Legacy Contact can see your documents but not your photos, or can see your emails but not your text messages. Accessible data may include iCloud Photos, Apple Mail (but not non-Apple Mail platforms stored only in third-party sites, like Microsoft 365), and notes, contacts, calendars, and reminders.
They may also be able to access any iMessages backed up to iCloud, iPhone call history, files in iCloud Drive, Health Data app data, Voice Memos recordings, and your Safari bookmarks and reading list — not that you have anything embarrassing in there — as well as anything on your devices that you’ve secured in iCloud Backup, like App Store apps and all the content (photos, videos, documents, etc.) stored on your device.
However, your Legacy Contact can’t access any of your payment info on purchases made through Apple Pay or cards saved under your Apple ID, nor any of your in-app purchases. They also can’t get into Keychain to access Safari-based or Wi-Fi user names and passwords, internet accounts, or credit card numbers and expiration dates. If you want them to be able to see that information, provide it separately, outside of Apple channels.
For more, visit Apple’s Data That a Legacy Contact Can Access page.
CREATE A GOOGLE INACTIVE ACCOUNT MANAGER
While Google does not have a legacy contact, per se, it does allow you to designate an Inactive Account Manager. This lets you to grant your loved ones access your accounts and data once the accounts (and presumably, you) become “inactive.”
The Inactive Account Manager ensures that if you cease using your accounts for an extended period of time, there is a way for your digital heirs or others to prompt you to be active (if that’s physically, or metaphysically, possible) or to enable them to access accounts and data on your behalf.

(Somehow, Sleeping Beauty‘s inactivity seems more palatable than thing about a more permanent version.)
What Does Inactive Really Mean (to Google)?
You may have received an email from the Google Accounts Team this weekend. It said that as part of their efforts to protect data:
…We are updating the inactivity period for a Google Account to two years across all our products and services. This change starts rolling out today and will apply to any Google Account that’s been inactive, meaning it has not been signed into or used within a two-year period. An inactive account and any content in it will be eligible for deletion from December 1, 2023.
(…)
If your account is considered inactive, we will send several reminder emails to both you and your recovery emails (if any have been provided) before we take any action or delete any account content. These reminder emails will go out at least 8 months before any action is taken on your account.
After a Google Account is deleted, the Gmail address for the deleted account cannot be used again when creating a new Google Account.
To keep your Google accounts active, the letter pointed out that you can do anything from reading and sending an email (in Gmail), using Google Drive, watching YouTube videos while logged in, “checking in” on Android, downloading an app to an Android device, and more, as specified in their Inactive Google Account Policy.
The letter points out that you can download your data using Google Takeout, and plan for your inactivity (including any Divine Google Inactivity in the Great Beyond) by setting up the Inactive Account Manager.
Obviously, if you’re alive and kicking, you want to check into your Google accounts often enough in a two-year period that all of your account roots and tendrils won’t be pruned away. Google says it will send periodic emails to your account and any recovery email you have set up.
However, we have no way of knowing how good the Wi-Fi is in the Great Beyond, so if you want your loved ones to have access to the data in your accounts before Google deletes it, setting up your Inactive Account Manager is a wise next step.
Set Up Your Google Inactive Account Manager
Google’s going to consider you inactive after two years of inactivity, but you won’t want to cut it that closely. Choose a deadline for when the company should consider your account inactive enough — for example, after three months or 12 months of inactivity — to give your Inactive Account Manager a yoohoo. If you pass away and no longer use the account, that timeline will be triggered.
When you set up the Inactive Account Manager, you can choose to either share your data with someone or delete your account once the deadline has passed. You can also choose to share different data with different people. (So, Taylor Swift can access all YourTube videos for your family and write tribute songs based on them; meanwhile, you can designate America’s Dad, Tom Hanks, to safely review your Gmail and Google Drive.)
- Log into your Google account.
- Go to your Inactive Account Manager page. It’s initially very sparse, with some boilerplate language.
- Click Start.
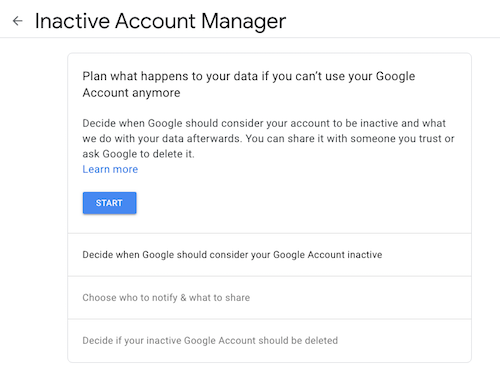
Google will walk you through a series of prompts:
- State how long Google should wait (3, 6, 12, or 18 months) before considering your account as inactive and notifying your Inactive Account Manager. (Tom Hanks loves you, but he’s a busy guy, so let’s not bother him with false starts.)
- Provide and confirm your own contact information: phone number, Google email address, and a recovery email address.
- Identify whom should be notified and which of your content can be shared with them if you do not respond to attempts to contact you. You can select up to 10 people! For each, you provide an email address and select from a long list of sharable Google-related data (calendars, contacts, Google Drive, Gmail, YouTube, etc.). You can click “Select all,” “Select None,” or specific items.
- Confirm the person(s) to be notified, and (if you wish) add a personal message that will be sent to them only after your account has been inactive for the period of time you’ve designated.
- Create an optional autoreply message to go to anyone who sends you an email at your Gmail account after you’ve been “inactive.” (Be kind. Don’t freak people out after you’re gone.)
Revise or turn off your inactivity plan at any time.
Your Inactive Account Manager will have 3 months from the time you “go inactive” to download a copy of any data that you selected from your Google account. After three months, Google will delete your account and its activity and data.
Note: if you never set up the inactive Account Manager, your digital heirs will still be able to submit a request to access or close the account. However, they’d have to go through the same onerous (and unofficial) process we discussed last week when talking about closing social media accounts: providing photo ID, sharing a death certificate, and otherwise proving authorization.
RESOURCES FOR MANAGING YOUR DIGITAL ACCOUNT LEGACIES
There are only so many issues that can be covered across two posts regarding how to handle digital legacies. You may want to review the following resources to help you develop your digital estate plan, whether involving major operating system platforms or social media accounts.
Creating Your Digital Estate Plan (Kindle) by my esteemed veteran professional organizing colleague Judith Kolberg — Judith’s books are chock-full of wise advice and clarifying narratives. This book will guide you through the essentials of setting up a plan to make sure your digital estate and legacy is handled as you want.

How To Safeguard Your Digital Privacy (DeathWithDignity.org)
How to Prepare Your Digital Life for Your Death (PCMag.com)
Ask Help Desk: How to Set Up Legacy Contacts for Your Online Accounts (Washington Post)
How to Add Legacy Contacts to Your Accounts (NOLO)
What To Do With Someone’s Social Media Accounts After Someone Dies (MyFarewelling.com)
Digital Legacy Tutorials for the Public (Digital Legacy Association)
Social Media Will Template (Digital Legacy Association)
As social media continues to grow and software-as-a-service becomes a mainstay of 21st-century life, our needs for social legacy memorials, legacy contacts, and individuals to handle our digital estates will continue to grow.
Are there issues related to this topic you’d like to see me cover? And how are you coming along with setting up these kinds of contacts?
Paper Doll Explains Digital Social Legacy Account Management
ANTICIPATE THE FUTURE
An essential part of organizing your paper and information involves thinking wisely about the future. It requires anticipating what might (or will) happen and taking precautions to make things less problematic when the possible, probable, or guaranteed happens. This is why so many Paper Doll posts deal with organizing your information to pay your taxes or cope with illnesses or prepare for the worst-case scenario.
Because we don’t know when we might get ill, or be unable to handle our financial affairs, or shuffle off this mortal coil, there are documents and actions for ensuring that others will be able to take care of what’s necessary. Some essential posts from the Paper Doll vault for accomplishing these tasks include:
How to Create, Organize, and Safeguard 5 Essential Legal and Estate Documents
The Professor and Mary Ann: 8 Other Essential Documents You Need To Create
Paper Doll’s 10-Minute Tasks to Make Difficult Moments Easier
Paper Doll’s Ultimate Guide to Getting a Document Notarized
A New VIP: A Form You Didn’t Know You Needed
Cross-Training for Families: Organize for All Eventualities
In most cases, attention is focused on tangible, paper documents. However, there are some key digital precautions that everyone should take.
HOW TO SECURE YOUR DIGITAL SOCIAL LEGACY
Until the last few decades, digital assets weren’t a matter for much concern beyond ensuring that your loved ones could access your computer. Thirty years ago, most people did not even have email. It was 1995 before Wells Fargo was one of the first financial institutions to offer online banking, and most people have only needed online credentials for their most important financial accounts in the last 15-20 years.
But then there’s social media. It’s hard for younger people to believe, but Friendster, one of the first social media platforms, didn’t start until 2002. MySpace followed in 2003, and Facebook launched in 2004, but only to college students. Personally, I started on Twitter and Facebook in 2008, and platforms like Instagram and TikTok are still in their relative infancy. (Of course, each social media platform is generally taken up by younger people before its popularity spreads.)
So, it’s understandable that, unlike making sure your loved ones or executor of your will can access your checking and investment accounts to deal with your financial legacy, most individuals have spent little time thinking about handling digital social legacies.
Perhaps you’re thinking you’ll just abandon your accounts, leaving a digital ghost town. You’ll be gone, so who cares? Right? Wrong.
First, social media accounts are always ripe for hacking; you don’t want your account and image taken over by ne’er-do-wells who might prey on unsuspecting friends or followers by faking your identity. Second, social media accounts contain a wide variety of personal information, personal and family history, and photos, things that you want your loved ones to be able to control.
If you operate a business, your social media accounts for your company are almost certainly tied to your personal accounts. (For example, you can’t have a business page on Facebook without first having a personal profile.) This means that the continuity of your company’s marketing is dependent upon control over your own social media.
And finally, there’s a personal legacy to consider. You might want to keep your accounts up, as is, after you depart for all eternity (or at least until a megalomaniacal billionaire destroys your favorite platform). But you might prefer to have it taken down so that links to it cannot be used to harm your good name or be engaged in unseemly online activity. It’s tricky.
However, none of your wishes can be followed if your loved ones lack control over your social media platforms. To that end, let’s look at how you can ensure your digital social legacy is secure.
Put Your Legacy in Good Hands
Before you consider the what, you need to select the who, in terms of whom do you want to put in charge of your digital social legacy? This may or may not be the same person to whom you’d give your Power of Attorney or have as the executor of your will or designate to be guardian of your children.
Whether you call them your digital executor, digital heir, representative, or designee, you need to ask yourself:
- Whom do you trust to carry out your wishes, or anticipate your preferences if you leave no instructions? What you think you’d want in 2023 may not include things that will be unimaginable until 2043.
- With whom will you still be in close contact by the time a digital social legacy has to be managed? It’s hard to believe, but your bestie from college may be someone you haven’t spoken to in a decade by the time you are in your 40’s. One of your closest friends in your 60’s may, sadly, not be in the world (let alone your world) when you’re all in your 80’s.
- To whom are you comfortable giving access to private conversations? You haven’t necessary said or done anything in your Twitter DMs or Facebook chats that would bring shame on your family, but maybe you went through a period where you said unkind things about your ex-spouse or had some spicy conversations? You might not want your current significant other or adult children to read everything in your private social media inbox.
- Which of your friends is likely to stay current enough with technology to be able to handle your digital legacy? Your BFF may meet all the above criteria but not know a QR code from Krispy Kreme, or two-factor authentication from two-for-one taco night. Digital skills matter.
Inventory Your Digital Social Assets
Make an inventory of your social media assets. I’ve previously written about having a general digital asset inventory. Obviously, you’ll make sure the executor of your will has access to all of your financial assets (accounts for banks, brokerage houses, etc.), and next week’s post will look at a wider array of digital assets related to your personal and professional life.
For this, you’ll need organized list or spreadsheet of all of your social media platforms indicating:
- The name of the platform (Facebook, TikTok, Instagram, etc.)
- The locations where you access it (phone, computer, tablet, etc.)
- Your screen name
- Your login credentials* or the location where you keep them
* Your login credentials should change frequently, which means you may need to update this information often. Rather than keeping your logins on paper or an unlocked spreadsheet, see if your digital password manager offers emergency account access. This allows you to set access for an individual’s email address if something happens to you.
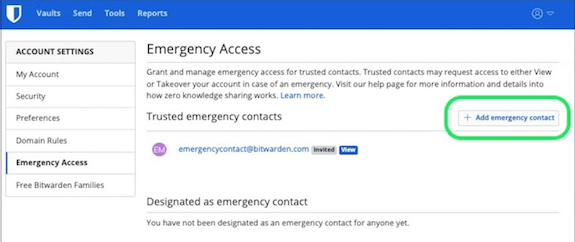
They can put in their credentials (as set by you), and you’ll be notified by email that they made an access attempt. If you’re still around, you’ll say, “Eeek! Why is the lothario I met on a cruise and married three days later trying to access my digital password manager?! I’m shutting this down and calling my attorney!” But if you take no action — because action is no longer something of which you’re capable — then they’ll gain access and be able to oversee handling/dismantling your accounts.
Once you figure out who is going to handle your digital social legacy, and have arranged for them to know where your accounts exist, there are different protocols for each platform.
Facebook Digital Legacy
One of the good things Mark Zuckerberg and company did was establish the idea of creating a Facebook legacy contact. Your legacy contact can be assigned to manage your main profile after you pass away, assuming the page has been memorialized. (You should set your memorialization preferences in your account. Anyone can request that a page be memorialized. If a request is put in, Facebook goes through a process of verifying that the person has passed away.)
A few notes: first, legacy contacts only apply to your main Facebook profile. Second, profiles don’t have to be memorialized. You can choose to have your profile deleted after you’re gone. Finally, if your legacy contact somehow doesn’t know you’ve passed but someone else requests that Facebook memorializes your account, your legacy contact will be notified by email and be able to set the rest of the process in motion.
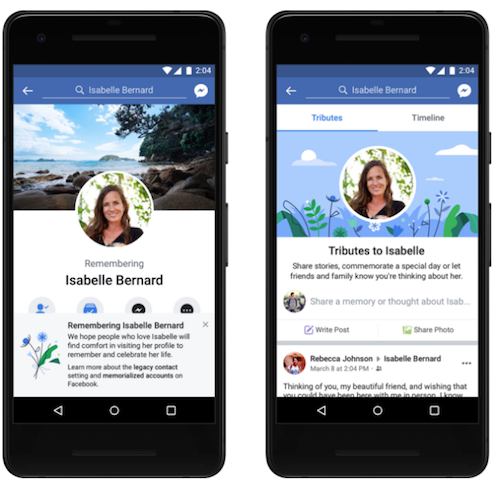
Legacy contacts can’t actually log into your account, and thus can’t read any of your messages. They also can’t remove any of your friends or make new friend requests. A Facebook legacy contact isn’t pretending to be you, just managing your account on your behalf.
What can your Facebook legacy contact do?
- Download a copy of what you’ve shared on Facebook, assuming you’ve turned this feature on. This is a nice way to create an archive of your digital life to pass down through your family, and guarantees access to photos and information even if Facebook eventually ceases to exist. (Note, if your digital designee is just logging in with your credentials, they can also download your archive, as just you can do at any time.)
- Write a pinned post for your profile. This might be used to inform others that you’ve passed, share a final message, provide details about a memorial service, or otherwise speak to issues related to your legacy.
- Update the cover photo and profile picture for your account. Consider discussing this, in advance, with your legacy contact or revisit this issue every few years, leaving instructions in a digital will where you might have a digital executor handle such things.
- Request the removal of your Facebook account after a memorial period.
Also, be aware that your legacy contact can view all of your posts, even if you’ve ever created a post with the privacy set to Only Me. (I suspect most people are less likely to have “Only Me” posts where secret, private stuff exists. I mean, who would bother posting that to Facebook only to hide it? I assume most people use Only Me posts to draft posts, then forget to change the privacy setting. No? Just me?)
To add a legacy contact to your main Facebook profile, you can try to follow the official instructions here. There are instructions for whether you’re using a computer browser, iPhone app, or Android app, and there’s a “More” dropdown for help with the iPad app, mobile browsers, or Facebook “Lite.” The variety is the good news. The bad news? They’re out of date.
Unfortunately, when I painstakingly followed Facebook’s instructions for the computer browser (so I could verify them for you), I found that the settings Facebook said would be visible were not. Blerg.
I selected Settings & Privacy, then clicked Settings, and then was supposed to see General Profile Settings, from which I was to locate Memorialization Settings. But I never saw General Profile Settings, and none of the options I clicked yielded anything that looked like that. Ugh!
Sooooo, I followed the iPhone settings, and they were also not exact. However, I was able to noodle my way to what I needed, so I’m going to give you my own directions for using the iOS app to set your memorialization and legacy contact settings (and hope maybe Facebook’s Android directions are correct).
- Click on your face/avatar on the bottom right of the iOS Facebook app.
- Scroll down to Settings & Privacy and then tap on Settings.
- You’ll see the logo for Meta (Facebook’s parent company) and then Accounts Center. The first option is “Personal details.” Tap that. Weirdly, this will open the actual Accounts Center on a fresh screen.
- Scroll down to Personal Details (yes, again), and on the resulting page, click on Account Ownership and Control.
- You will see “Memorialization” or “Deactivation or Deletion” as options. Select Memorialization. On the resulting page, you should be able to select Memorialization and your legacy contact. I’d set mine years ago, so my only options were to delete or change what I’d already created.
It’s frustrating that Facebook doesn’t make this easier, and more frustrating that their instruction pages fail to keep pace with their platform changes. Imagine how much more frustrating it would be if you waited decades and tried to deal with this while in poor health or declining cognitive capacity!
Twitter (X) Digital Legacy
Twitter has become X (but almost nobody is actually calling it that); the documentation still says Twitter. And, unfortunately, Twitter/X does not have a formal legacy contact. Instead, your digital executor or representative will have to contact Twitter directly to delete your account. (Twitter does not have memorialized accounts.)
Twitter/X is very clear that, “We are unable to provide account access to anyone regardless of their relationship to the deceased.” So, if you don’t provide login credentials for your account to your loved ones, they will not be able to archive your posts. If there’s any chance that your family will want to archive the content of your account, they should follow these steps:
- On your Twitter/X account page, navigate to settings. (In the browser, click on “More” at the bottom of the left-side column, and Settings & Support will be your last option. In iOS, click on your face/avatar, scroll down, and Settings & Support will be the last option.)
- Click on Settings and Privacy.
- Click on Your Account.
- Click on Download an Archive of Your Data. You may have to re-confirm your password or send a code shared to you by email or text.
Note: if your designee has access to your account credentials to do all of the above, they can also follow steps 1-3 above and then select Deactivate Your Account.
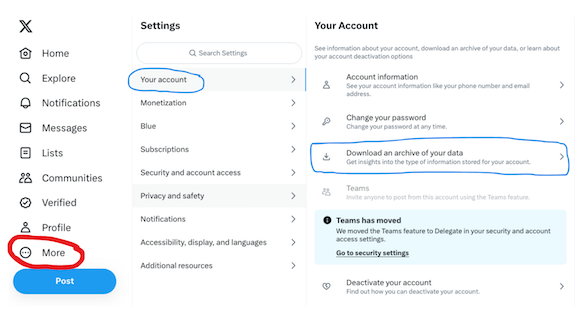
To close your Twitter/X account (without access to login credentials), someone will need to submit a request for the removal of a deceased user’s account.
They’ll need to go to the Twitter deactivation page and select “I need help deactivating and account owned by a person who is incapacitated, or deceased” and then select “The owner of the account is deceased.” They’ll then fill in the remainder of the form with their name and contact information, relationship to you (the account owner), and the Twitter account name.
Allegedly (because we’ve all heard stories about how things are going at Twitter/X these days), your designee will be emailed instructions for providing more details, including information about themselves (including proof of identification) and a copy of the death certificate, in order to process deletion of the account.
Instagram Digital Legacy
Instagram is a Facebook-owned platform, so you have the same options as with Facebook, to have your account memorialized or deleted after you pass away.
Mystifyingly, however, Instagram does not allow you to make your selections while you are still living! Rather, to have your Instagram account memorialized or removed, if your designees does not have access to your login credentials, they’ll have to follow a similar process to Twitter’s and furnish proof that they are your verified representative and that you have passed on.
This page explains how to request memorializing an Instagram account. They will start by filling out this Instagram form for memorialization or this form for deletion and provide information about themselves and the deceased, including uploading a copy of a death certificate.
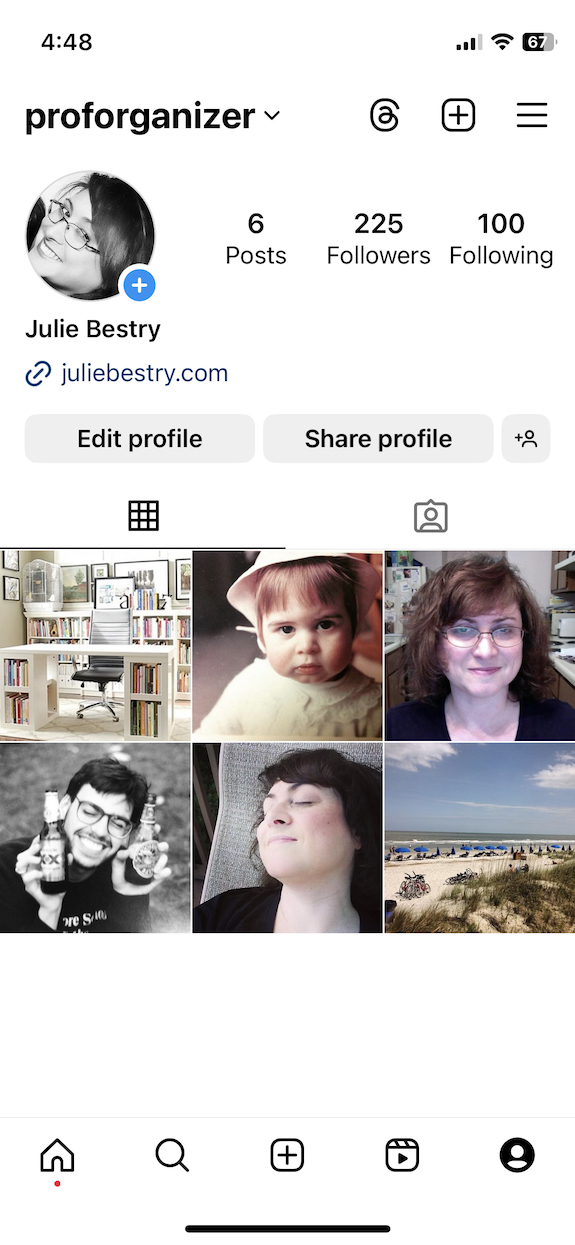
As with other platforms, if your designee has access to your login credentials, they can log in as you to download and archive your entire account for posterity. Of course, as with most social accounts, you can do this periodically on your own. I don’t really use Instagram, so my entire account activity is visible on one screen.
TikTok Digital Legacy
If you only use TikTok as a source of viewable entertainment, you may not care what happens with your account. Still, I’d advise you to have your digital executor log in with your credentials and close your account via these steps:
- Tap your Profile icon at the bottom right of the screen.
- Now tap the three horizontal lines (sometimes colloquially called the hamburger) at the top right of the screen.
- Select Settings and Privacy.
- Select Account. (The official instructions say to tap “Manage Your Account” but that appears to be an outdated choice.)
- Select Deactivate or Delete Your Account and confirm your selection.
On that same account screen, the next option down lets you choose Download Your Data; they’ll get an archive of your profile, activity, and app settings. However, the format options are TXT (human-readable) or JSON (machine-readable) files, so your loved ones will be able to see random comments you made, but not the cute videos you watched.
If you are a TikTok creator, note that there are no memorialization options. Your digital legacy contact can (as described above) act as you, with your credentials. It’s not uncommon to see someone’s parent or spouse appear on TikTok, explaining that the account holder has passed away. However, without access to those credentials, there’s no way to alert someone’s TikTok followers and fans that they are gone.
This is problematic because many TikTok creators use their accounts to earn money. Left unattended, an account (and the resultant earnings) could be hacked, and imposters could use the account to scam followers. To prevent this, and to ensure any monetization of existing videos is protected, this is one account where making sure your loved ones have your credentials and can access your account may protect not only your creative legacy, but your financial one as well.
LinkedIn Legacy Contact
Perhaps because LinkedIn is designed for professionals, you’d expect that more thought would be put into protecting account-holders’ legacies. I was disappointed, however, to find out that LinkedIn does not allow you to set a legacy contact in advance, nor can you arrange for page memorialization for yourself.
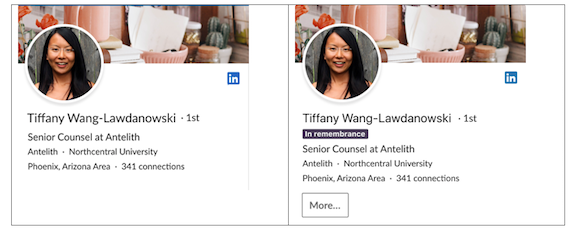
(This is LinkedIn’s official example of a memorialized account. Research indicates, and I hope, that this is not an actual person’s memorialized account.)
Your designee can contact LinkedIn, however, to arrange to memorialize your profile or close it. For either option, they must fill in a form verifying their standing to act on your behalf and providing proof of your passing.
It’s important to note that unlike (for example) Facebook’s memorialization practice, a legacy contact or representative can’t add a tribute or post explaining what has transpired. Instead, LinkedIn locks the account.
Still, there are significant benefits to LinkedIn’s memorialization process. They place a memorialization badge on the profile page as a symbol of remembrance. They also cancel all LinkedIn products (except Apple-related subscriptions), terminate connections to third-party services and close mobile and desktop sessions (so nobody can sneak into the deceased’s office or home computer to access account information).
LinkedIn also stops sending notifications to the decedent (so the loved one handling their email won’t have to deal with junk mail) and ceases sending notifications about them (re: birthdays, work anniversaries, etc.) to members of their network. The person who died will stop popping up in automated sections of the site, like “People you may know” and “recommended connections.” If you’ve ever been startled to see the name and likeness of someone who has passed away show up on your Facebook or Twitter account unexpectedly, you know how much a relief LinkedIn’s approach could be.
JUST THE BEGINNING
Social media accounts are just the beginning of your non-financial digital legacy. Next time, we’re going to look at how you can set up your Legacy Contact for your Apple ID account and an Inactive Account Manager (and Trusted Contact) for your Google accounts.
I’ll also share a bevy of resources for helping you manage accounts for those who have passed and make things easier for directing your own digital legacy.
Calm Cooking Chaos (Part 2): Organize Your Recipes Digitally

We’re now one week closer to “Recipe Season,” which spans from Thanksgiving to New Year’s Day. Whether you’re aiming to replicate everyone’s favorite tried-and-true or you’re looking to discover (or invent) a recipe to dazzle the tastebuds, it all begins with organization.
Last week, in Calm Cooking Chaos (Part 1): Organize Your Paper Recipes, we covered how to gather your paper recipe collection (from cookbooks, magazines, clippings, family scribblings, and note cards), sort them, downsize, and create a recipe binder.
BUT FIRST, WHY NOT FILE FOLDERS?
Before moving on to digital recipes, I’d like to note why I focused on binders but ignored recipe files using the same categories. Given that, as Paper Doll, I’ve brought you 15 years of pro file folder posts, a few readers wondered about this omission.
The truth is, as great as file folders are for most reference categories (including financial, legal, medical, household, and personal papers), recipes in file folders tend to be more easily forgotten. In two decades of testing recipe filing with clients, I’ve noticed that paper recipes organized in binders tend to be flipped through and used more frequently, while file folders of recipes, sorted and categorized in the same manner, tend to be ignored and often forgotten.
There’s a serendipity to opening a binder (much like a cookbook) and flipping the pages, happening upon something sumptuous — something that just doesn’t exist when having to turn floppy magazine or newspaper clippings, one-by-one, in a file folder, carefully assuring that the whole pile doesn’t fall off your lap. Recipes encased in sheet protectors, clipped into binders, are both more functional and more given to yielding inspiration.
Cooks are also more likely to stop to consider whether a new recipe is deserving of joining a binder, whereas someone using a filing system might just throw a new clipping into a folder, leading to another build-up of never-used recipes. If file folders work for you, embrace them, but I’m on Team Recipe Binder.
Now, on to the digital discussion.
PAPER VS. DIGITAL RECIPES?
Before we look at how to create a digital recipe collection, it’s important to understand why you might choose to stick with a paper system, move to digital, or embrace a hybrid approach. In part, it depends on what format of recipes you already have. If most are in hardcover cookbooks, the effort to organize individual recipes is different from what it would be if you mostly have loose clippings or even random digital versions.

Advantages using a paper recipe collection:
- No learning curve — If your recipes are already on paper, you can sort and organize them quickly and easily in your physical space without needing any new skills. Let’s face it, if you can play Gin Rummy or parcel out the mail to the right person in your household, you can sort your paper recipes and organize them (as described in last week’s post). Conversely, organizing recipes digitally will require you to use basic computer or smartphone skills; if you don’t already have those skills or don’t want to learn them, paper might be better for you, at least for now.
- No technology required, Part 1 —You don’t have to keep a digital tool (computer, phone, or tablet) in your cooking space, where things can get wet and/or sticky.
- No technology required, Part 2 — Cooks whose recipe collections are solely on paper aren’t dependent upon electricity, internet, or Wi-Fi. If you tend to cook in a rustic old cabin, or your home is far from cell towers or internet service, paper might be better for you than digital.
- Nostalgia makes some meals taste better — There’s a sense of warm wistfulness when you cook with a recipe card written by your great-grandmother. If that means something to you, you may not get as excited about organizing your recipes digitally.

Moving from a paper recipe collection to one that is all digital has a different set of advantages:
- Digital recipes are accessible from anywhere — If you visit your adult children across the country, you can pull up your child’s favorite cake recipe and share it with their spouse in a matter of seconds. (Do not malign the spouse’s cooking skills. That’s a no-no!)
- You can share digital recipes easily — If someone wants to try making your favorite recipe, there’s no hand-copying or searching for a scanner. Opt for texting, tweeting, or (if you’re in the same space and both iOS users) Airdrop.
- You can eliminate all the recipe clutter from your home once you go digital — So many of my clients are eager to downsize in retirement but are overwhelmed by how they’ll fit their cookbook collection and piles of recipes in a much smaller kitchen space. Going digital means they don’t have to worry.
- Recipes won’t get misplaced, Part 1 — With a paper system, there’s always a chance for human error and sliding a recipe back into the wrong space, but if your recipes are on the computer or in the cloud, they’re backed up. (You do regularly and automatically back up your computer, right? If not, be sure to check out Paper Doll’s Ultimate Stress-Free Backup Plan.)
- Recipes won’t get misplaced, Part 2 — Search is magical. Whether you’re doing a simple search of your computer or a fancy-pants Boolian search with lots of “this ingredient AND that ingredient BUT NOT this other ingredient” options, digitizing your recipes makes it easier to find what you want.
- You can add/create recipes in more ways (again, without clutter) — There are so many ways to add recipes to your digital collection through various digital capturing methods:
- Photograph or scan the recipe via an app
- Use a traditional scanner
- Use the Web Clipper in Evernote (of which, more later) or a similar capture method in a recipe-specific app.
- Accept a shared recipe via Airdrop, email, or texting to get it into your digital space and then move it where you want it to live.
- Type a recipe from scratch (or even handwrite it into your phone or tablet with a stylus or Apple pencil). This works whether you’re copying an old recipe or creating a new one.
- Dictate the recipe into your computer or mobile device using the built-in dictation system.
What about a hybrid system?
There’s no reason that you have to choose between paper and digital recipes. If you’re feeling iffy about a move to a digital collection, but are overwhelmed by all of the paper recipes you have right now, explore baby steps toward getting comfortable going digital.
For example, you could keep your cookbooks, but start transitioning your clippings and loose recipes to a digital system. Or, you could begin a practice of backing up all of the family favorite recipes to digital so that all of your adult children (or grandchildren) can impress their friends and make those beloved dishes year-round, not only when you’re all together. (Trust me, a recipe will be just as delicious even if it’s not limited to once a year.)
YOU COULD START WITH A BASIC DIGITAL RECIPE FOLDER SYSTEM
In a comment on last week’s post, my colleague Sabrina Quairoli mentioned her approach:
Some years ago, I decided to get rid of my paper binders and go digital with those recipes. I scanned them using the Tinyscanner app and saved them in a folder by the recipe’s name. It works great, and I still pull from these recipes every so often.
A digital recipe filing system like Sabrina’s is similar to a recipe binder or file folder system. It allows you to “file” your recipes into digital folders by category, such as “meat entrées” or “desserts” with little muss or fuss. Whatever category you might have in a tangible system can work in a digital one.
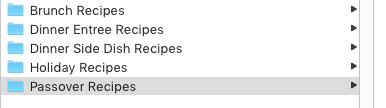
Whether your recipe files are on your computer or in a cloud-based system like Google Drive, you get to create basic categories, and then use the search function to find recipes by keywords in their names as well as content in the saved files, dates created/modified, and so on, as with all computer files. The learning curve here is low; anyone who already saves files and knows how to search them can use this method.
UPGRADE AND ORGANIZE YOUR RECIPES WITH EVERNOTE
As an Evernote Certified Expert, this upgrade is my favorite option to recommend to clients who are tech-inclined. There’s a slightly steeper learning curve (but you can build up to mastery, starting with skills you already have).
Evernote is a step-up for cooks who already have recipes in any digital format, like Word or Google docs stored on their computers or in cloud accounts, as well as recipes in any kind of digital note app, photo app, or scanned files. But with Evernote, you have some extra advantages over other digital systems.
Capture
Cooks can use all of the methods I described above (scan, type, record, etc.) to get a recipe into Evernote, but the platform has some additional goodies:
- Record recipes verbally — If the elder chef in the family isn’t much for writing down the ingredient measurements or instructions, you can just tap and record as they cook, creating a legacy recording of what they’re saying and any questions or observances you make as they work. This is a fun, interesting alternative to using the dictation function.
- YouTube — Evernote has a nifty feature where, if you put a YouTube link into a note, instead of just being able to see and click the link, the entire video appears. If you’ve got a favorite recipe you’ve watched on a YouTube cooking channel, you can capture and watch the entire video right from your note, then type as you watch to add ingredients (so you can make a shopping list) and note any vital instructions.
- Autocapture — If you’re not so adept at taking close-up photos or scanning with your phone’s camera, Evernote has you covered. You can set your in-app camera to Auto mode, then hold the phone steady over any recipe or card so that the edges of the paper are visible inside the frame. Evernote’s camera will automatically detect, focus, and take a great snapshot of your recipe. (See below. Note: there’s no audio.)
- Web Clipper — Customize how you capture a recipe. One of the nifty things about the web clipper (available on all the major browsers, like Chrome, Safari, Internet Explorer 7+, Firefox, Opera, Microsoft Edge for Windows 10+) is that you can choose how much of a page you want.
Have you noticed how much extraneous material is on some web pages, especially those with recipes, like ads, pop-ups, navigation panels, etc.? The Evernote Web Clipper lets you choose how you want a page clipped. There’s Article (the main section of the page), Simplified Article (which removes ads, formatting, and layouts), Full Page (a copy of everything in the window, Bookmark (a link with a thumbnail photo), and PDF.
- Create your own recipes as new notes — In addition to all of the creative methods, there’s also the standard one of typing your recipe in. Initially, I was going to tell you that Evernote has stellar templates — just create a new note, give it a title, and instead of writing in the body of the note, click “Open Gallery” to select a template.
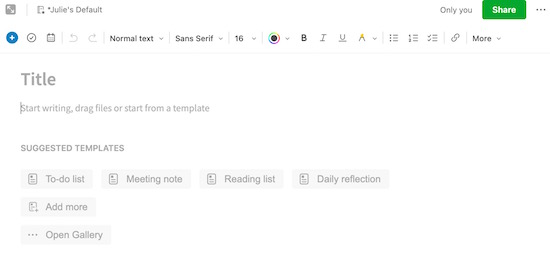
But I was surprised to learn that right now, there are no recipe templates (although there is one for menu planning). As I started writing this post, I texted my colleague Kimberly Purcell, whose entire business, Amethyst Productivity, focuses on Evernote training.
Kimberly is a foodie and cook (and her husband is even a professional chef!), so I turned to her the other day and challenged her to design a recipe template for the new section of templates created by Evernote Experts. So, if you’re an Evernote user already, when that template pops up someday soon, you’ll know how it got there!
Annotate and Add Materials
Evernote’s Web Clipper also lets you capture selected areas of a web page, which is great for those times when a site has multiple recipes on a page and you just want to capture that gorgeous Icebox Cake and not those Brussels Sprouts. You can change formatting (bold, italics, underline), font, and size of anything you input yourself, and you can choose highlight colors.
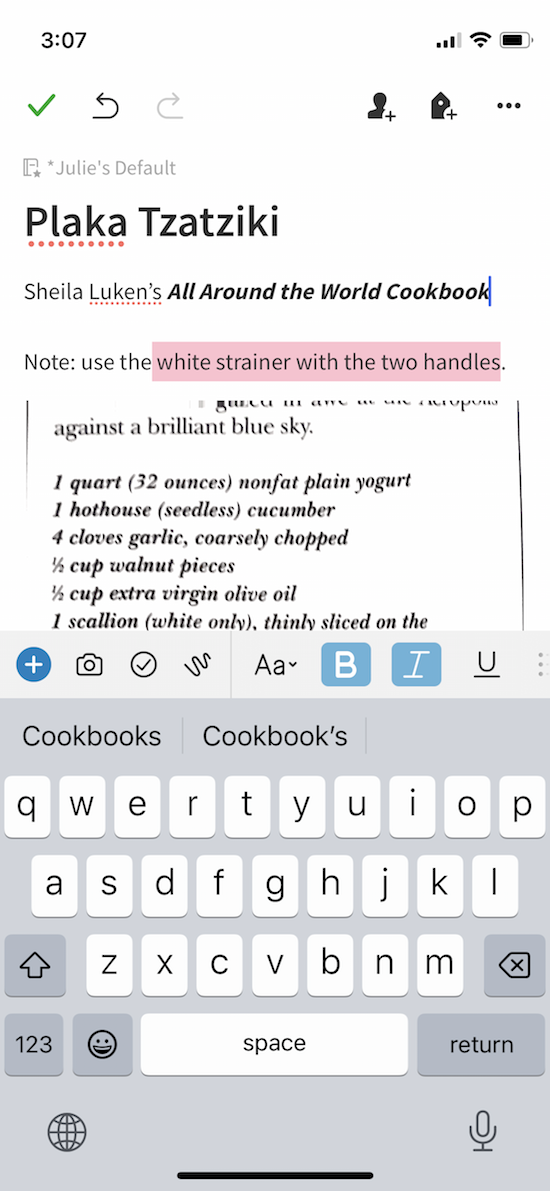
- Customized Clips let you annotate your captured recipes. Evernote has annotation tools to let you add shapes, colors, and stamps (with text) to let you tweak a recipe you capture. You can annotate recipes whether you clip them with the Web Clipper or capture them through scanning, photos, or any other method.
- Add your own photos and comments to your recipe collection. — Not only can you save the photo from a cookbook, print, or online recipe, but you can add your own photos of how you’ve created, plated, and garnished a recipe. Then, whether you include text or annotation via Evernote’s tools, you can add your own notes to recipes you’ve acquired to say how you’ve tweaked it for your preferences, keeping the original and updates all visible but without clutter.
Tag Recipes to Increase Search Capabilities
The basic format of Evernote is to create notes and then related notes can be grouped into notebooks. However, there’s an additional system that allows you to create tags, like little sticky-note tabs, to connect recipes with important information.
So, you might have notebooks with all the general categories (appetizers, salads, entrées, desserts, etc.) we discussed last time. But then you can create much more granular notations with simple tags to label, and later find, any or all elements:
Cuisine/Ethnicity: Italian, Indian, Mexican, Chinese, Mediterranean, etc.
Diet Type: vegetarian, vegan, low-sodium, low carb, gluten-free, high protein/keto, kosher, halal, etc.
Meal experience: breakfast, brunch, lunch, dinner, dessert, sides, appetizers, beverages
Main ingredient: eggs, pasta, fish, chicken, beef, cheese, chocolate, etc.
Prep or Cooking Time (or separate tags for each): 10minutePrep, 30minutesPrep, 45MinuteCook, etc.
Cooking method (gadget or method): oven, stovetop, toaster oven, grill, crock pot, air fryer, Instant Pot, etc., or bake, fry, roast, slow cook, sheet pan, etc.
Holiday or seasonal item tags: Thanksgiving, Christmas, Hanukkah, New Year’s, SuperBowl, picnics, barbecues, autumn soups, winter casseroles, etc.
Recipe origin — You might put the name of a cookbook or magazine, the name of the person who gave you the recipe, or note whether it’s a family legacy (on your side or your spouse’s side) recipe.
Family-specific tags — Whether someone loves or hates a recipe (or an ingredient) or is allergic, you can create whatever tags you like to quickly add or eliminate a recipe from a search.
Tagging is easy. Just click the tag icon when you create a recipe note; if you’re clipping a recipe with the Web Clipper, you’ll be offered a field to type tags. As you type, if you’ve already created a tag, it will auto-populate the field (just like when you type on Google).
Notes About Evernote Search
Organizational structure is always important. That said, whatever system you use, digital organization can be about more than hierarchy and structure because of the availability of search, and Evernote’s search is powerful. Beyond looking in a specific notebook, you can:
- Use search if you can’t remember the exact recipe, but you know you have one that uses kale and cod, or chocolate and heavy cream.
- Use the optical character recognition aspect of Evernote’s search text in photos or scans of handwritten recipes. Seriously, if you scan in a photo, search can read and find text in the photo. As for handwriting, it does a better job with printing than cursive, but I’m impressed it can read my writing.
- Use a combinations of tags to search for dinner recipes with a main ingredient of fish, made with a sheet pan, that you can finish in 20 minutes, and which does not include garlic. Or a kosher recipe for brunch that uses salmon and dill. Boolian search is mindblowing!
As you know from last week’s post, Paper Doll is not much of a cook, but the leader of the Evernote Certified Expert, Brittany Naylor team does cook. Last year, she was interviewed by fellow Expert Vlad Campos on a few Evernote-related subjects, and provided a peek into her own digital recipe collection, talking about how to Create A Smart and Beautiful Recipe Book on Evernote.
CONSIDER PINTEREST IF YOU PREFER VISUAL RECIPE ORGANIZATION
Not everyone wants to reinvent the recipe wheel. If most of your recipes come from food websites, recipe blogs, or social media, you can use Pinterest to save your recipes, as well as to search for recipes from within Pinterest (pinned by other users) that fit your interests. And then you can save other people’s recipes to your boards, too.
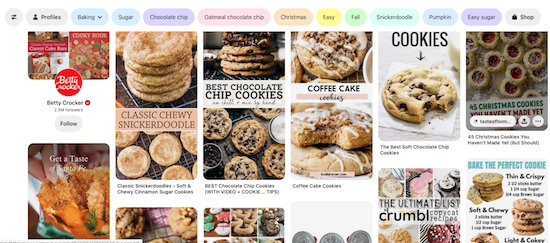
You’ll need to set up a Pinterest account, and then create boards for your overarching categories (like Dinners or beef recipes or cookies). If you’ve never used it, you can click on my Pinterest page to see all of the organizing (and other) boards I’ve created.
When you see a recipe you like on the web, simply click the “Pin” icon that hovers over most photos on the web, or use the share option on your mobile device or the pinning applet in your browser.
Beyond boards, Pinterest has no complex structure, and your ability to provide keywords or tags is limited to the little comment field at the bottom of your pinned item. Think of it as the digital equivalent of clipping a recipe from a magazine, pinning it to a cork board, and writing a note in the margin.
So, you can’t be as granular or creative with tagging as you could be with Evernote, but if you prefer simplicity and a search as familiar as Google’s, Pinterest might be your preference.
APPS FOR ORGANIZING RECIPES DIGITALLY (PREVIEW)
The above methods all use digital platforms that already exist for other purposes — computer files, Evernote notes, Pinterest pins — to organize the recipes you already have and the ones you want to collect in the future. But what if you want a system that was specifically developed for organizing recipes?
As you may have guessed, there’s an app for that.
Actually, there are dozens of apps for that. Next week, in the final installment of this recipe-oriented series, we’ll look at a number of recipe organizing apps — some that are famous and have been around for a long time, others that new but gathering steam. (And no, that wasn’t a cooking pun, unless you enjoyed it.)
We’ll even revisit a fabulous app that helps you to index, discover, and organize your recipes with a bit of a social aspect.
So, be sure to put next week’s post on your colander calendar. Until then, keep planning your Thanksgiving week meals, and please let me know in the comments if you have a preferred method for organizing your recipes digitally.
Paper Doll Responds When They Say “Be Our Guest”
The theme of this week’s post has become somewhat bittersweet since the I originally conceived it. On Tuesday, October 11, 2022, Dame Angela Lansbury passed away at the age of 96. Depending on your age and tastes, you may know Lansbury from various points in her eighty-year career.
If you’re a cinephile, you may know her from films from her earliest role in Gaslight and in the 1940s to The Manchurian Candidate in the 1960s and Bedknobs and Broomsticks in the 1970s, to Anastasia, Mary Poppins Returns and the Knives Out sequel, which hasn’t even been released yet!
If you’re a fan of Broadway, you could have caught her in anything from Stephen Sondheim’s early Anyone Can Whistle to the title role in Auntie Mame to the distasteful pie-baking Mrs. Lovett in Sweeney Todd: The Demon Barber of Fleet Street. And, if you watched television in the 1980s, 1990s, or 2000s, then you probably knew her best as Jessica Fletcher from Murder, She Wrote.
However, if you’ve been a kid or a parent or a baby sitter any time since 1991, then you will recall Lansbury voicing Mrs. Potts (alongside Jerry Orbach’s Lumière) in the classic animated Disney production of Beauty and the Beast. And if you’re wondering what any of this has to do with organizing, here’s a hint:
Perhaps this post’s theme might seem less shoehorned in (if less palatable) if I could sing it to you. But recently, I was asked to serve as a guest and offer advice and information on three disparate topics: productivity, technology, and paper, and I’d like the opportunity to share this material with you.
THE CHATTANOOGA TIMES FREE PRESS EDGE MAGAZINE
On October 20, 2002, almost twenty years ago, in Professional Organizers Are A Growing Trend, I was profiled in the Chattanooga Times Free Press for the first time. Over the years, I’ve been delighted to be interviewed, right up through March 2021, when I was profiled in the newspaper’s Edge, a business-themed magazine.
However, I was particularly giddy when Jennifer McNally, the new editor of Edge asked me to write the October Business Acumen column in an issue devoted to staying productive. While the issue is geared toward professionals and business owners in the Chattanooga region, I think you’ll find it informative and appealing, no matter where you reside or what you do.
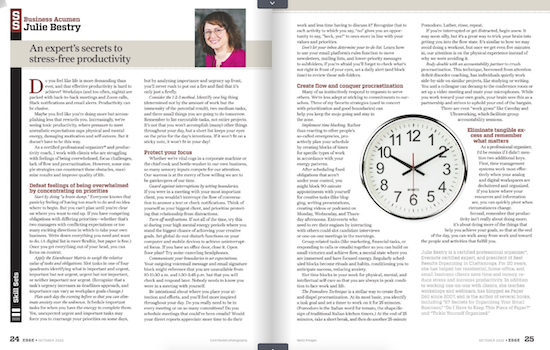
You can read the entire October issue of the Edge — my column spans pages 24 and 25, but other columns range from How to Own Failure (and Still Preserve Your Reputation) to the Take It From the Top series with advice from Chattanooga leaders on issues ranging from tracking goals, focus, and discipline to allocating time strategically and anticipating challenges.
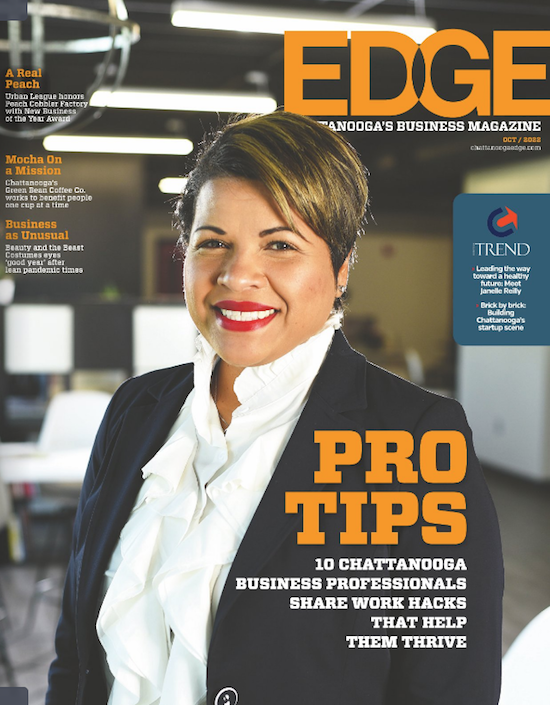
You can also head directly to my guest Business Acumen column, An Expert’s Secrets to Stress-Free Productivity on the newspaper’s site. To give you a taste, it starts with:
Do you feel like life is more demanding than ever, and that effective productivity is hard to achieve? Workdays (and too often, nights) are packed with back-to-back meetings and Zoom calls, Slack notifications and email alerts. Productivity can be elusive.
Maybe you feel like you’re doing more but accomplishing less that rewards you. Increasingly, we’re seeing toxic productivity, where pressure to meet unrealistic expectations zaps physical and mental energy, damaging motivation and self-esteem. But it doesn’t have to be this way.
In the column, I share my strategies for conquering overwhelm by identifying your priorities, protecting your focus, creating flow, and conquering procrastination. I encourage you to take a peek and let me know what you think.
THE STREAMLINED CONNECTION
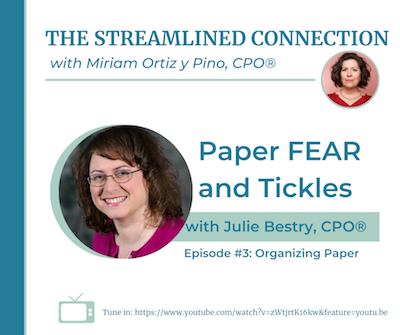
A particularly charming guest experience was getting to be on my friend and colleague Miriam Ortiz Y Pino‘s video podcast, The Streamlined Connection.
Miriam is a Certified Professional Organizer and Money Breakthrough Business Coach. Her company is More Than Organized, and she’s a firecracker! Like me, she’s been at this for more than two decades, and Miriam’s got an amazing way of creating transformation.
Miriam offers one-on-one in-person and virtual services including organizing, business coaching, speaking, and training in a variety of areas (including the fascinating topic of Sacred Money Archetypes). Miriam also delivers Streamlined Solutions courses for tackling clutter, time troubles, and paper, and live and virtual group workshops for professionals.
It’s an absolute trip to talk to Miriam, because every conversation yields insight. So, I was tickled to be the first guest on her show.
As a Paper Doll reader, you will not be surprised that, when given the opportunity to talk about organizing, I chose my favorite topic, paper. However, unlike when I talked about the philosophical aspects of Why Paper Still Matters on the NAPO podcast earlier this summer, Miriam and I went in a different direction.
On Organizing Paper with Julie Bestry: Paper FEAR and Tickles, we explored the nitty gritty of the frustrations of different types of paper clutter, and how strategically considering both fear and tickles can help you dig out from under.
Miriam has since had some organizing and productivity industry rock stars as guests, including Amy Payne, Regina Lark, Geralin Thomas, Mike Vardy, Leslie Josel, Robyn Reynolds, and Nietra Rose! (Seriously, check it out!)
ORGANIZED ASSISTANT
The amazing (and Canadian) Janet Barclay has graced Paper Doll‘s pages many times over the years. I’ve known Janet since the days before modern social media, when we were both getting the hang of things on Ryze.com. (Don’t go visit; it’s all spam now. Sigh.)
Although Janet started out as a professional organizer and productivity consultant, she eventually found and perfected her niche in supporting organizing professionals. She works her magic as a “website caregiver and designer,” which means she helps people keep their online identities afloat so we can focus on our own clients. She rocks that way.
But Janet rocks another way, as one of the biggest cheerleaders of the organizing and productivity profession. Her Organized Assistant web site is home to blog posts and articles that provide a broad perspective for those of us who work in the field, but she also created the Productivity and Organizing Blog Carnival for the reading public, collecting monthly themed posts on categories ranging from organizing junk drawers to efficiency in the workplace to organizing when a member of the family is ill.
I’m proud to say that I’m one of Janet’s Megastar Blogggers, having contributed to more than 50 monthly carnivals, and am joined by my fancy-pants colleagues Hazel Thornton, Linda Samuels, Sabrina Quairoli, and Seana Turner.
 In the spring, I referenced having recertified as an Evernote Certified Expert. As I often talk about the reasons I love and use Evernote, Janet asked if I’d like to share the certification process with her readers, and I was only too excited to do so.
As an Evernote user, it was easy to pull together my resources for the guest post. I had notes from my original certification as an Evernote Certified Business Consultant in 2015, then as an Evernote Certified Consultant a few years later, and now under the current program, an Evernote Certified Expert. Evernote’s so-powerful-it’s-spooky search capacity found everything I needed to write Adventures in Becoming an Evernote Certified Expert. (This also means I had no excuse for procrastinating on actually writing it!)
Hopefully, you’ll be entertained as you learn about my experience getting certified, and it may encourage you to get certified, use the skills and support of an Evernote Certified Expert, or just learn more about Evernote in its newest incarnation as so much more than just a note-taking app.
Writing this, I’m shocked to realize it’s been nine years since I’ve written an entire post about Evernote. It’s a completely different platform now, with so many more features and opportunities to organize your digital life. So, don’t be surprised to see more Paper Doll posts in the future regarding how you can use Evernote to be more organized and productive.
BE YOUR GUEST?
As much as I love working with my in-person and virtual clients, giving presentations, and writing this blog, it’s even more fun when I get to share a (digital) stage or blog space. As I’ve reported, throughout 2022 I’ve been on a variety of podcasts and have guested at various summits, about which you can read more:
Paper Doll on the NAPO Stand Out Podcast: Why Paper Still Matters
Paper Doll Picks: Organizing and Productivity Podcasts
Paper Doll on Planning & Prioritizing for Leadership
Paper Doll Shares Secrets from the Task Management & Time Blocking Summit 2022
Not enough Paper Doll for you? You can also check out my Press Room page for more links to interviews and guest spots.
If you have a podcast, summit, or blog for which you might like to interview me on topics related to paper and information organizing or productivity, please feel free to use the Contact page on my site to let me know how we might work together.
ONE LAST LOOK AT MRS. POTTS & LUMIÈRE
Paper Doll cannot live by organizing alone, and I hope that as my guests, you take some delight in the pop culture cameos that have populated this blog since 2007.
Whether solving crimes as Jessica Fletcher or making the worst pies in London as Mrs. Lovett, or getting nominated for Academy Awards, Tony Awards, Golden Globes, or Emmy or Grammy Awards, Angela Lansbury was beloved. And as Lumière to her Mrs. Potts, Jerry Orbach (Law & Order‘s Lennie Briscoe, Baby’s father in Dirty Dancing, and in oodles of other roles on stage and screen) was no slouch, either. With that, I’d like to close today’s post with this behind-the-scenes view of how they put together “Be Our Guest.”
Thank you for being my guest at the Paper Doll blog, and thank you for letting me be a guest on your computer and mobile devices all these years.
Do (Not) Be Alarmed: Paper Doll’s Wake-Up Advice for Productivity
September’s approach means many things: a new school year, a new television season, Europeans coming back from their August-long vacations.
But in September, when I see kids lined up for the school bus, I remember when I went to kindergarten and Paper Mommy bought me a giant, orange, retro, two-bell alarm clock.
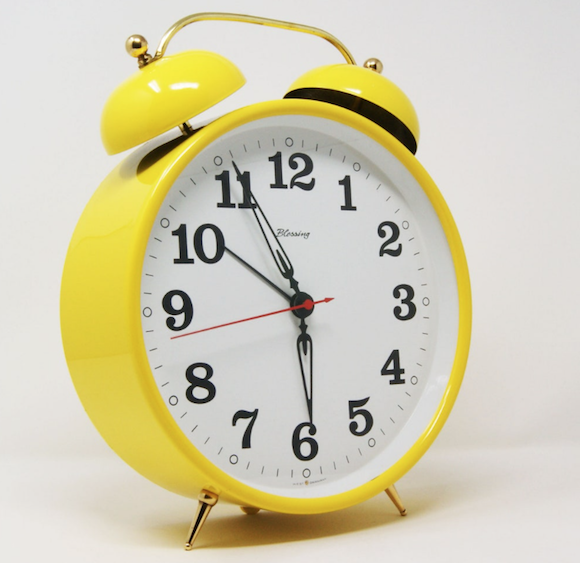
(I realize this is yellow and not orange, but we don’t have a photo of my childhood alarm clock. This is a very close reproduction.)
You could see the clock from any vantage point in my room, and the ring was sonorous. There was no way I’d ever oversleep and miss the school bus with that loud din. (Initially, as with all school-related things that year, I was excited. But it takes about three days of being awakened by something that loud for the delight to wear off.)
If you think about it, time management and productivity begins with waking up in time to set your plans in motion, so I thought we’d take a foray into idea of waking up on time.
A SHORT HISTORY OF ALARM CLOCKS
The alarm clock — even the very concept of waking up at a specific time — is fairly new.
Throughout history, people were generally awakened by natural occurrences: the sun rising (and warmth on one’s face or light in one’s eyes), the crowing of roosters, the crying of babies, or the call of nature. City dwellers might have been awakened by church bells or street noise, but farmers far from villages were dependent upon their own natural body clocks and the people and animals around them.
These not-very-specific waking hours were not a problem for most people until the Industrial Revolution in the 19th century. Before that, unless you were within proximity of a clock tower or your family had the wealth to own a clock at home, it was enough to speak generally of meeting someone at dawn’s first light or midday or supper time. However, with the advent of trains (and the ability to catch them) and factory work, it became essential to know the specific time of day. That included waking up on time.
Before the invention of alarm clocks (and into the twentieth century), city dwellers in the UK hired “knocker uppers,” people who would literally knock on one’s windows and doors with everything from broom handles to batons (as in police sticks, not beauty pageant contestant’s silver poles with streamers) to pea shooters! Believe it or not, some people continued “knocker upper” subscriptions long past the invention of alarm clocks; in fact, the last knocker upper service in the UK didn’t cease until the 1970s, long after the rise of household electricity and clock radios.
If you didn’t mind having a giant water wheel handy, you could have been awakened on time (to the sound of a powerful chime and a puppet show) with the assistance of the Water-Driven Spherical Bird’s-Eye-View Map of the Heaven, invented by Chinese monk Xi Ping in the year 725.
Although the first mechanical alarm clock was invented in 1787 by American Levi Hutchins but his design was never patented. Sixty years later, Antoine Redier in France patented the first adjustable alarm clock wherein each hour on the clock’s dial/face had a hole; if you wanted to get up at 7, you put a pin next to the hole next to the number seven. Want to get up on the half hour (or any time except on the hour)? You were out of luck.
It wasn’t until 1876 (which may seem a long time ago to you GenZ and Millennial readers, but that was only eleven years before one of my grandfathers was born) that an American patented a more workable alarm clock and began mass-producing them.
For more on the history of alarm clocks, from the World War II era shortage (due to the use of all spare metal for wartime production) to the development of clock radios, snooze alarms, and my beloved college-era SONY Dream Machine (in production from 1960s until the early 2010s),
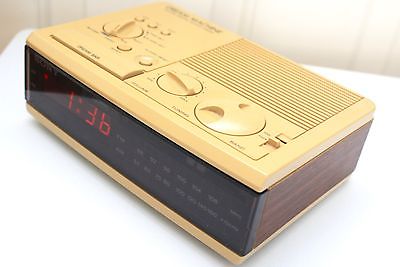
you can read Atlas Obscura’s lovely piece on the 2000-Year History of Alarm Clocks and All That’s Interesting’s How Did People Wake Up Before Alarm Clocks?
HAS PAPER DOLL FALLEN INTO A TIME WARP?
Are you fearing that Paper Doll has had an alarm clock dropped on her head?
You may be wondering why I’m talking about alarm clocks. After all, hasn’t everyone replaced alarm clocks with their smart phones? Yes, pretty much, most have.
But Paper Doll has a secret for you. Quite a bit of research finds that you might be healthier and happier using an actual alarm clock rather than your phone. And a happier, healthier you has a better chance of being productive and getting things done.
YOUR PHONE AS AN ALARM CLOCK, YAY OR NAY?
Sure, there are good reasons to use your phone as your alarm clock:
- You and your phone are already inseparable. You’re much more likely to trust it than a hotel’s front desk wake-up call or even your spouse’s promise to wake you up.
- It takes no effort to set your phone’s clock to the right time. Your cell phone provider already links your phone’s clock to the atomic clock of wherever you’re located by its connection to low-orbit GPS satellites; it (usually) even readjusts automatically when you change time zones. (If you’re not connected to cell towers, your phone’s internal clock takes over until the next time in connects to the network.)
- You can set your phone to wake you up with your favorite song or sound. Whether you’d like to wake up shaking your groove thing to Lizzo’s About Damn Time or prefer to pretend that you’re standing in for Bill Murray in your own version of Groundhog Day, there’s audio for you.
- There are lots of different alarm clock apps for iOS or Android to help you either ease into your day or be shocked out of your sleepy stupor, depending on which you prefer.
However, the ubiquity of phones in our lives is part of the reason they can be harmful in the bedroom:
Light at night is bad for us.
Harvard researchers found that increasing the amount of nighttime light study participants received increased their blood glucose levels similar to those found in people who are pre-diabetic. The nighttime light also decreased participants’ levels of leptin, the hormone that makes you feel satiated after a meal, so you stop grazing between dinner and bedtime and throughout the next day. So, too much light at night can impact your health, overall, and your waistline.
While any light at night can wreck our sleep, this is especially true of blue light. And yup, the screens on our digital devices (like our phones) tend to make use of blue wavelengths. This is a double-edged coin.
The blue light wavelengths are great during the day, as they amp up our moods, our reaction time, and our ability to stay focused and attentive. Yay, blue!
But those same wavelengths of blue light at night tinker with our circadian rhythms, making it harder to fall asleep. All that unnatural light tricks our bodies into thinking it’s still daytime, and so we don’t feel that pleasantly fuzzy sleepiness that makes it easy to drop off without worry or care. Boo, blue!
In fact, while all night light suppresses the production of melatonin, a hormone that controls our circadian rhythms, blue light is the most potent. So, not to scare you, but as cozy at it is to have your phone under your pillow or at your bedside, it’s not worth that blue light messing with your sleep and putting you at risk for obesity, hypertension, or diabetes.
Scrolling, and especially doom scrolling, spells doom for our sleep quality.
Watching any screens in the hour or two before bed is bad for us because of that blue light. But the content on our phones can be just as precarious.
Doom scrolling is the compunction to engage in negative information. When doom scrolling through Twitter or your favorite news feeds, keeping up with what’s going on in the world, you’re probably finding a preponderance of bad news, things that will stress you out and make you angry or frustrated.
It’s not your fault. Our brains are wired to experience a negativity bias, wherein (controlling for the emotional power of a piece of information), we’re more likely to see something negative as having a deeper impact on our lives than something positive. A study at the University of Sussex found that doom scrolling is more likely to make us feel anxiety, stress, fear, depression, and sense of isolation. (And yes, this got worse during COVID.)
Let’s not forget dopamine. Dopamine works when you’re scrolling through social media the same way it works when you’re pulling the arm (or pushing the button) on a slot machine. Dopamine is a hormone that works like a drug, urging you to seek further gratification, which may be a TikTok video that makes you laugh or a tweet confirming your negativity bias that a particular politician is leading to the ruination of all that is good and holy.
Of course, it doesn’t have to be social media. Video games, movies, videos, and TV shows are all (generally) energizing, and the last thing we should be engaging in before sleepy-bye time is whiz-bam-pow!
All of this is bad for your before-bed brain in the same way that letting a toddler get all “sugared up” and run around in the hour before bed will make it harder to get them to sleep. That’s why we focus on good sleep hygiene for tiny humans, giving them baths and stories and snuggle time, in hopes of relaxing them off to dreamland. Grownups need that help to power down, too.
And for those of you who are partnered, a phone-free bedroom mean an increase in the likelihood of intimacy, whether that’s relating emotionally or canoodling.
Scrolling is just as bad in the morning as at night.
Everything we need to avoid at night so that we can wind down and get to sleep is still going to be there when we wake up. But does it have to be there the very minute we wake up?
Whether it’s an email your boss sent off at 2 a.m., a tragic news story from the other side of the world, or whatever is “trending,” your phone can be a royal messenger of frustration.
Give yourself some time in the morning to ease into your day, whether that’s with your significant other, children, or pet. Even just having some quiet time between waking and breakfast can help you create the right mood for the day.
So, I challenge you to banish your phone from the bedroom.
REPLACE YOUR PHONE WITH AN ALARM CLOCK
So, if you’re not going to let the not-so-dulcet tones of your phone wake you up and start your heart racing, what should you use? Unless you have the funds (and the trust) to hire a knocker upper, an old school two-bell alarm clock or travel might be just the ticket. (Or, the noise might set your teeth on edge.)
Of course, it doesn’t have to be old school. There are some nifty modern alarm clocks that might be better suited to your particular needs, from glowing sunrise-simulation clocks that gently wake you with the kind of light that’s healthy for starting your day to clocks that shake, rattle, and roll you to your feet.
Here is just a sample of what you might consider, especially if you tend to hit the snooze button until the last possible moment.

Clocky — is an EXTRA LOUD alarm clock on wheels. What Roomba is for vacuuming the living room, Clocky is for getting you to actually wake up and start your day. When the alarm goes off, you get one chance to snooze, but after that, Clocky rolls and runs away, and you have to chase after it!
An MIT student who had trouble getting herself up and out of bed, Gauri Nanda combined her engineering skills with a desire to improve the aesthetics of alarm clocks to make them delightful instead of solely alarming.
Clocky comes in several colors (black, white, light blue, peach, blue, silver, and gold). It sells for $39.99 on the web site and on between $20 and $40 on Amazon, depending on the style.
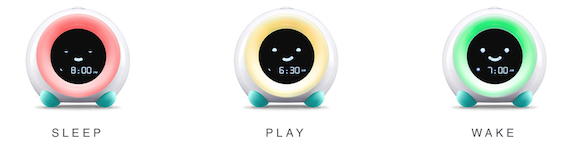
Little Hippo’s Mella Sleep Alarm — This kid-oriented charmer is a sleep trainer, alarm clock, sleep sounds machine, night light, nap timer, and digital nanny (helping convince your tiny humans to stay in bed until it’s time to actually wake themselves and the rest of the house).
Mella is white with accent features in Arctic Blue, Blush Pink, Bright Purple, Tropical Teal, and Kickstarter Green. You can buy Mella from the website or on Amazon for $49.99.
Pavlok’s Shock Clock 2 — This wrist-band waker-upper seeks to retrain your brain to make waking up about engaging your mind immediately. Pavlok’s Shock Clock 2 is very high-tech, able to track your sleep patterns using advanced motion detection via a 9-axis accelerometer. (No, don’t ask me what that is.)
To take advantage of your sleep rhythms, you can set the alarm so that it will only wake you between 0 and 20 minutes before your pre-programmed time to ensure it wakes you during the lightest stage of your sleep cycle.
The clock wakes you and gives you assignments to get your brain and body moving; if you’re a heavy, heavy, “I-hate-you-go-away” sleeper, it might make you do jumping jacks; Fitbit-style, it knows if you’re jumping (and no, unlike with Fitbit, you can’t put the Shock Clock 2 wristband on your dog…and I doubt your dog can do jumping jacks). The alarm won’t turn off until you’ve responded to its order to jump with “How high?” (OK, I made up that part.)
The Shock Clock 2 might assign you other kinds of activities, like going on a treasure hunt around your house to scan QR codes placed in various locations. If you seriously want to train yourself out of snoozing, this is definitely an intense way to go about it.
The Shock Clock 2 comes in red, blue, pink, and black, and costs $149 at the Pavlok store.
Ruggie Alarm Clock — This doesn’t even look like an alarm clock; rather, it looks more like a cozy bathroom rug for keeping your tootsies warm when you get out of the shower. But Ruggie is sneaky.
You can’t just hit the snooze. You have to get out of bed, and STAY out of bed for at least three seconds, with both feet on the pressure-sensitive mat. Plus, Ruggie has a library of morning greetings so your can personalize the start of your day with affirmations, empowering messages, and giggles.
Ruggie is a little too popular; it’s out of stock right now, but check back with the company, because this could be a fun way to entice yourself (or your not-so-self-starting kids) to get out of bed.
FURTHER RESOURCES
If you have any heavy sleepers in your house with special wake-up needs, consider perusing:
The Best Alarm Clocks for Sleepyheads (ADDitude Magazine)
When Alarm Clocks Fly: The Tools to Get You Out of Bed — The Best Alarm Clocks for Children and Teens with ADHD (ADDitude Magazine)
19 Best Alarm Clocks of 2022 (NYMagazine’s The Strategist)
Just remember to bear in mind what I said about light disturbing your sleep, and check reviews for mechanical clocks to make sure nobody is complaining about ticking noises.
Do you wake up on your own, or do you need an alarm? Is an alarm (on your phone or alarm clock) not quite enough? What’s your ideal way to wake up in the morning?
Have I convinced you to keep your smart phone out of the bedroom?
Please share in the comments and let us know how you wake up.
Follow Me