Paper Doll
NAPO2014: Fashion-Forward Organizing Solutions
Although Paper Doll generally focuses on managing your paper to be more organized and productive, sometimes we need to flip the picture, and look at ways to be more organized and productive to save (little green pieces of) paper. To that end, this post will review two wardrobe-oriented products from this year’s National Association of Professional Organizers Conference and Expo: one for helping you eliminate closet clutter, and one to change how you think about putting away your clothes. Both will help you save time and money, and maybe make you feel a little more fashionable.
MY WARDROBE GENIE
My Wardrobe Genie is the brainchild of Massachusetts-based Professional Organizer Susan Terkanian of AllSET Solutions. Susan explains My Wardrobe Genie as a personal clothing management assistant, a way to deal with the overwhelm of items in your closet with ease and confidence, but without undue expense. She has not only tested her system with real clients, she got input from a neuropsychologist!
 The key to a working wardrobe is keeping clothes that fit (your body and your lifestyle) as well as flatter, but letting go of what misses the mark: even if it was pricey, even if you’ve got happy memories associated with it, even if it was a gift. Intellectually, you know that you’ll never wear that itchy, ugly sweater that you’ve been guilted into keeping all these years. And putting those slacks with the ripped hem back in the closet (because you forget about the hem, every time, until you put them on) is like putting an empty milk carton back into the fridge.
To reduce clothing clutter and get a handle on what you own, My Wardrobe Genie combines the two essentials of any working system: a physical set-up and a behavioral process.
For the closet, My Wardrobe Genie comes with five colorful, laminated divider placards that hang from your closet’s rods to divide your closet into zones. These placards designate:
- Discerning/Decided — This nifty placard divides your closet rod into two areas: what you know for sure that you’re keeping, and what you’re still noodling over in your head. Just that one initial sort as you return clean clothes to the closet, or work your way down the rod, sets the stage for making decisions. Does this fit me? Do I wear it? Does it look (and feel) good? If you know, it goes on the Decided side of the placard. If you are still working on discerning the value, or trying to figure out if it will be donated, discarded, or otherwise distributed elsewhere on the planet, it goes on the Discerning side. Everything in your wardrobe starts out on the “Discerning” side, but (as indicated), once you decide, you move it to the other side of the divider.
- Anything Pressing? — Aside from the hardy few who get their moments of Zen from ironing, not many people are a fan of getting out the ironing board and pressing their clothes. But if your to-be-ironed clothes are out of sight and piled in the laundry room, you’ll never be inspired to tackle the ironing, and if they’re mixed in with the other clean, ready-to-wear items, you’ll pass over them when you make haste to dress. Keeping all the to-be-ironed clothes together lets you know when it’s time to turn up the music and rock out (or zone out) while ironing.

- Mending and Alterations — Sure, it’s great for you to pull out the mending and put it by your sewing machine (or the bag to take to the tailor), but the truth is, at best, you’ll just be creating more piles that you probably won’t get around to addressing. With this section divider, you can see at a glance when you have enough items to make it worth zipping over to the tailor or blocking off time in your schedule to do mending. (For those wondering, for any “mending” more complicated than re-attaching a button, Paper Doll believes in the power of delegation! Why deny someone employment using skills that far surpass my own? Paper Mommy has taught me well.)
- Spare Hangers — Because putting an empty hanger back where you pulled it from is a guarantee that your closet will become disheveled quickly! Store all your spare hangers together to find the right kind when and where you need them.
- Customizable — There’s a blank placard for you to customize to your preference. Maybe you have work uniforms that you want to keep separate from your casual and dressy clothes. Or, perhaps you’re keeping maternity clothes handy for a planned-for blessed event. Make that closet zone work for you.
For those of us who categorize our clothes by color, weight, sleeve (or skirt) length, or other attributes, there’s no need to revise. You can still be that granular in organizing your closet — once you get things to the Decided zone.
Each My Wardrobe Genie kit comes with the five placards, five colorful, coiled elastic hanger cords (to attach the placards to the closet rod), a discard bag, a donation bag, and labels for the bags. Susan expects the My Wardrobe Genie online store to be in place this July.
Although pricing is not listed on the site, the original IndieGoGo campaign looked to price each kit at around $30.
In theory, could you do this on your own? Sure, but as with most organizing concepts, we find that if people could do them on their own, they would have already done so. My Wardrobe Genie gives you that extra guidance to move forward, physically and behaviorally. My only thought is that people with truly overstuffed closets (and/or bad lighting in their closets) may still need a little extra hand-holding from a friend or professional organizer to tackle the initial phases of whipping the closet into shape.
While My Wardrobe Genie is great for your closet, what do you do if you’ve got a lot of drawer-based clothing? For those who lack expansive (and sometimes expensive) walk-in closets, a small closet space means relegating anything that doesn’t have to be hung up to whatever drawer space exists. But if you’ve lots of clothing but not a lot of drawers, what’s a fashionista to do?
PLIIO®
Luckily, there’s Pliio®. Longtime readers of this blog know how much I appreciate this innovation that lets you, for all intents and purposes, file your clothing, upright! But in case you’re new to what Pliio has to offer, I’ve got a little recap. Co-created by Canadian Professional Organizer Clare Kumar of Streamlife, Pliio is one of those brilliant tools that makes you wonder how and why it took so long for someone to come up with it.
 Pliio, itself, comes in two parts: the Pliio® Clothing Filers™ (17″ long x 8″ wide x 1/4″ thick),
 which are essential to the process, and the Pliio® Organizing Boxes (9″ x 11″x 5″), which serve as the wardrobe equivalent of a desktop file box, filing cabinet or drawer.
 The basics are pretty simple — practically any article of clothing can be wrapped and folded around the Pliio clothing filers. I’ve seen Clare work magic with T-shirts, jerseys, light-weight knits and sweaters, as well as soft (sort of flowy) unstructured bottoms, like yoga pants or skirts, and even dresses. The thinner the fabric, the better it works, and the instructions say that it all works best when there’s about three inches of excess material beyond the edge of the filers.
See it in action:
Once your clothing properly Pliioed (what? it’s not a verb yet?), you can easily lined up clothing wherever you want it to go — in your drawers, on your closet shelves, or even in your luggage! Use the organizing boxes to keep them perfectly aligned for added orderliness. You only need six inches of depth in your drawers or suitcases to accommodate Pliio Clothing Filers, and you can turn the boxes on their sides (for six inches of depth and nine inches of height) to stack filed clothes anywhere, even on CD/DVD shelves!
For a while after Pliio’s release, you could only buy it on QVC, but it’s available (in the U.S. and Canada) at Bed, Bath and Beyond for about $20/set of ten filers.
It’s not easy to impress me with “doodads,” and I’m fairly frugal, so I only buy what I find to be flawless, but I’ve given Pliio as gifts. One friend with refined tastes — who is already incredibly organized (and isn’t even a professional organizer!) — liked the system so much, she went out and bought more, and Pliioed her husband’s T-shirt wardrobe!
My Wardrobe Genie and Pliio are just two inventive ways to get control of your clothing, get organized, and stop wasting time and money on closet clutter.
NAPO2014: It’s a Wrap! Organizing Your Wrapping Supplies with Wrap It!
It’s not yet July, but some people are already thinking about the holidays! This tweet, from a fun-loving scientist I know, illustrates eagerness to get started on shopping and wrapping:
pretty sure I’m the only person who during this break before work dinner wrapped Christmas presents.
— Kelly O. Sullivan (@KellyOSullivan) June 18, 2014
And though it turned out to be a mistake, a post office branch in the Williamsburg neighborhood of Brooklyn, New York actually started promoting Christmas stamps this week!
While it’s not a paper and productivity topic we touch upon often, eliminating gift wrap clutter and organizing your wrapping options is definitely something we’ve discussed previously:
- It’s a Wrap! Wrapping Paper Alternatives, Furoshiki & Frogs
- Paper Doll Wraps Up the Holidays and Makes It All Stick (Part 1)
- Paper Doll Wraps Up Some Alternatives to Wrapping Paper (Part 2)
THE PROBLEM
Birthdays and holidays and baby showers. Oh, my!
Anyone who has ever tried to wrap a series of gifts of varying shapes and sizes knows that wrapping is not a one-size-fits-all experience. In the pre-gift bag era, I once tried to wrap an unboxed, stuffed lion for my best friend’s toddler, and there is photographic evidence (which I will not share), indicating that I failed wrapping school. A roll of shiny tape and perhaps two pounds of tissue paper later, it looked like a lump — maybe a soccer ball, maybe a chemistry set. Trust me, it looked better once unwrapped.

The options are almost endless. Wrapping paper comes in different lengths, and the volume on each roll varies. Sometimes wrapping paper comes flat, folded in squares, so that it takes up less space (but has an annoying crease, usually just where you wish it didn’t). And tissue paper is packaged altogether differently, folded like pre-GPS gas station maps. Sometimes, a gift bag is more apt, but bags come in multiple heights and widths, and then there are the ribbons and bows and furry/fuzzy/sparkly/twinkly stuff sold to adorn the gifts you give. (This is where Paper Mommy excels. All presents for children, and some for adults, are decorated with lollipops and similar candies. Twice the fun, none of the glitter.)
With so many different kinds of wrapping supplies, you end up needing different kinds of containers. Sometimes, an under-the-bed, flat-ish lidded bin will work, but it can be hard to find one to accommodate the longer rolls of wrapping paper. There are a variety of standing solutions that emulate trash cans, but unlike Weebles, when they wobble, they do fall down. I’ve seen many of my more artsy/craftsy clients peruse Pinterest for DIY-solutions to sew or glue or create themselves, but that can take a lot of labor.
Then there are the supplies. Tape — you want the non-shiny kind so that it’s invisible against the wrapping paper. Scissors. Those little noodle-y things that help you make ribbons curl nicely! Do you store them with your wrapping station (if you have a wrapping station more robust than “in the closet” or “under the bed”) or do you borrow from the office supply/school supply/miscellaneous drawers of your house? And if you can’t find what you need and end up buying duplicates, you’re worse off than if you hadn’t had any supplies in the first place!
It’s enough to make you want to give everyone a gift card and call it a day!
At this year’s NAPO Expo, however, a new product came to market for keeping all of your gift packaging supplies under wraps.

THE SOLUTION
WRAP iT™, developed by New Yorker Adam Levine (pictured below), is designed to create a

solution for neatly organizing and storing all gift wrap supplies. I have to admit, I was dubious. I’d seen what amounted to zip-up garment bags for wrapping supplies before, and in the end, everything tended to fall to the center of the bag, like hockey sticks in a duffel. (Am I betraying my Buffalo, NY roots?)
But Wrap iT really is different.
Wrap iT comes in two color schemes (blue and copper) and two sizes: Deluxe and Original. The interior of both versions can hold 26 rolls of wrapping paper, up to half of which can be the extended-length rolls (in the Deluxe version (pictured below)), which are often too long to fit in any standard paper organizer. The wrapping paper is held in place with heavy-duty elastics. When you’re done wrapping, slide the roll into the elastic bands at the top and bottom, twirl your roll about one-half a turn, and the loose ends remain tucked in place. No straggling ends to rip or tear.

In addition to the interior section, the Wrap iT has multiple clear PVC pockets to accommodate folded wrapping and tissue paper, gift bags in multiple sizes, gift tags and greeting cards, bows, ribbons and wrapping tools, as shown below.


Adam and his people refer to the Wrap iT as similar to an “Armored Gift Wrap Tank” made extra-sturdy to protect those delicate bows and frilly ribbons. In addition to the high-grade elastics, the clear PVC is water-repellent (in case you’re schlepping through snow to get to a gift-wrapping party) and has a heavy-duty, all-the-way-around nylon zipper. Velcro closures clasp the nylon flaps to the PVC pockets.
The Deluxe Wrap iT measures 44″ long by 19 1/2″ wide, and fully stuffed is 4″ thick. Empty, it weighs only 1.8 pounds, but has a maximum storage capacity of 22 pounds. (That’s a lot of wrapping!) The Original Wrap iT is the same width and thickness when packed, but a touch shorter at 33 1/2″ long. It’s 1.6 pounds empty and 19 pounds at full capacity.
Thus, storage is easy, as the bag lays flat enough to slide under a bed, but the build-in hanger lets you easily hang it vertically in whatever closet has four inches of adequate width and enough depth to handle a winter coat.

The Deluxe sells for $59.97; the Original for $54.97; you can also get a combo pack of one of each or a two-pack of either size for $99.94.
See the Wrap iT in action:
Paper Doll has to be honest. I’ve long since given up on wrapping presents. If it fits in a gift bag, I’ll surround it with some pretty tissue paper; otherwise, I’ll probably have it shipped directly from Amazon and that charming A to Z logo will serve as all the wrapping it will have. But if I were a wrapper, especially one with lots of tiny tot birthday and holiday gifts to decoratively wardrobe, the Wrap iT would be hanging in my closet.
NAPO2014: Just in Case? LifeinCase™
Chances are good that you’ve had reason to worry — at some point in your life — about evacuating your home or town in an emergency. Maybe it’s been a random conversation with your kindergartener about why you have fire drills at school but not at home, or you’ve read the federal government’s Ready.gov pages on emergency preparedness and wondered how you measure up. Or maybe you’ve had actual experience with floods or hurricanes, and don’t ever want to be caught unprepared for getting all your documents together.
Longtime readers know that Paper Doll advises having all of your VIPs (Very Important Papers) tucked safely away, as we’ve discussed in:
- Top 10 Vital Documents — Do You Know Where Your VIPs Are?
- More VIPs — Very Important Papers Beyond the Top 10
- Safeguard Your Very Important Papers: Safe Deposit Box Basics
- The Ultimate Treasure Map: Creating a Document Inventory
The truth is, whether you keep your most important documents in your safe deposit box, in a fire-proof safe, in your filing cabinet or even your deep freezer, you still need to deal with the following issues:
- Do you actually possess all of the documents you might need?
- Are all your documents accessible?
- Are they portable — and quickly — in case of emergency?
To ensure that you have all the documents you need, you can (and should) refer to posts and articles like those to which I’ve linked above. But knowing you ought to do something doesn’t always mean it gets accomplished.
With regard to accessibility, keeping documents (originals, or more likely certified copies) at home means that you don’t have to worry about the bridge between you and your bank’s safe deposit box being washed out when you need to show vital documents to your insurance agent. But even if your papers are at home, are they always protected (from theft and from the elements)? And what do you do when you travel, or especially if you travel frequently?
As much as I love clients being able to have a tidy VIP section in the legal area of their Family Files, in a dire emergency, you may not have the time or focus to search and find everything before you go. That’s why I was intrigued to see a new product at this year’s NAPO Expo that focuses, not just on another kind of filing system, but on easily maintaining and safekeeping vital documents.
LIFE IN CASE™ — THE BASICS

LifeinCase™ didn’t merely exhibit at the NAPO Expo. It won the prestigious 2014 NAPO Organizers’ Choice Award for Best Solution for Organizing Information at Home. Let’s see why.

Each LifeinCase™ features:
- A portable case: The poly, briefcase-style tote is lightweight but durable and water-resistant. It’s not going to act as a flotation device in case of a water landing, but it’s going to keep your documents relatively dry and safe if you’re escaping amid the harsher elements. The lid clasps shut with Velcro, so unlike three-ring binders which might fly open in brisk wind, documents are safe.
- A 5-folder system: LifeinCase™ has a poly folder for each of what the creators consider the five main categories of documents you’re likely to need in an emergency: Personal, Financial, Medical, Estate, and Property.
- Handy checklists: On the exterior of each folder, there’s a printed checklist of 10 essential documents to keep within that folder.
- 500 Sheet Capacity: The sturdy tote holds up to 500 pages, plus the folders. This is built to be a self-limiting system, so you keep storage to a minimum (of just the vital documents) and keep clutter at bay. This isn’t for all of your papers — just the papers you’d need in an emergency.
- Grab & Go: The LifeinCase™ tote can travel with you or be stored in a personal safe. Relocating? Let the movers take your locked filing cabinet, but keep your vital documents private and safely with you.
Also, for those who need or want to maintain access to certain cloud-based documents, LifeinCase™ has partnered with MobilLogic (about which, we’ve written previously), so individuals and companies can match up the paper files outlined in the LifeinCase™ checklists with personal or business systems, including electronic data.
THE FIVE CATEGORIES

For a little more detail on the categories and each folder’s checklists:
The personal category focuses on the essential VIPs specific to you, personally. These would be your birth certificate, copies of your passport and Social Security card, citizenship papers, military documents, etc.
The financial category limits itself to just the essentials you might need if you were displaced and needed to temporarily rebuild your world — such as after a community evacuation. These might include a copy of your most recent income tax return, a list of your credit cards (or, as Paper Doll recommends, a photocopy of the front and rear of all of the contents of your wallet), copies of stock and bond certificates (or at least their numbers and pertinent information), loan and credit contracts, etc.
The property category includes, as you might expect, property titles (for real estate, vehicles, boats, and whatever other real property you own), lists and details for any current mortgage, loan or lien documents, as well as a copy of tax assessment notices, purchase contracts, and records of capital improvements, in case they’re needed for insurance or tax purposes after structural damage.
The medical section would include contact information regarding whom to notify in case of emergency, health insurance information, a list of names and contact information for physicians and other healthcare providers, a documented history of medical conditions, and more.
Estate documents might include names and contact information for attorneys and estate executors, a signed copy of any wills or trusts, and copies of life insurance policies, including contact information for associated agents.
LIFEINCASE™ VERSIONS
In addition to the original LifeinCase™ green-on-frosty-white option, there are military-branded versions for members of U.S. Army, Navy, Air Force, Marines and Coast Guard.
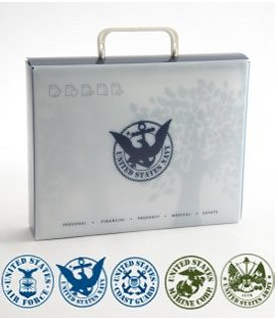
THE STORY OF LIFEINCASE™
LifeinCase™ was developed by New Englanders Diane Hoyle-Moran and Mark Gibson. For more about the development of LifeinCase™, watch this recent interview with Diane on the Military Shopping Channel.
And below, a picture of Diane and her co-developer, Mark, clearly enjoying the NAPO Expo.
 FOR WHOM IS LIFEINCASE™ DESIGNED?
LifeinCase™ probably isn’t for those of you who already have an intricate and organized document system set up, with myriad backups in place. But if you’re not sure what documents you have, or where you have them, or you (or someone you love) may not be the type to independently put these documents in order, LifeinCase™ gives you a swift kick in the rear for getting started and a little hand-holding to get you through to the end of the process. The checklists give the user the opportunity to say, “Hey, I don’t know where this document is — I’d better go look for it!” or, in the case of some document types (like estate paperwork), “Hey, I don’t even have this kind of document. I’d better make a call to set some important steps in motion!”
This would make a particularly great gift for new graduates, young(ish) newlyweds, members of the military, frequent travelers, and others who might not otherwise have the inspiration (or information) necessary to get started on organizing vital documents on their own.
LifeinCase™ is priced at $34.99 for the original and military versions, and is available at bulk discounts, so you’d save 15% off two cases, 23% off 3-8 cases, or 35% off nine or more cases.
However you organize your essential paperwork to make it accessible in case of emergency, the most important part is that you get started. Just in case.
BONUS UPDATE
LifeinCase™ has provided coupon codes for Paper Doll readers! When you order your LifeInCase™ systems, use the following codes:
BESTRESULTS for a 10% discount on the original green LifeinCase™ kits
BESTRESULTSUSA for a 15% discount on the Military Design LifeinCase™ kits
NAPO2014: Our Friends at Smead Are on the Up and Up!
Longtime readers of Paper Doll know that I’ve always championed vertical organizing tools. Up is where it’s at!
Sometimes, that has meant making use of vertical space to an expansive degree. For example, we have previously looked at The Container Store’s Translucent Cascading Letter File Tote, as well as a variety of other “tall, flat” solutions in Paper Doll Adjusts the Vertical Hold: Space-Saving File Solutions.
At this year’s NAPO Expo, Smead introduced the Cascading Wall Organizer (illustrated, in action, in my NAPO 2014 Conference Recap a few posts ago). The space-saving, vertical organizing tool keeps folders off of your desk and lets you make use of wall space. If you’ve got a corner office, desk space might not be at a premium, but if your office is merely in the corner (of the kitchen, or the classroom), or your office is a different hotel room every night, you know how difficult it can be to keep everything together when there’s no place to put it.
When open, the expanding interior displays six removable, letter-sized, straight-cut folder pockets, each of which holds up to 25 sheets of paper. The cascading base and pockets are made of durable, acid-free, tear-proof and moisture-resistant polypropylene. There’s a clear pocket affixed to the front for extra storage of documents, calendar pages or motivational quotes and photos, and a looped extension at the top of the organizer to enable easy hanging.
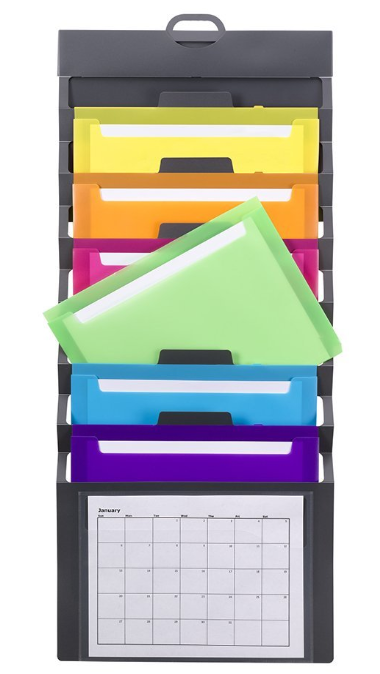
When closed, the Cascading Wall Organizer measures 14 1/4″ wide x 10 5/8″ high, and looks much like a portfolio case. An elastic cord closure holds documents securely when you and your collapsed organizer are mobile.
The Cascading Wall Organizer comes in two styles, grey with brightly colored pockets (as shown expanded, above),
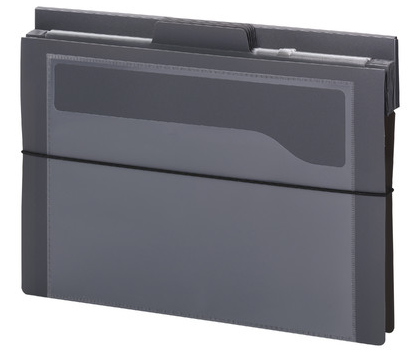
and grey with neutral (varying shades of white/grey) pockets. A blank label sheet is included in the set.
The Smead Cascading Wall Organizer is new and not yet widely available, but can currently be found for about $17 at Amazon.
Video about it:
STAND UP AND CHEER IN THE STADIUM
Of course, not all the vertical office supplies we want will need to take that much vertical space. Sometimes, we’re find with using our desktops or other flat surfaces, but we just want our files to stand up, like good little soldiers, but with a narrower profile than usual.
Last year, after the NAPO2013 Conference and Expo, I shared my excitement in New Smead Organized Up™ Folders Stand At Attention, about vertically arrayed file folders designed to work ideally with backpacks. The tentpole of that new Smead line was the Organized Up™ heavyweight vertical file folders, but the “upstanding” line also included Organized Up™ MO Vertical File Cases, and StackIt one-pocket folders and three-pocket organizers.
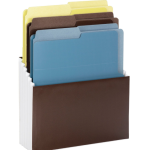
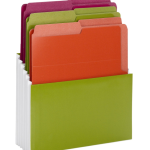
Smead has now expanded (no pun intended) the Organized Up™ line with the Organized Up™ Vertical Stadium File for use with the heavyweight vertical file folders. It’s like the original Smead Stadium File that I reviewed in 2010, but it allows you to organize and file documents upright, in the same way you print, read and shuffle them. Each of the Vertical Stadium File’s three double-capacity, tiered pockets expands to 1 3/4″ and is fixed in place, riser-style, so files always stay visible and never sink down or get lost.
-
- Nutmeg
-
- Peridot
The Vertical Stadium File comes in two color schemes. The Nutmeg version includes six heavyweight vertical Earth Tone Folders (two each of Leek, Nutmeg and Stonewash Blue per package), while the Peridot Stadium File has the Bright Folders (two each of Fuchsia, Orange and Peridot per package). In the interest of full disclosure, I stand by my original contentions that other than the Fuchsia, these are not loveliest colors Smead could have chosen (though I’ll admit the Stonewash Blue has grown on me).
As a reminder, the Organized Up™ letter-sized folders are constructed of a durable, heavyweight material and are open on the top and right, but closed on the bottom and left sides for added security. The folders are dual-tabbed so they can be used both vertically (with the Organized Up™ Vertical Stadium File, and in backpacks and in narrow drawers) and horizontally, for traditional use. Each folder expands to hold up to 25 sheets of paper.
The Smead Vertical Stadium File runs about $18 at Amazon and specialty office supply stores.
WHAT’S UP ON CAMPUS?
Later in the summer, and closer to back-to-school time, we’ll be exploring Smead’s Campus.org line of university-oriented school supplies. But one of their new products particularly stood out for today‘s theme.
Last year, we reviewed the red-rope style vertical paper storage solutions in Upright Expansion: Pendaflex® Vertical Reinforced Expanding Wallets and Files. Pendaflex’s vertical approach was definitely a variation on the norm for expanding wallets, and the primary color options were refreshing, but Smead has developed an alternative for fans of poly vs. paper.
The Campus.org Vertical Step Index Expanding File comes in three colors: dark grey, lime green and purple. (I’m beginning to think someone in the Smead R&D line has a penchant for unusual shades of green for the office supply palette.)
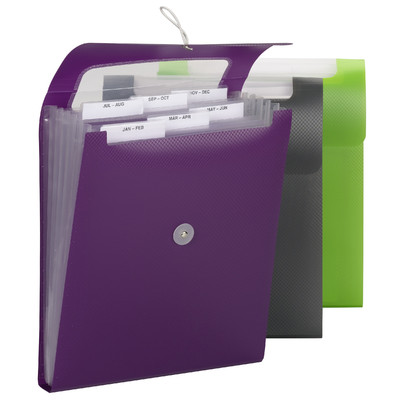
This letter-sized polypropylene organizer measures 1 1/2″ deep x 10.2″ wide x 12 1/2″ high and has an embossed (nubby) exterior. The poly casing and pocket material is both rip-proof and water resistant, and is arranged riser-style, or stepped, so the rear files aren’t hidden. To keep documents safe when you’re on-the-go or up-in-the-air (even if your backpack isn’t fully secure and in its own locked-and-upright position), the Vertical Step Index Expanding File has a top flap as well as an elastic cord closure. Each file includes preprinted and blank tab inserts for indexing and customizing your contents.
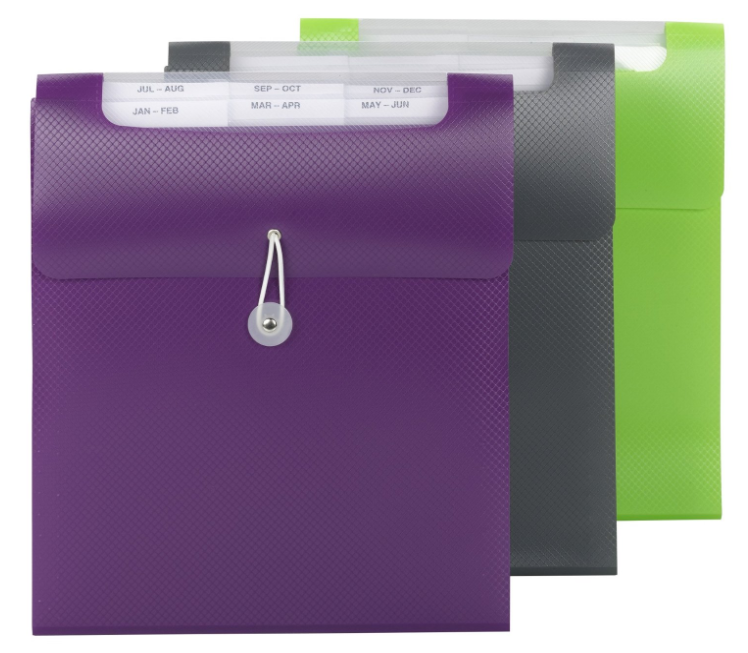
Speaking of closure and contents, this expanding file has something particularly innovative. The foldover flap has a clear window, so you can see the tiered tabs of the pockets without ever opening up the file. Thus, although you might color-code your documents or notes, if you prefer to keep everything in one color combination, you can still see the labeled tabs of any of multiple expanding files at one glance and know your contents without opening each file.
The Campus.org Vertical Step Index Expanding File runs about $8 at Amazon.
UP, UP AND (CARRIED) AWAY
For Paper Doll, it’s easy to get excited about novel approaches, like vertical file storage (or the horizontal clipboards we talked about last month). But novelty doesn’t mean suitability in every case. When dealing with your papers, no single solution works for everyone. For some people, horizontal makes the landscape gorgeous, while for others, the portrait of a happy user means vertical supplies. For some, color variety is inspiring, while others prefer uniformity to maintain focus. We are each our own special snowflakes, so feel confident that the only office supplies you need are the ones that fit your requirements.
Until next time, when we’ll be looking at more attention-getting and practical organizing products from this year’s NAPO Expo, your Paper Doll promises to stay on the up and up!
NAPO2014: Notetaking and Pendaflex/TOPS’ FocusNotes™
Notetaking isn’t just about capturing information, but about beating the clock. People can speak at about three words per second, but can handwrite (without shorthand) only 0.3 of a word per second. There’s no way to get it all down with analog notetaking. However, that might be OK, because not everything that gets spoken is worth committing to paper, and as we discussed in the last post on my NAPO214 conference experiment in going paperless, the less you’re able to write down verbatim, the more likely you are to recall and understand what you’ve written.
WHY AND HOW DO YOU TAKE NOTES?
In an academic setting, notes let you record information so that you can learn, reiterate it for an exam, or use it in practical ways. In a work setting, or if you’re on a committee or a board, notetaking is less about learning and more about preserving — who said what, what obligations are to be met by whom, what ideas were brainstormed, etc. And sometimes, we need to take notes to keep ourselves focused so that we don’t lose something in translation — or to emotion — like when a physician is imparting important, or maybe even scary, information or instructions.
To some people, taking notes just means writing down everything you can. So, it might come as a surprise that notetaking is a science, one that has multiple sub-disciplines, and one that can dramatically improve both recall and comprehension.
Some famous and popular notetaking methods include:
- Sentence Method, where each new thought is a separate line, breaking concepts into simple statements
- Mapping, including concept mapping and mind mapping, where individual ideas are illustrated with lines, circles and pictures to indicate their hierarchical or other relationships to one another. It also includes sketching and drawing methods like Sketchnotes, developed by Mike Rhode and illustrated, below, by Los Angeles-based professional organizer Deron Bos.
#sketchnotes from @JoeContrera‘s opening keynote at #NAPO2014 pic.twitter.com/dRNN4wVFhz
— Deron Bos (@bosorganization) May 29, 2014
- Charting, which makes use of tables and graphs, is great for noting facts, like dates, processes and events
- Outlining (with Roman numerals at the highest level, then capital letters, numbers and lowercase letters, all nested and indented) which is more linear than the other methods, but requires having a sense of where the information is going from the very start
- Guided notes, where the presenter provides a written map of the speech or lecture, but with words, phrases or sentences left blank for the note-taker to fill in. This evokes memories of third grade, but is popular on conferences handouts, as well.
One of the most enduring and popular notetaking methods is the Cornell Note Taking System, developed at (my alma mater) Cornell University about sixty years ago by Professor Walter Pauk. He eventually made the method famous in his classic book How To Study in College, to the point that I (and probably many of you) learned the system in high school science classes.
CORNELL NOTES
Cornell Notes is a note-taking as well as a note-organizing method, with the goals of capturing, condensing and enabling review of material.
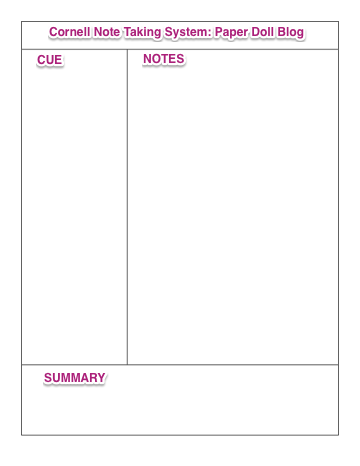
Each sheet of paper is divided into three sections:
- Notes: A large, lined section running about 3/4 of the width of the page, from the right margin towards the left, for the purpose of recording actual notes, contemporaneous with the lecture or meeting. (It’s a good idea to leave a few blank lines between main ideas for filling in missed details later.) The goal is to capture the main ideas and details presented, with longer/larger concepts paraphrased in the note-taker’s own words. Whenever possible, wordiness is replaced with symbols and abbreviations.
- Cue: A narrow, unlined column running on the left side of the page is used for listing key words or concepts and for developing questions for self-quizzing or further investigation. This should be done as soon as possible after the end of the class or meeting.
- Summary: A broad, lined or unlined section, spanning the width of the page, is for summarizing key concepts, and should be used within 24 hours of taking notes to heighten recall.
Once you’ve learned Cornell Notes, notetaking becomes more systematic and robust. The problem is that it has been fairly difficult to find notebooks that have the sections pre-divided for the user.
At Cornell University, and at other schools that promoted use of the system, notebooks with this layout used to be pretty easy to find (back when I was young and dinosaurs roamed the earth), but are far less available these days. Lifehacker had an extensive post on how to create a Cornell Notes notebook of your own, and there are a variety of sites with templates for Cornell Notes, but that’s a lot of effort. So, I was thrilled to see a new product at the NAPO Expo in Phoenix!
FOCUSNOTES by TOPS™
Pendaflex, newly owned by TOPS, has developed FocusNotes™, a format of notebooks they describe as “Comparable to the Cornell Note Taking System.” Without stepping on any intellectual property toes, they’ve preserved the essentials of the system. Each page is topped with a section for the date and the class or meeting’s purpose, followed by sections for notes, cueing and summarizing.
FocusNotes come in six formats:
- FocusNotes Notebook — This side spiral-bound notebook has 100 sheets of 11″ x 9″ 20 lb. paper.
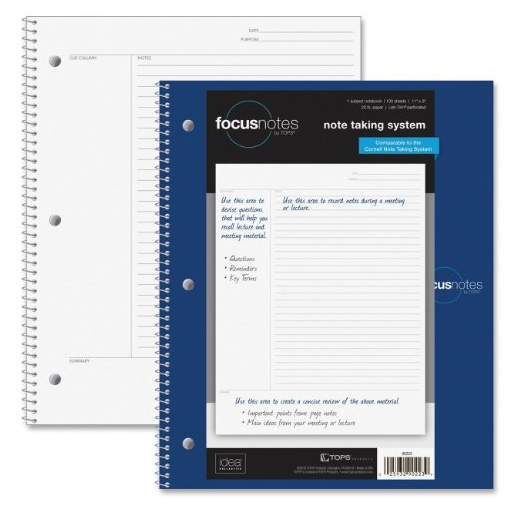
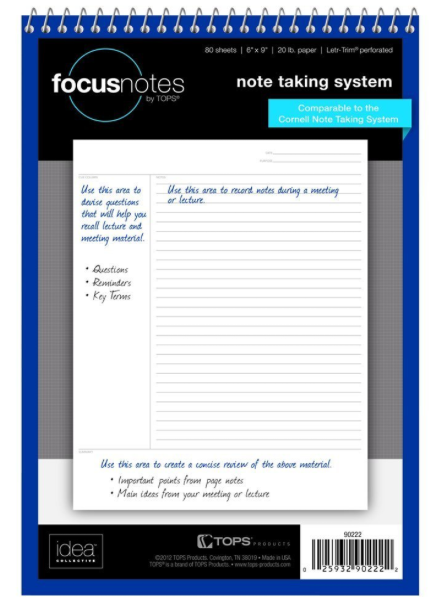
- FocusNotes Steno Pad — Wirebound at the top, this 6″ x 9″ pad of 80 sheets of 16 lb. paper has a sturdy back cover and is suitable for taking work notes on-location or classroom notes in a lab or otherwise on-the-go.
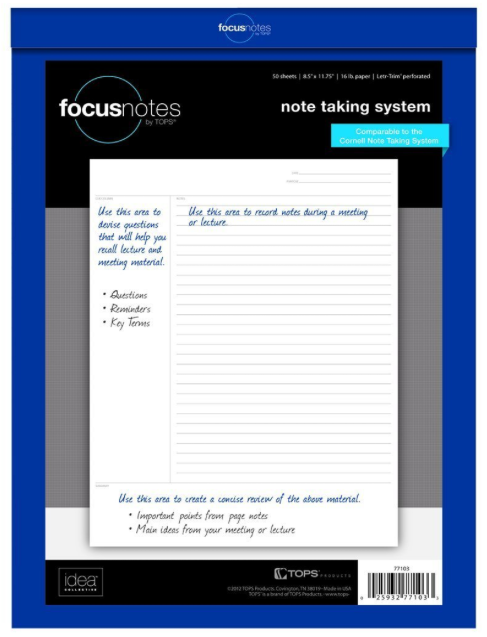
 FocusNotes LegalPad — Bound at the top, each 50-sheet pad of 16 lb. 8 1/2″ x 11 3/4″ paper is perfect for left-handed note-takers. A sturdy back cover works well when you have to take notes on-the-go (or on your lap).
- FocusNotes Jr. Size Legal Pad — This 5″ x 8″ notebook has 50 sheets and a sturdy back cover, like the full-size version, and is also made of 16 lb. paper.
- FocusNotes Composition Book — This 80-page update on the classic gives you the feel of a traditional composition notebook with a Cornell Notes-ready format and 80 sheets of 9 3/4″ x 7 1/2″ paper.
- FocusNotes Filler Paper — For those who prefer to keep their notes in binders, this loose-leaf, 3-hole-punched, 8 1/2″ x 11″ stack comes 100 sheets to a pack of 20 lb. paper.
Prices range from about $3-$9 per notebook/filler set, and FocusNotes can be found at Amazon and office supply stores.
This (silent) video illustrates FocusNotes in action:
For more on the Cornell Notes method, consider reviewing:
- The Cornell Learning Strategies Center’s “cheat sheet” on Cornell Notes
- Video on the 5 Rs (Record, Reduce, Recite, Reflect, and Review) for academic use of the system
- Writer’s Bloc‘s post on How To Use the Cornell Note Taking System Effectively for Business or Client Meetings (Note: Writer’s Bloc formats the page atypically, flipping the left and right sections, which may be helpful for left-handed note-takers.
NOTETAKING SYMBOLS
To speedily take handwritten notes, it helps to have some shortcuts in mind. For Paper Doll, it’s a hodge-podge of triangles (the Greek letter Delta (Δ) means “change”), asterisks (for “vital follow-up!”) and arrows (–> to me, means “leads to” or “causes”).
A blog called The Cramped “is a site dedicated to the pleasures of writing with analog tools.” Their recent piece on paper-based markup language might be a good place to start if you want to develop your own shorthand for using Cornell Notes or any other handwritten system.
So, how do you take notes?
Follow Me