Archive for ‘Paper Organizing’ Category
Notions on Notebooks: Organize Your Paper Picks
There’s a stain on my notebook where your coffee cup was…
Notebooks. Use them for recording clues in your current mystery or keeping a diary of the progress of your great romance. Copy down notes for school or draw up ideas for your next big event. A notebook, in the broadest terms, is someplace to keep your thoughts safe from the vagaries and whims of undependable synapses. Your brain is good at thinking things up, but unreliable at preserving your genius.
As Paper Doll, I value the inherent advantages paper has over electronic devices. It’s immediately available — there’s no need to power it up. Unless you’re involved in government or corporate espionage, it’s unlikely anyone will want to steal your notebook (as opposed to your shiny tablet computer). No specialized tools (stylus, cable, charger) are needed. If you don’t have your favorite pen, you can write with a pencil (even one of those stubby ones from miniature golf), a crayon, or if you’re desperate to get that inspiration down on paper, an eyeliner or lipstick.
Sure, there are numerous benefits to keeping your information digitally, too. You can’t back up a paper notebook, except by photocopying (unless you’re a John Adams with son John Quincy around to make copies of everything by hand). You can’t collaborate simultaneously with a writing or work partner. Sure, you can pass a notebook back and forth like a third grade slam book, but simultaneous collaboration requires a cloud service like Google Drive. (Then again, if you share documents across two Google accounts and one person deletes their account, you lose access to all the shared documents created at the other person’s end. And, of course, reduced security of paper notes is only as problematic as your own lack of vigilance, but while the NSA probably can’t see into your breakfast nook, you don’t know when or whether Evernote or Google is granting somebody a peek at your digital accounts.)
These issues and more have come to my mind after reading Janine Adams’ The Virtues of a Nice Lined Notebook and Lifehacker’s Note Taking Styles Compared: Evernote vs. Plain Text vs. Pen and Paper. At some point, we’ll look at how to select the right electronic note-capturing system for your needs. (We’ve already talked about hybrid systems, like the Evernote Smart Notebook by Moleskine.) But today, I’ve been thinking about (what else?) paper notebooks.
Not all notebooks are created equally; neither should you forget that you are unique, and your choices need to reflect your personal needs. Consider the following!
Price and Branding — If capturing information is your only concern, an off-brand, black-and-white speckled composition notebook from the dollar store should suffice.

However, if you’re the kind of person who can’t write a grocery list unless it’s bound in leather, then you might want to look at this classic Unclutterer post, 35 Luxury Notebooks To Organize Your Life.
Or, you may be less hung up on price, but it matters to you that your notebook is stamped with a name like Cavallini or Fabriano for cachet or Field Notes or Moleskine for hipster cool. Or maybe Rhodia‘s little trees on a golden backing remind you of your Grandpa. If these things matter to you, buying a notebook that doesn’t fit your need for prestige may mean it’ll just be clutter in the bottom of the drawer a few weeks from now.
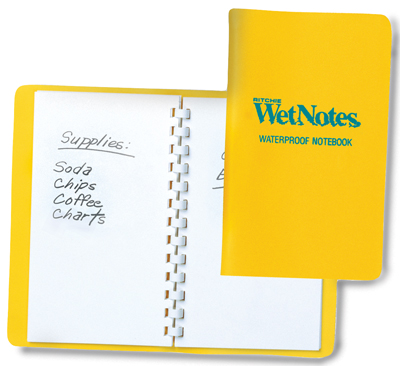
Portability — A small spiral-bound notebook, the kind in which school kids used to record homework assignments and (1970’s-era TV drama) reporters used for interviews, will fit nicely in a purse or a man’s front shirt pocket. Many purveyors have lovely (faux-fancy) small notebooks. But if you prefer a larger canvas, with something closer to letter-sized paper, recognize that the trade off is that you’ll have to carry something else, like a backpack or messenger bag, to protect your notebook from the elements. Well, unless you choose waterproof notebooks, like the ones we talked about a few years back.
Binding — Spiral can be messy when you tear pages out, unless the paper is also perforated. Fancy sewn bindings with gussets allow upscale notebooks to lay flat when open, making them more like traditionally-bound books. If the difference seems subtle to you, your binding choices won’t matter. If you’re a princess with a pea-green, machine-glued binding, you may never fall asleep and get to use your dream-capturing notebook.
Paper quality — Some people can just as happily write on a paper napkin as parchment, but if you have a fondness for luxe inks, you need to make sure your notebook of choice can stand up to your writing implements of choice without any bleed-through. Tip: The Well-Appointed Desk is a great blog for learning about papers and inks and whether they play nicely with one another.
Lines — Lines on the highway to delineate lanes? Essential. Lines on your face? Misery in the mirror. But lines on your notebook page make a difference. If you’re linear and focused and number your lists, you’ll probably want lines. If you’re all about mind-mapping, the blank page will probably suit you better. Of course, the types of lines may make a difference, in which case, alternatives like the White Lines notebooks we discussed in Green-Eyed But Not-So-Monstrous, might be your preference. Lines, grids, graphs — only you know what you need.
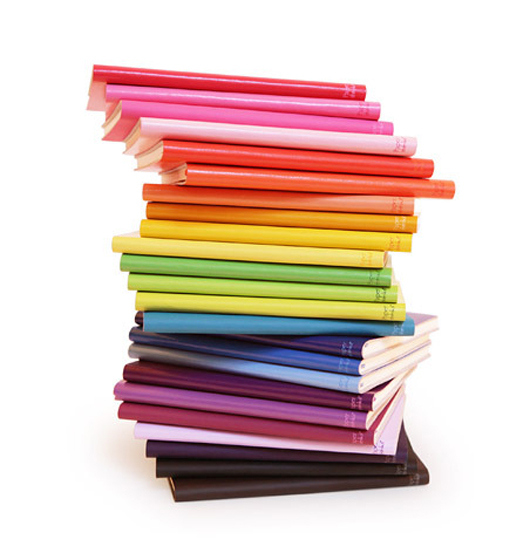
Color — Again, that seventh grader in you might long for the black-and-white speckle, but Paperthinks‘ rainbow of recycled leather notebooks (from pocket-sized to large, slim or regular, ruled or unlined) might fulfill your passion for a colorful lifestyle.
Or, you might eschew color for classic Parisian chic, like the Moleskine Black Line we talked about last year.
CAVEAT: Over the years, I’ve had many clients who loved the sensory delights of fancy-schmancy notebooks: the colors, the materials, the bindings. They haunted bookstores and stationers and gift shops and bought them giddily, as if they were guilty pleasures. But they never used them. Why? For the same reason we save the “good” china for a special occasion and never wear that perfect outfit because the event doesn’t live up to the dream occasion we imagined when we bought it.
Could you dare write “broccoli, Lemon Pledge, dental floss” in a $52 leather-bound, crimson notebook? If not, either stick to manhandling those sexy notebooks in the stores (but skip buying them) or purchase notebooks with fancier covers but replaceable inner workings. Switch out the paper parts of the notebooks when you’ve filled them with brilliance or drivel, but keep your signature-style colors and fabrics on display as you desire.
Tell Paper Doll — what’s your notebook style? What do you think it says about you? Please reply in the comments.
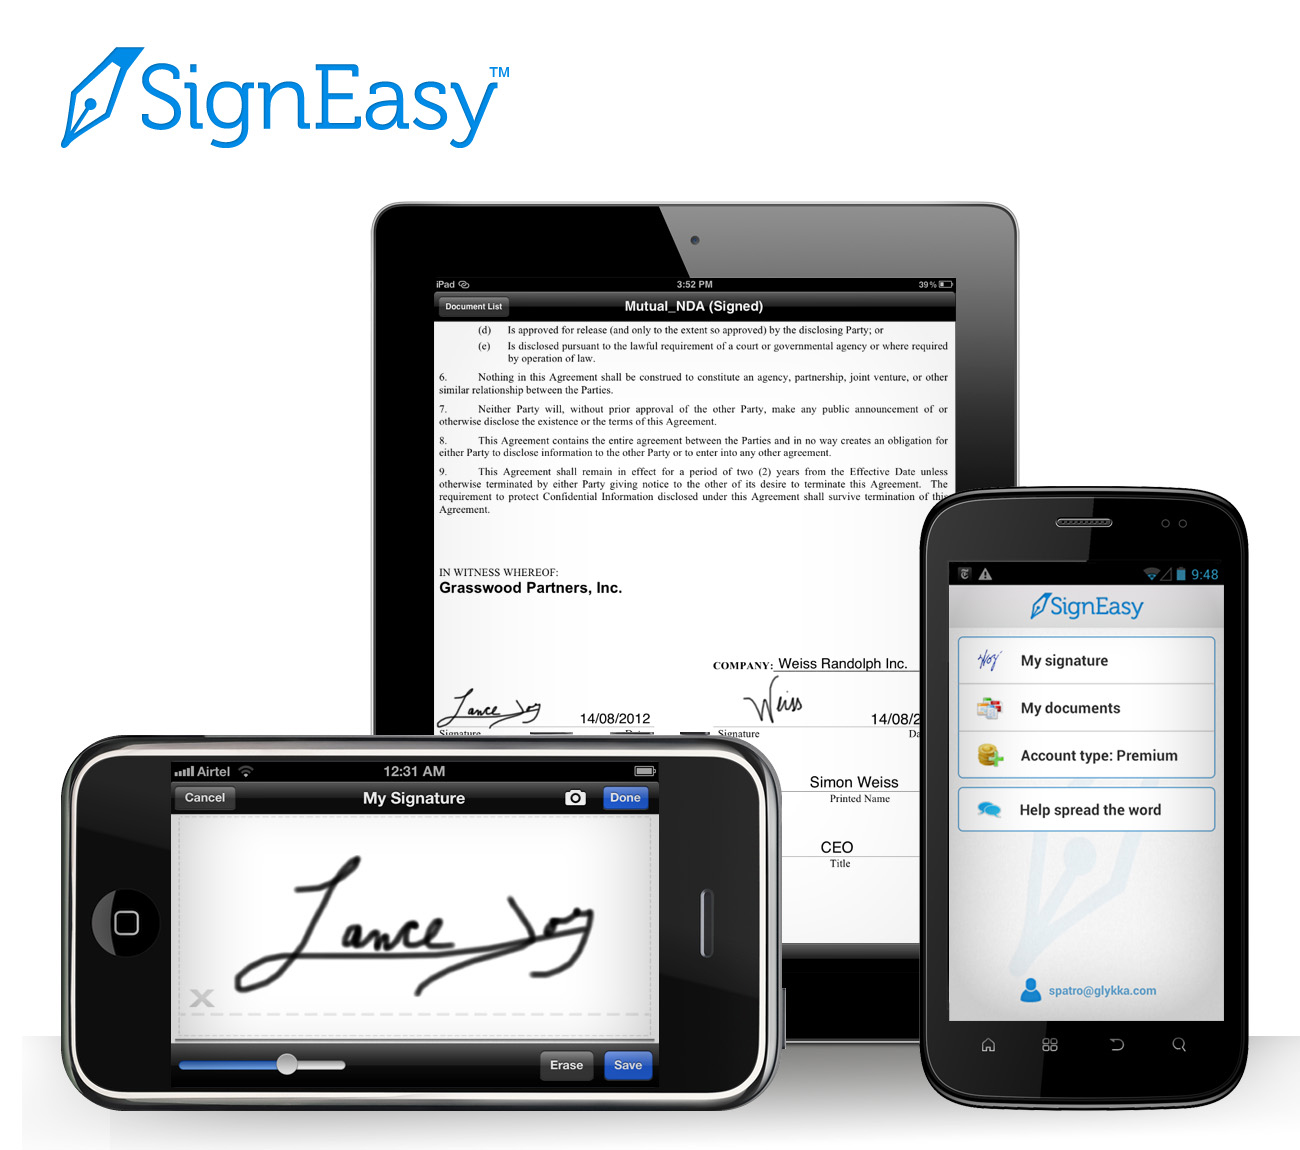
Max Headroom Meets John Hancock: Digital Signatures Series: SignEasy
Your business partner just realized he needs your signature on an important client contract that will impress the venture capitalist he’s meeting in two hours. Unfortunately, you just headed off on a well-deserved vacation to a remote mountain cabin. And let’s imagine everyone involved is the buttoned-up type who needs more than a handshake and a promise. Do you really want to divert yourself through one tiny town after another until you can find a random stranger willing to let you use her printer and fax machine so you can send the document on its way?
Or, closer to home, let’s say you forgot to sign your middle schooler’s permission slip to attend an important field trip, and said kid is pretty miffed at you. What do you do?
Use it as a chance to build up the tough love and teach your kid that “tsk, stuff happens” and get back to what you were doing? Feel guilt-tripped enough to excuse yourself from work, and then drive halfway across town in crazy traffic to sign the permission slip under the gaze of a disapproving school secretary?
What if there were a better way? There is! You can use a digital signature!
Electronic signatures are legally binding in the United States, Canada, the UK, Australia, throughout the European Union and elsewhere, per the Global and National Commerce Act (ESIGN), the Uniform Electronic Transactions Act (UETA) and European Directive (EC/1999/93).
Major players in the digital signature field include Docusign and Echosign. This is just the first in a series of ongoing posts on innovative ways to sign-and-send, without needing an envelope, stamp, fax machine or courier service. Watch this space for more on this topic.

SignEasy just turned three this summer, but this company has some pretty advanced features for a toddler.
Start by downloading the SignEasy app, and then create an account with a valid email address. Next, you’ll log in to create your signature and save it. From there, it’s just three easy steps: import, sign and send!
IMPORT
No matter where it lives, you just import the document in any of a few easy ways:
If someone emails you a document, just tap on the attachment and select SignEasy as the Open In option. (You know, like “Open in Safari” or “Open in Microsoft Word.”)
You can also forward it to add@getsigneasy.com from the email address set as your SignEasy username.
Or, if you want to import the document from Dropbox, Evernote, Google Drive, Box or some other file storage app/accounts, just open it, select the option of “Send to” or “Export to” and then tap on SignEasy.
No matter how you import it, the document will appear in the “My Documents” section of your SignEasy app.
SignEasy supports PDFs as well as all the Microsoft Office (DOC, DOCX, XLS, XLSX, PPT), Apple Pages and OpenOffice formats, images (JPG, BMP, PNG, TIFF), Text, HTML, RTF, and CSV. With the most recent release, SignEasy can handle importing filenames containing native alphabets or scripts in Spanish, Russian, Chinese, Korean, Japanese, Arabic and Hebrew.
SIGN
Once you’ve got your “paperwork” in front of you on your phone, tablet or other gadget, sign the document using a stylus or your finger. (Don’t turn this into a blonde joke; don’t use a real pen.) I suggest using a narrow-tipped stylus so that your signature will look more “real” and reflect the types of signatures on other documents you’ve signed, just in case there are any legal questions later on.
The app will let you adjust the color and size of your signature to your preferences, either on an ad hoc basis or to create a default. You can also use the security settings to password-protect your signature so nobody can steal your John or Jane Hancock.
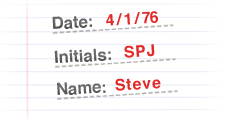
Complete your document, as necessary, with your initials, the date, any additional text, your company logo and more. You can also insert buttons and checkmarks on the iPhone/iPad version (but not on the Android or Blackberry versions, so far).
Any given document can be signed by up to three signers, including the account holder. If you’ve got a whole board or committee needing to sign off, there’s a slightly kludgy work-around where you get the initial three signatures, and then you reimport the finalized document back to SignEasy and repeat the process.
Offline signing is supported, so you can sign multiple documents and save them as drafts until you’re able and/or ready to send them.
Signatures created with SignEasy are only stored on the mobile device where they are created, never on the server. Signatures “pass through” the server, along with all the rest of a document’s contents, only when users generate the final signed document.
SEND
Email the signed document to whomever needs it, CC it to yourself, or tuck it away in your digital filing cabinet (Dropbox, Evernote, yadda yadda).
PRICING
SignEasy is a free app, and is available for iOS, Android and Blackberry platforms. You can sign up to three documents for free each month, too. If you want to sign unlimited documents each month or have cloud storage integration, there’s an annual fee of $29.99 per year for the premium package — about the cost of 65 First Class postage stamps or one or two overnight deliveries. Less frequent users can purchase pay-as-you-go document credits, where $4.99 gets you ten sign-and-sent documents. These plans are designed for individuals/single professionals only, so if you’ve got a whole staff looking to use this, there’s a volume licensing schedule for business and enterprise level usage.
Do you use an electronic signature program or app? Do you have a favorite? Please share your thoughts and concerns in the comments section, below.
Upright Expansion: Pendaflex® Vertical Reinforced Expanding Wallets and Files
Last time, when we delved into the “stand up” Smead Organized Up file folders, we talked about the advantages of vertical file folders. Organized Up’s bright folders were a bold stroke in Smead’s bevy of novel filing goodies, but this year’s National Association of Professional Organizers Annual Conference and Expo also had a sleeper product in the category of adjusting your vertical hold. (Paper Doll is suddenly aware that the term “vertical hold” is now wholly out of date. Let us pause while creaky bones gear up for the next paragraph.)
Perhaps lost in the haze and delight over new Esselte/Ampad products like the SimpleSort and Versa Crossover Notebook, a not-quite-as snazzy but no less hardworking product struggled to get attention. If Smead’s Organized Up folders were colorful social climbers, Esselte’s Pendaflex® line delivered two worker-bee classic products with updated styling: Vertical Reinforced Expanding Wallets and Files.
Normally, when you put papers into expanding folders, they’re horizontally arrayed, which means you have to reach into each section, pull out a stack of papers, turn them 90° and search for what you need. It’s not a world-ending problem, but it diminishes efficiency.
![]()
Pendaflex® Vertical Reinforced Expanding Wallet
Vertical alignment means that you can quickly let your fingers do the walking and assess files in the orientation in which you read your papers. With the Pendaflex® Reinforced Expanding Wallets, your documents are already standing at attention, ready for your perusal. And let’s face it — the main identifying characteristics of any document (logos, titles, dates) are most likely going to be found at the top.
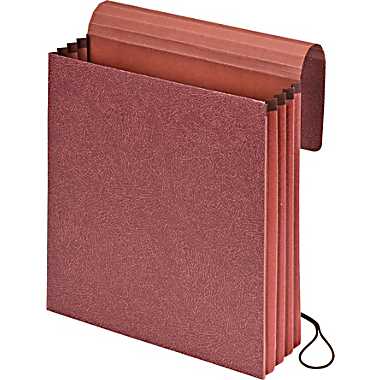
Each wallet is one interior, acid-free, letter-sized pocket, expandable up to 3 1/2″, made of 10% recycled fiber and 10% post-consumer fiber. Rip-proof reinforced gussets keep the tops of the accordion-style expanding sides firmly attached. A scored flap with a hardy elastic closure lets you protect your documents as the wallet’s contents expand, keeping them safe from prying eyes and secure from accidental up-ending when your life simulates a bad comedy.
The expanding wallets are ideal for transporting papers in backpacks, enabling students to isolate and pull out the appropriate papers without having to remove the wallet from the pack and flip it vertically (as is necessary with standard accordion-style wallets).
In case you’d prefer something a little more pizazzified than the accordion-style default of attorney-friendly “redrope” red fiber material, the Vertical Reinforced Expanding Wallets also come in bright red, blue and yellow.
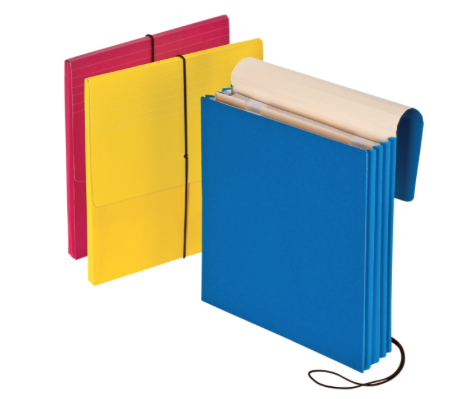
Pendaflex® Vertical Reinforced Expanding File
If the wallets are workhorses, the expanding files should be celebrities. That vertical orientation makes it easy to file and access papers, and the same full-size, scored flap with elastic closure and rip-resistant gussets keep this letter-sized tough guy going strong. But unlike the wallets, the expanding files are no mere expanding empty shell.

The Pendaflex® Reinforced Expanding Files come in three varieties:
- Alpha (A-Z) with 21 pockets
- Daily (1-31) with 31 pockets
- Monthly (January – December) with 12 pockets
Unfortunately, redrope is all you get, at least for now.
Whether you’re trying to tote client files or homework, create a vertical, fully-enclosed tickler file, or keep track of a year’s worth of lesson plans or club activities, Pendaflex® has you covered.
New Smead Organized Up Folders Stand At Attention
Like many professional organizers, I can be methodical and ritualistic. Sure, I like spontaneity as much as the next gal (OK, I really don’t, but let’s leave that aside), but when I go to the National Association of Professional Organizers Annual Conference and Expo, there are a few rituals I like to follow. After checking into the hotel, I like to head to the conference registration booth right away, pick up my conference bag and separate the read-and-recycle materials from the goodies and information I’ll need for the blog and organizing clients.
I have another ritual, related specifically to the Expo. As soon as it opens, I bypass my usual Shopping Mall Method for moving methodically through conference booths; that always has to wait until one essential task is completed.
A BELOVED VENDOR
![]()
Like a kid set free in a toy store, I make a run through the Expo until I find my personal North Star. That would be the Smead booth, occupied by my NAPO Expo boyfriend, the redoubtable Jim Riesterer!

Jim always makes sure that I get the low-down on the newest of the new Smead products, and in return, I share my opinions…loudly and with wild gesticulations. (Ignore the facial puffiness and flat hair. 2011 was a weird year.) Smead always knows I’m ready to offer my feedback.
Jim’s a stand-up guy, so I was delighted when he delivered the colorful and (literally) stand-up filing products in Smead’s new Organized Up™ line. Take a gander at the video and the new upright goodies.
The basic elements of the Organized Up™ system start with the Organized Up™ heavyweight vertical file folders. Since you read most papers in a portrait (uppy-downy) instead of landscape (lefty-right) orientation, doesn’t it sometimes make sense to file them that way, especially when you want to keep folders on your desktop without using up too much prime real estate?
It’s also helpful for students and others on-the-go to be able to tote file folders in backpacks, affix them to clipboards, or store them in drawers too narrow for letter-sized hanging folders. A vertical folder just makes sense in so many situations!
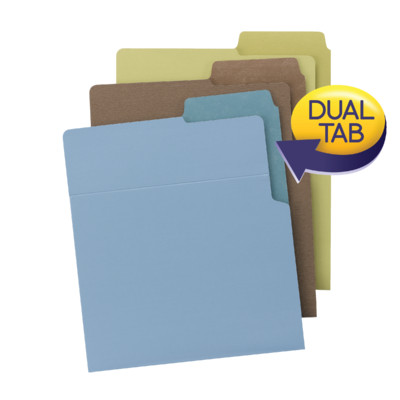
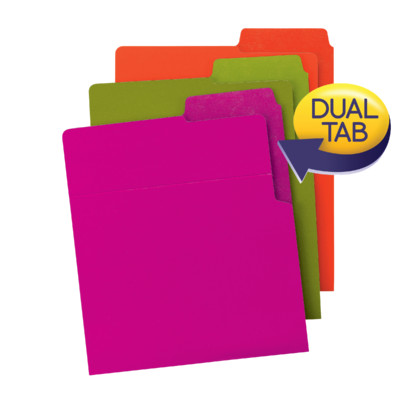
The Smead Organized Up folders impressed me with their durability. Paper Doll is a sucker for a heavy-duty folder, one that won’t flop over if you hold the bottom with just one hand. (Have you ever had a “dead-fish” handshake? A floppy folder disappoints in the same manner.) The heavyweight, water-resistant files should stand up to extensive, repeated use, and though the folder decor isn’t as fancy as some might prefer, Smead has a secret weapon — dual tabs!
The dual tabs let you label any folder for both vertical and horizontal use — assign labels to both edges up front, or be comforted that you can easily change the folder orientation if you want to switch to use them in traditional hanging folders vs. on your desktop, in a backpack, or in narrower, non-hanging file drawers.
The Organized Up™ folders also have a fold-down front. About two inches down the vertical front surface of each folder, there’s a crease, allowing you to fold the edge towards you and get a close-up look at the folder contents.
Each 9 7/8″ x 12″ coated stock folder is made of 100% recycled content, 30% post-consumer waste, and holds up to 25 sheets of paper. The Organized Up™ folders are closed on the bottom and on one side for extra security.
The Organized Up™ heavyweight vertical file folders come in two color schemes: Earth Tones (which I find dismal and depressing–leek, nutmeg and stonewash? Seriously?) and Bright Tones (Fuchsia, Orange & Peridot, which make me want to dance around my Paper Doll HQ office).
The folders may be found at various office supply retailers and on Amazon. While this is a nifty launch, prettier colors and a wider variety of patterns/styles would be nice once the line has gotten its footing. Also, I’d like to be able to buy the folders in 25-count boxes, rather than packages of six (two folders per color) as currently available. (A six-pack runs about $5-6.)
For those less likely to use a file riser, clipboard or notebook and who might be seeking an official file-box solution, the Organized Up™ folders can be used with Organized Up™ MO® Vertical File Cases. The brown diamond-themed case hold up to 600 sheets of paper. They’re made from a durable printed corrugate material and have die cut handles to allow for easy lifting and transporting. I must admit that the brown leatherette pattern isn’t my cup of tea. The color schemes and patterns for the horizontal Smead MO® system cases are much snazzier. This brown is just snoozier.
THE DAINTY COMPETITION
It should be noted, Smead wasn’t the first out of the starting gate with vertical file folders. That honor belongs to the Doyenne of Domesticity in her Martha Stewart Home Office with Avery Vertical File Folder line. (Whew, that’s a mouthful!)
Martha’s 1/2-cut, portrait style folders measure 9-1/8″ x 12″ and have a left-side seal to maintain paper security. (Understandably, vertically-arrayed papers are a bit more floppy than traditionally horizontally-positioned ones.) Martha’s folders were surely lovely, coming in 6-pack assortments of black and blue-green damask, aster and wave patterns, as well as a blue, grey and cappuccino solids with interior linen patterns.
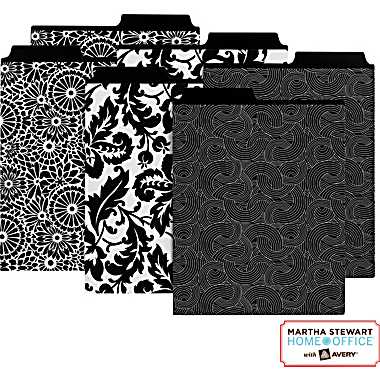
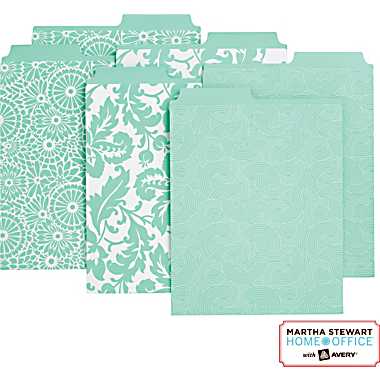
Martha won points for being first, but not necessarily for being sturdy. Her vertical files are pretty, and nice enough for home and light office use, but lack the powerhouse sturdiness of the Smead Organized Up™ folders. Martha’s line also lacks fold-down flaps and dual-tab writing surfaces.
OTHER STAND-UP SOLUTIONS
Smead’s vertical assault on the filing realm didn’t stop with file folders. The Organized Up™ line includes the 9 3/4″ x 11 1/2 Smead Stackit™ One-Pocket folders
and the Smead Stackit™ Three Pocket Organizers
for when you need your presentation materials to be extra-secure on-the-go.
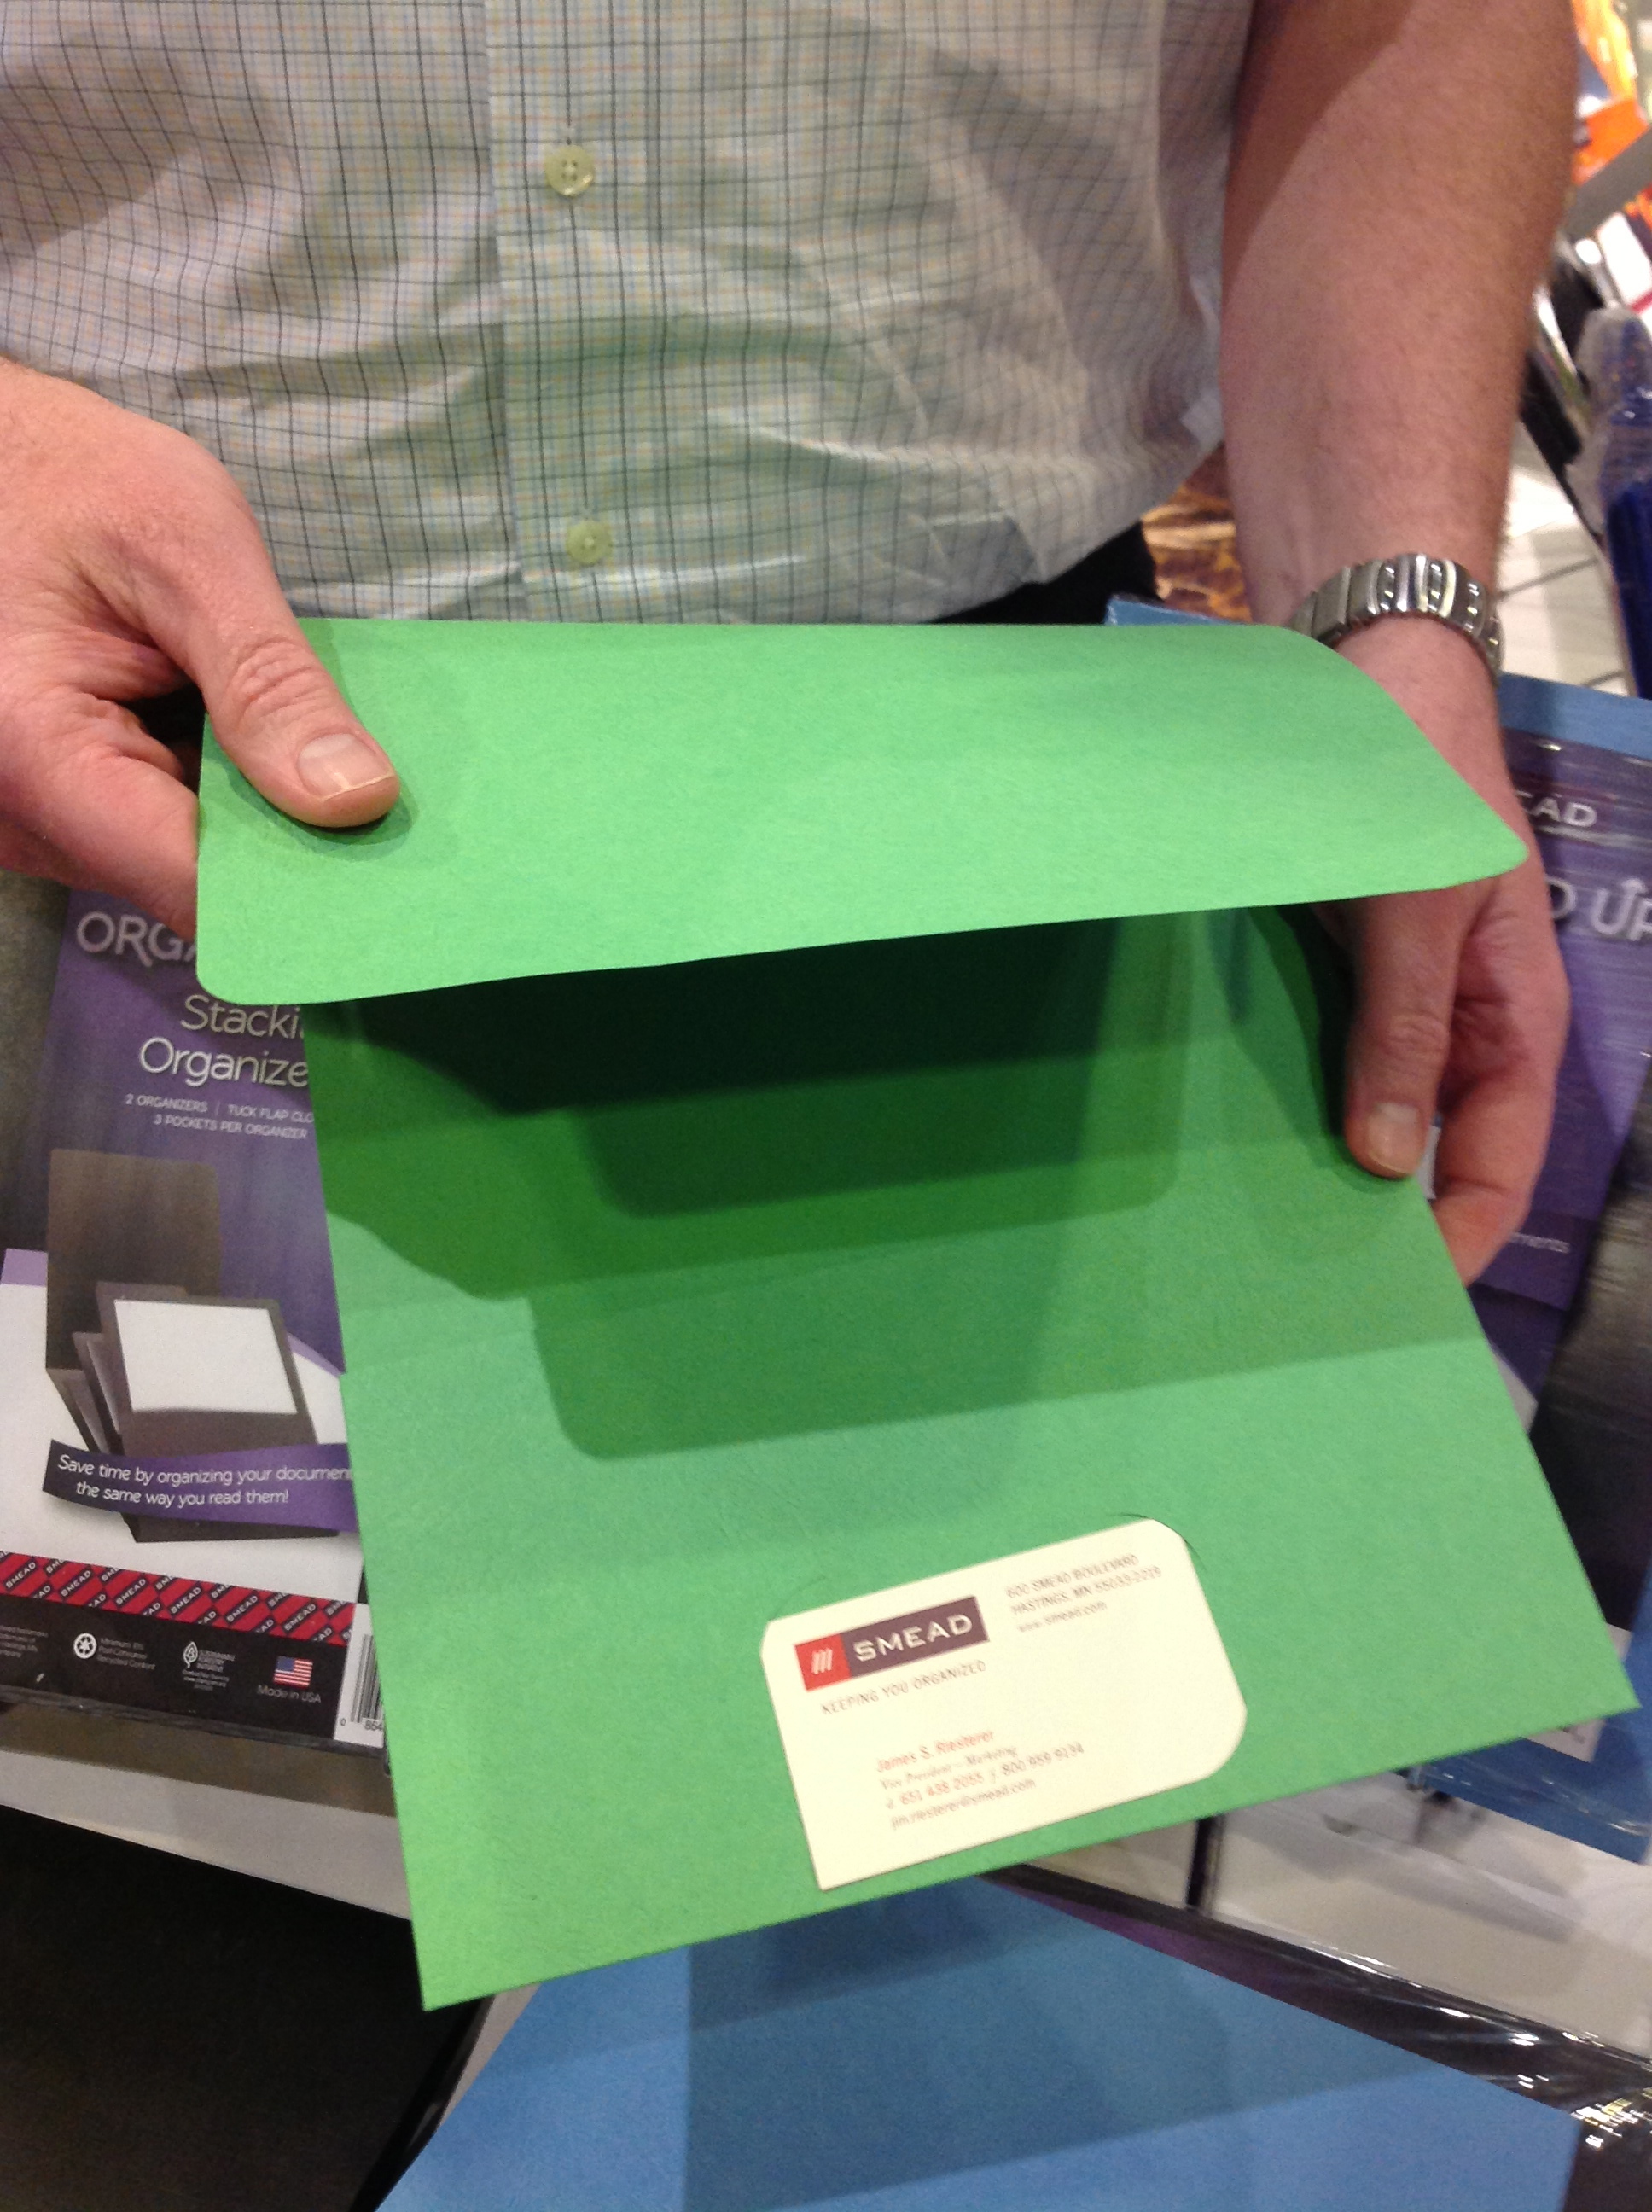
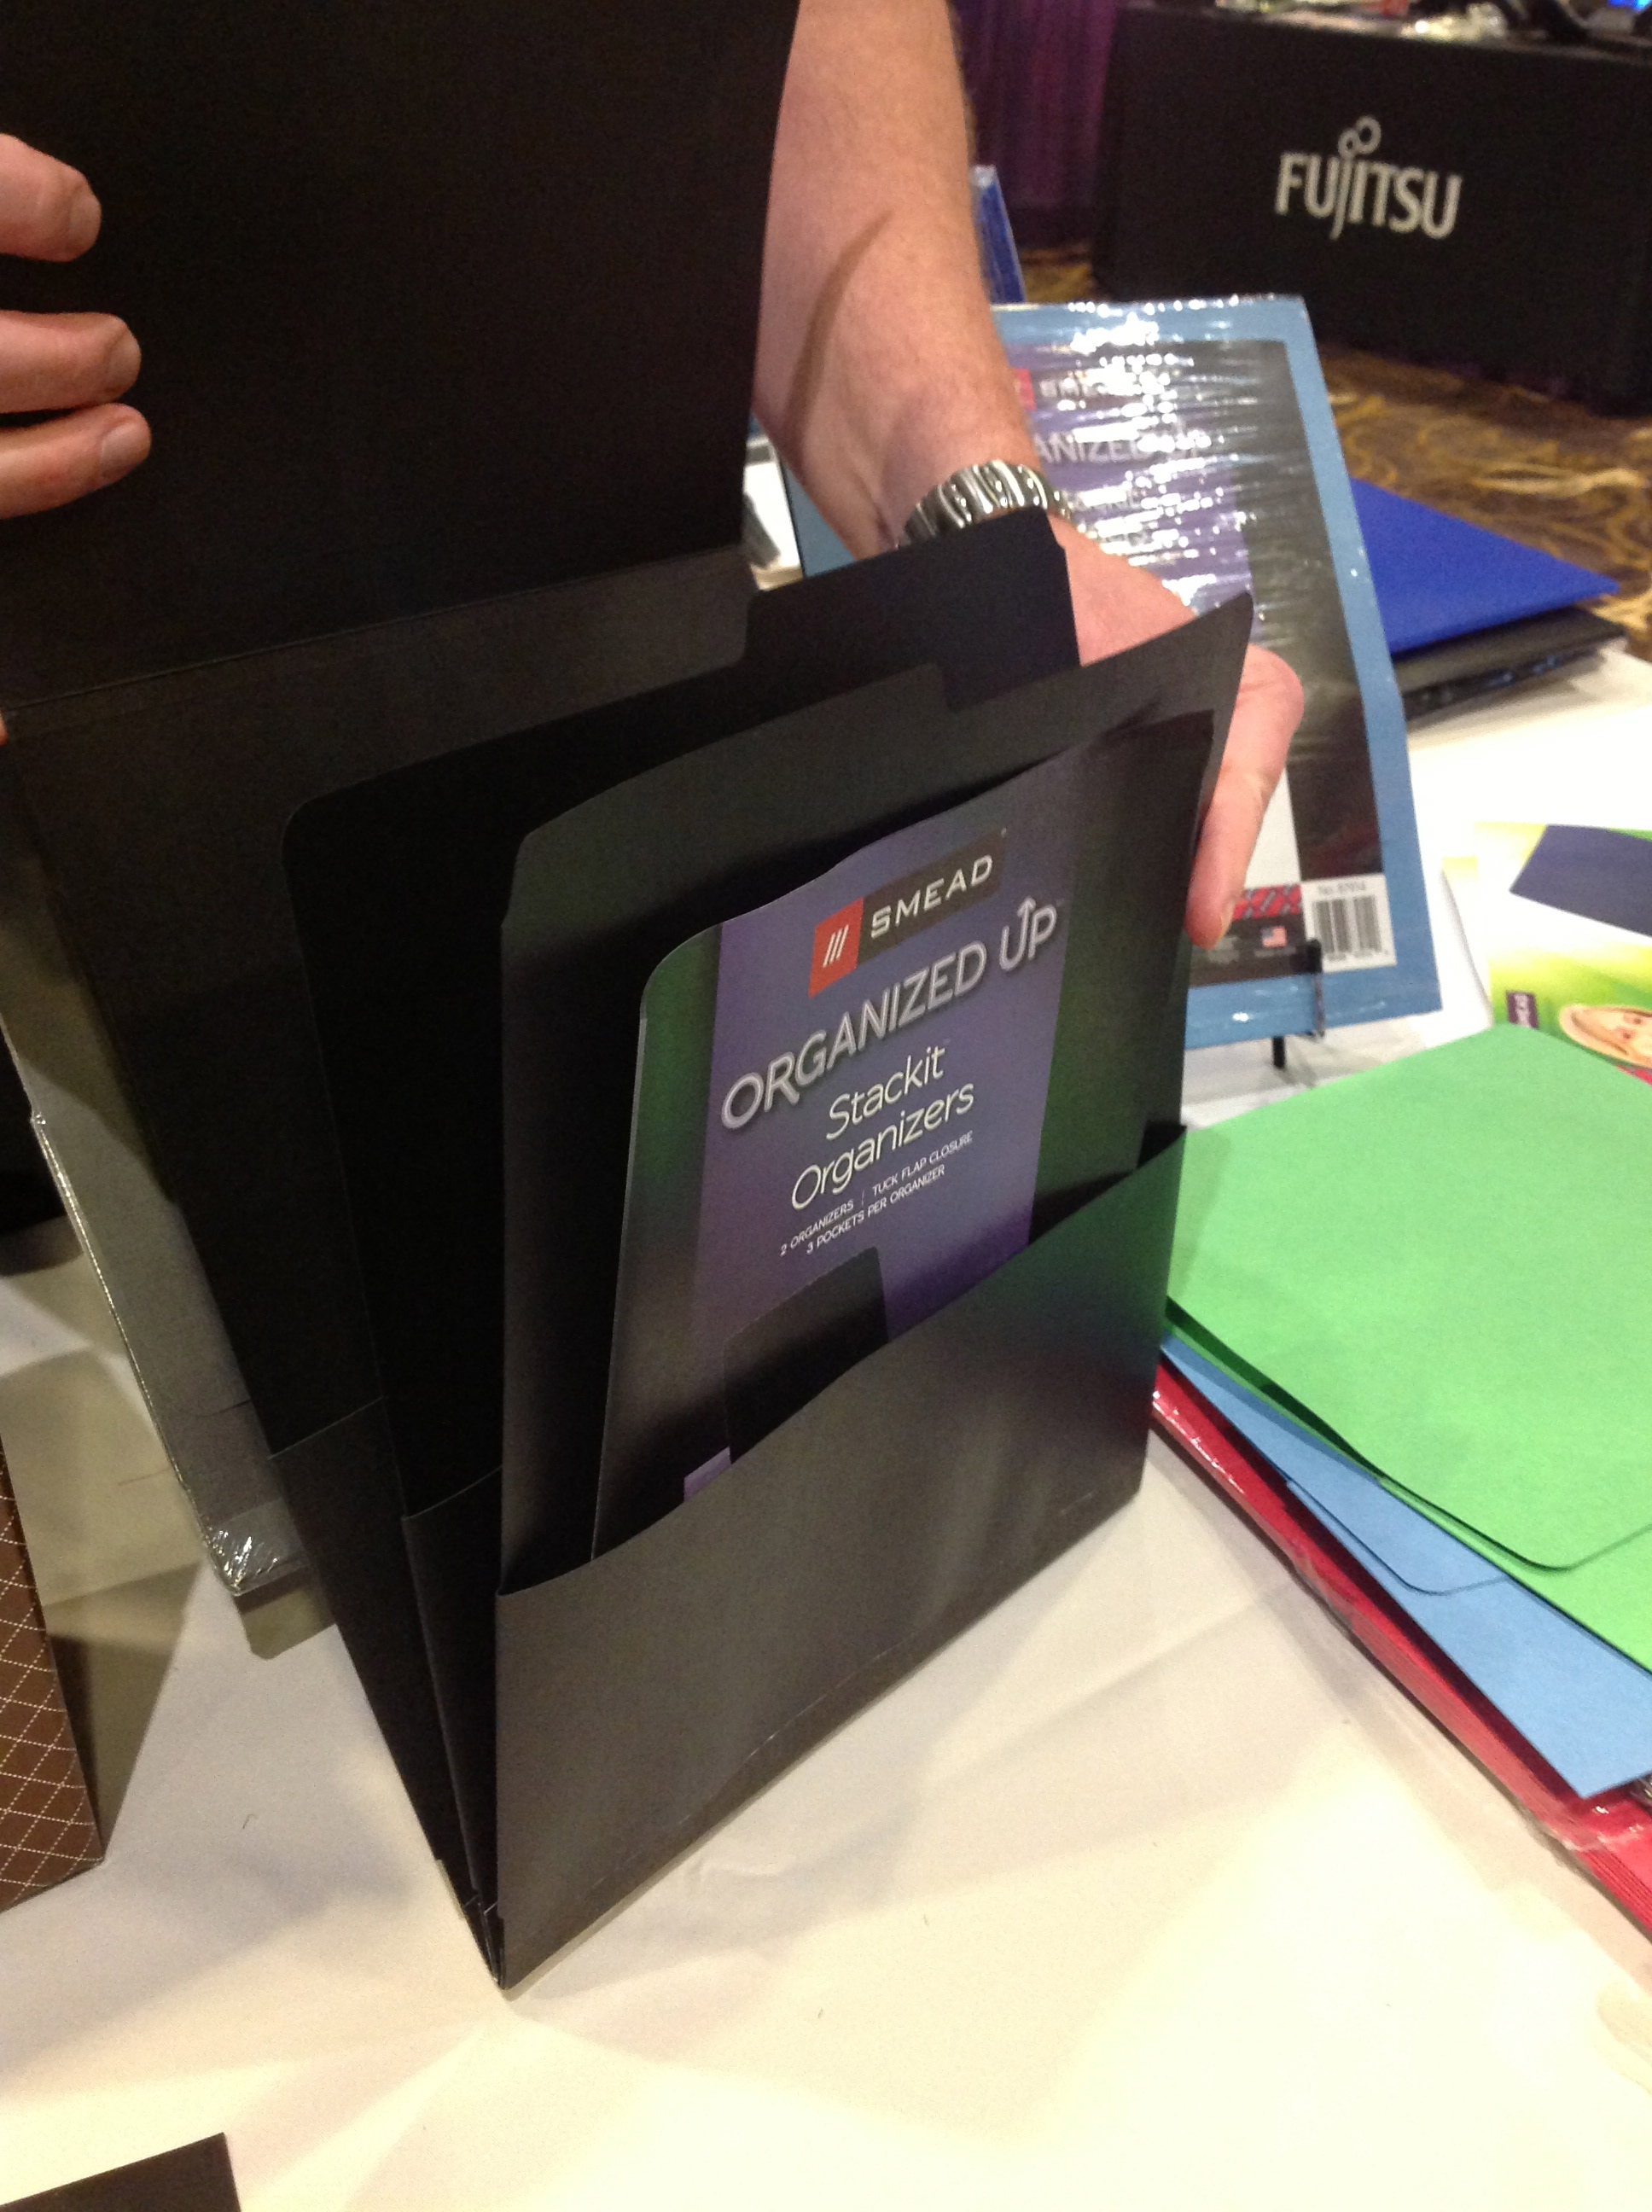
The Stackit™ One-Pocket is made from textured stock (in black, blue, green or red) or heavy-duty linen stock (in black, dark blue or grey) and comes five to a package for about $7. It can hold up to 100 sheets of paper.
The Stackit™ Three-Pocket Organizer has three tabbed divider-pockets, suitable for labeling, and each pocket holds up to 50 sheets each. It comes in (dark blue, grey or black) linen. Two organizers come in each package, for about $6.50. Both items include business card slots and a straight-cut flap that can be tucked in for securing contents.
File folders or presentation folders, heavy-duty or light-hearted patterns, I think we can all agree to stand up and cheer for more variety in our file folder options.
Presto, Change-o! NAPO Expo 2013 Shape-shifting Organizing Products #3: Ampad Versa Crossover
Yet another shape-shifting organizing tool from the Expo at this year’s annual National Association of Professional Organizers Conference caught Paper Doll‘s eye. Merely changing how something looks may dazzle fans of Transformers (Have you heard? They’re robots in disguise!), but to pass the Paper Doll sniff test, a product has to not only change shape, but also improve function.
In our last two posts on binders and notepads, we’ve looked at how small features and format changes can really modify the user experience and not merely the appearance. Today, we’ve got one more item that has potential in that arena.
Ampad Versa Crossover Notebook
At first glance, the Ampad Versa Crossover looks like an unassuming Navy blue spiral notebook. (Such is the stealthy sneakiness of shape-shifting organizing products!)
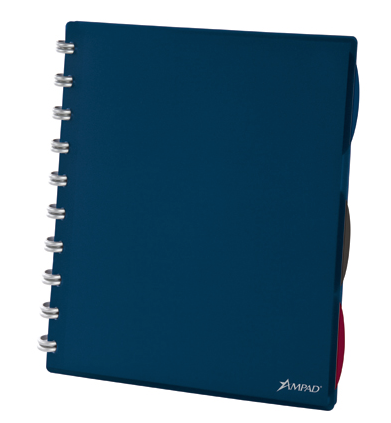
But upon further inspection, the benefits and added features of the Versa Crossover become obvious. First, it’s not a spiral notebook at all, but like the Staples Arc notebook I reviewed last year, the Versa Crossover Notebook is customizable and held together with plastic discs instead of wires. And the system appears to be less a notebook, and more a combination of notebook, binder, and day planner, all in one. Indeed, nothing is permanently bound at all!
The Basics — The front cover is made of sturdy poly; the rear cover is actually a flexibly poly doubled-flap that unlocks and folds out to display a plastic dual-pocket setup: one full-sized pocket and one half-pocket. The two surfaces can be folded together to click into place at the rear of the notebook or the outer flap (the part that doesn’t serve as the back cover) can be folded over a stack of pages to create a section divider, hiding some papers for security or improved focus.
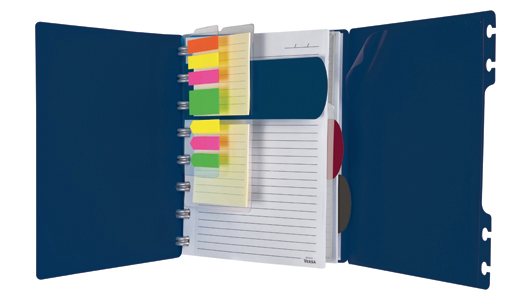
Flags — Each Versa Crossover Notebook includes a re-positionable plastic backing sheet bearing a combined total of 105 colorful tape flags and mini-highlighter flags. Position it at the front of the notebook, at the start of any section, or just prior to whatever note page you’re currently using.
Task pads — Ampad includes a larger plastic sheet with two stacks of thirty 3″ lined, sticky note task pads.
Clear poly security pocket — Use it to gather receipts, parking validations, tickets, business cards and more; then seal the envelope with the secure upper corner closure, and reposition the entire pocket to wherever is most convenient.
Plastic dividers — Three stiff-but-flexible, narrow, translucent poly section dividers, in black, blue and burgundy/red are included with every notebook. They can be positioned at any level of the page, and the dividers extend about a quarter of a inch beyond the outer notebook margin to enable easy access to just the right papers.
The key to the Versa Crossover Notebook’s appeal, however, is that the paper — indeed, all elements of the notebook, including the covers, flaps, flags, task pads, pockets and dividers — can be re-positioned anywhere in the notebook. That’s because instead of being attached by spiral wires, everything is held in place by the discs nestled perfectly inside uniquely shaped oval “tabby things.” (Ampad hasn’t provided a better name, so that’s what I’m calling them. They’re not quite key-shaped, or even sideways mushrooms. I’m sure Ampad would welcome improved nomenclature. Paper Doll sure would!)

You might assume the paper would be hard to re-position, or would rip or become messy, but after repeated experiments at a secure Paper Doll testing facility (OK, my dining table), I found that the stiff paper held up to rigorous re-positioning (though the process worked best when at least three or four sheets, and as many as a few dozen, were relocated simultaneously).
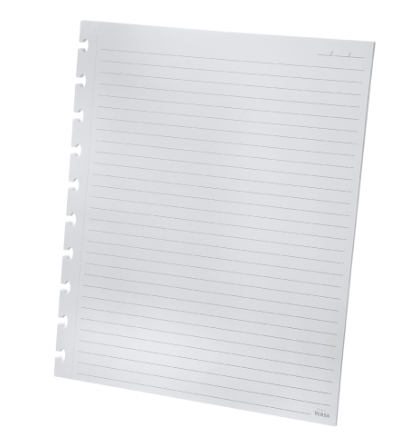
Each ruled sheet, lined on both sides, is pre-marked to remind you to put the date at the top (to improve chronological filing options) and perforated, yielding about 5/8″ margin from the edge of the page, giving ample space for the “tabby things.” (Seriously, have you got a better name?) Although the notebooks come with wide-ruled pages, graph paper is available in refill packets.
In addition to the Versa Crossover’s shape-shifting capabilities in general, I like that this notebook is especially lefty-friendly (in terms of handedness — you know this is an apolitical blog). Pages are lined similarly on both sides, so one can either choose to just write on the “reverse” side of pages, or flip everything upside down to create easily-accessed pages to the left of the rings.
The heavy duty Versa paper is appealingly thick and I’ve found that gel ink pens do not tend to bleed through to the reverse, making it easier to get complete use out of all of the paper provided.
However, I have a few suggestions to make the Versa Crossover Notebook fully customizable. First, from a utility perspective, Ampad needs to provide a hole punch to punch “tabby thing”-shaped holes in paper other than the ruled and graph paper already available. Users need to be able to insert their own documents (itineraries, boarding passes, calendars, etc.) into the Versa system.
Speaking of which, a blank calendar page would not go amiss as an addition to make this a little more planner-like and worthy of the price (see below). An optional business card holder would amp up the professional potential of this organizing tool.
Ampad’s official video walks the user through all the permutations.
The Versa Crossover Notebook comes in two versions, letter-sized and 6″ x 9″; 60 wide-ruled sheets come standard; both ruled and graph-style refill packets contain 40-pages of letter-sized or 5 1/2″ x 8 1/2″ sheets. Other accessory refills include double stacks of 3″ square sticky note sheets and tape flags; both varieties adhere to a plastic backing cut with “tabby things” to be inserted and re-positioned anywhere in the Versa Crossover.
The Versa Crossover Notebook is so new that I’m not seeing it listed at major office supply retailers like Staples and Office Depot. However, Amazon is pricing the letter-sized version at slightly above $17 and the smaller version about one dollar less. No pricing on refills was available at press time. (I realize I was on hiatus for twelve weeks, but my gracious, prices have really gone up on basic office supplies, especially those with whiz-bang ingenuity.)
Be assured, we still have oodles more organizing products to show off from the 2013 NAPO Expo. Come back soon!
Follow Me