Paper Doll
Mysteries in the Office Supply Aisle: Paper Doll Plays Detective
The world of professional organizing isn’t likely to become a mystery classic. I don’t anticipate Decluttering on the Orient Express, The Maltese Filing Cabinet or The Thin Man’s Disturbing Pile of Paper Clutter to become New York Times best-sellers. And certainly, I doubt anyone’s ever thought of writing a mystery about office supplies. Until now.
This past weekend was my state’s tax-free holiday weekend. A beloved friend and former client (we’ll call her Paper Sara) and I were planning to get together for dinner, and arranged to meet at a local big box office supply store. It should be no surprise that Paper Doll loves school supplies. After all, what are school supplies except office supplies for those whose office is a cubby or locker?
Speaking of lockers, when Paper Sara found me, I was transfixed by the metal pop-up LockerMate locker shelves near the front of the store.
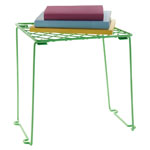
I’d gotten one open, but couldn’t quite close it. When I mused aloud that I suspected it must operate like an ironing board, Paper Sara played Holmes to my Watson and managed to break it down. (Paper Doll only claims expertise in organizing; mechanical engineering is a different course altogether).
We discussed our envy of kids these days, at least in relation to school supply options. I clearly recall Paper Mommy having to schlep me to a nearby lumber yard to have a splintery wooden board cut to the guidance department’s specifications, and even then, the balance of the board inside the locker was precarious. Similarly, I remember using brown paper Wegman‘s grocery store bags as book covers; students now have their pick of stretchy Spandex book covers  that seem more like fashionable bathing suits than ways to protect 9th grade Social Studies texts from spilled lunch and slushy snow.
Paper Sara and I were gleeful at the prospect of marching up and down every aisle to “take inventory” and view all of the best in school and office supplies. I was pleased to share my advice and counsel on products I’d researched for my blog posts, and we spent some quality time unboxing (non-shrink-wrapped) products to examine them. We Tsk-Tsked over store-brand faux-Lucite desk accessories that squeaked, the very type against which I’d contrasted the non-squeaking Pendaflex PileSmart Organizer Tray we talked about a few weeks ago.
As my flair for the dramatic didn’t extend to opening shrink-wrapped packaging, I had to limit my fun to acting out the benefits of Smead’s Easy Grip Pocket, which I blogged about after this year’s NAPO conference. It’s just not the same, trying to illustrate the seemingly magic “grippy” powers without a brick or heavy item inside, or even achieving true tactile contact with the non-slip grip. Nonetheless, Paper Sara appreciated the concept and was eager to acquire one for taking her Cleveland, Tennessee Sara’s Hallmark Store financial paperwork to her accountant.
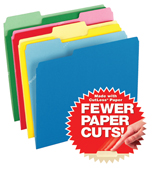
We wondered, not for the first time, why standard hanging folders were invented in such a horrible green shade. (That’s a mystery that only Esselte, the former Oxford Pendaflex Company, inventors of hanging folders, know for sure.) We marveled at anti-microbial (“Fights Mold, Mildew and Odors”!) file folders and those that fight paper cuts.
Next, we visited the Sharpie center and shared our mutual compulsion to organize everything that visiting children (and I’m sure, a few grownups) had put asunder. We straightened out the colors into their pre-labeled cubbies, separated the traditional Sharpies from the newer, snazzier Sharpie pens and markers, and tested the loveliness of colors, like Berry vs. Boysenberry and Coconut vs. Stingray. We sought, in vain, to tidy away one stray Sharpie marker in Pomegranate, which lacked a home altogether. (Readers: Don’t think we weren’t tempted to buy it, just to ensure a more organized display!)
At this point in a real mystery story, there would be a seemingly tangentially-related flashback, so Paper Sara and I shared our back-to-school shopping recollections.
It will surprise nobody that Paper Doll not only liked school, but particularly back-to-school supply shopping. Paper Mommy was happy to relinquish the duties to me, and by third grade, I’d have spent much of August writing and rewriting the ultimate school supply list. If Paper Mommy wondered why I felt compelled to have a new compass and protractor each year, she kept it to herself, happy that her weird little child could get so much joy from college-ruled paper and so much intellectual abandon out of an interior debate between Trapper Keepers vs. standard two-pocket folders.
(Speaking of which, did you know that people in the Midwest and Western U.S. have their own school supply lingo? From fellow professional organizers Krista Colvin and Brandie Kajino, I recently learned that while we Buffalonians had quotidian two-pocket folders, our cohorts to the left of us had Pee Chees!)
Flash-forward to the present day. Although Paper Doll likes to consider herself an expert in office and school supplies, our anthropological dig through the store turned me into Paper Poirot. First, we located an unusual treasure in the same aisle as index cards, from the Pendaflex (Esselte) Oxford line. At first, they appeared to be index cards as well, but the slightly rounded corners set them apart from traditional “take notes for your book report” resource. It was a 75 pack of 3″ x 5″ Assorted Book Mark Cards.
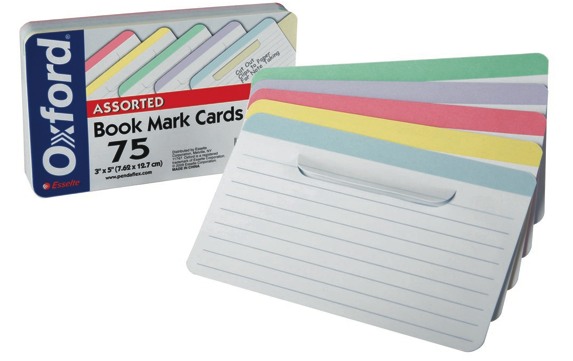
I immediately saw the appeal of the cards, which are designed to have multiple benefits for students and other researchers:
- As bookmarks, they specify the page you wish to mark.
- As lined index cards, they allow you to write copious notes to reference what you’ve found on the page. Students, from elementary kids to PhD candidates would find these dependable ways to capture thoughts and match them to the primary source material.
- As tabbed cards, they’re more likely to stay in place than glossy bookmarks. Anyone who has ever dropped a stack of textbooks with numerous pages marked by standard index cards, napkins or loose papers knows that method can be a recipe for chaos.
- As a tabbed card, they prevent any concern about page-damaging adhesive residue, such as we discussed a few weeks ago in Organizing With Post-it Notes: Revenge of the Floozies.
- Coming in assorted colors, the cards allow the user to color-code notes and references.
- The colorful top lines of the tabbed cards allow the user to label and categorize.
Book Mark Cards obviously provide the greatest boon to academic reading, but could easily be adapted for use in cookbooks (especially those with poor indexing), to aid in quickly finding a favorite recipe for a specific occasion and making applicable notes for future reference. Had these cards been available when I was a television program director, it would have made the comparative data in the cramped Nielsen ratings books much easier to track.
I was so impressed with this simple, elegant solution to a problem I’d long encountered that I bought it on the spot. However, when I returned to my computer, I was flummoxed. There was nary a word of reference to this product on the Pendaflex website, nor on any office supply store websites, nor anywhere, it seemed, on the internet. The Oxford Book Mark Cards were a ghost!
Never to be dissuaded from following the scent of a good office supply mystery, I searched the product’s UPC code, first on the web in general, and then in the UPC Database (usually a treasure trove of tracking information on intriguing, if surreptitious, product behavior). Nada!
My Google-fu had failed me. At this point, I called in professional organizer reinforcements on Facebook and Twitter. Many theories abounded. Was it too new a product to be listed anywhere? Had it been discontinued? Perhaps my city was a test market? Was I in some crazy Matrix/Inception/FightClub alternate reality?
(The first rule of Oxford Book Mark Cards is you don’t talk about Oxford Book Mark Cards!)
Finally, when organizing product maven Jeri Dansky declared that she, too, was giving up, I knew I’d have to go to the source, and first thing Monday morning, I placed calls and sent emails to various Esselte VIPs. The fabulous Meryl Altuch, Esselte’s Director of Product Marketing, solved the mystery. (She even managed to provide the lovely photo you see above, obviating further failed attempts on my part to take a close-up digital photo without the flash obscuring the words on the packaging. Yes, Paper Doll needs an official photographer!).
The resolution to the mystery of the ghost product? Oxford Book Mark Cards are currently only available in Office Depot stores. It’s a bit of a proprietary product for them, but it doesn’t seem that Office Depot sells them online. So, if the Book Mark Cards meet your little (or full-size) researcher’s needs, you’ll have to visit one of the 1100 Office Depot stores near you.
A less satisfactory alternative for those unable to reach an Office Depot is a competing product from Mead (the Trapper Keeper people!). The Mead Bookmark Index Cards are available from Amazon, in packs of 70 instead of 75, but only in sets of 12! Hopefully, Office Depot will start making their cards available via online ordering in the future.
Every mystery story seems to have a primary puzzle, a grand A storyline, and a smaller B-story. From our shopping trip, the B-story came in the form of itty-bitty index cards. Certainly we’ve all seen traditional 3″ x 5″ cards, the larger 4″ by 6″ cards and even 5″ x 8″. (Sidebar for students heading back to school and hoping to impress either their biology or history teachers: Carl Linnaeus, the father of modern taxonomy, invented the index card.)
But what are we to make of the Oxford Half-Size Index Cards? They measure 3″ x 2 1/2″ and come in both color
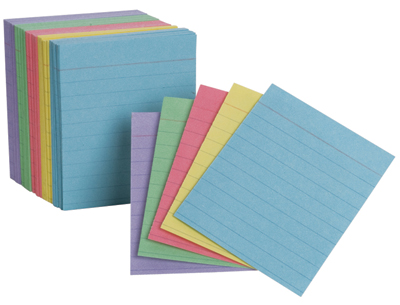
and standard white 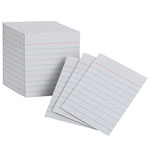 , and are lined like traditional index cards.
They’re cute and sometimes the appeal of office supplies can be chalked up to aesthetics. But Paper Doll is curious as to what students (or anyone) might use these narrower index cards to do that they might not do with standard cards. Is there a compelling reason one might want smaller index cards? Is there an educational experience for which smaller cards are superior? (For example, is it easier to learn kanji  when there’s less white space on the flashcard?)
The solution(s) to this mystery, I leave for you readers to detect. Please submit your ideas, practical and silly, sublime or ridiculous. What might you do with a half-size index card?
WhitePaper RAFTing: Adventures in Paper Organizing
Recently, an acquaintance explained the way the brain forms memories. She asked me to close my eyes and imagine the first time I ever rode a roller coaster. I laughed nervously and opened my eyes quickly. My friend knew that certain experiences become memories that are so powerful that they are indelibly inked into our subconscious. Sometimes these memories are pleasant; other times, terrifying. The common thread is that recalling memories make an experience so real that we feel that we’re right in that adventure, all over again.
Professional organizers are often maligned. People assume that, collectively, those of us who work daily at imposing order on chaos may not be spontaneous or adventurous. On my colleagues’ behalf, I assure you this is not the case. As for myself…I offer full disclosure.
It was a kiddie roller coaster, designed for children to comfortably ride…alone, without parental nurturing. I’d nagged, wheedled and cajoled Paper Mommy into letting me ride, but after no more than three seconds, and with my car just barely beginning to climb a 10 incline, my screams to be let off were blood-curdling. I don’t mean that they could be heard on nearby rides. I mean, they could be heard in distant states, possibly even in Ontario, Canada. The supervisor had to stop, manually reverse the ride and carry me off.
Paper Mommy‘s patience with my terror was sorely tested that day, as I also climbed to the top of one of those multi-story, partitioned multi-lane slides, where amusement park visitors slide down on burlap magic carpets. With a distant view of Paper Mommy at the bottom, I climbed the interminable staircase, took my place in line, and started my descent. For a moment. I froze in place on the first (and, in retrospect, hardly-steep) part of the slide, wedged my sneakers along the rails of the lane, turn white and assured the world that there was no chance I’d be going downward. (Eventually, some stranger’s good-hearted dad inched his way down and pulled me to safety.) I recall the terror to this day.
It’s not exactly whitewater rafting, but these memories are part of why Paper Doll (and colleagues) truly understand the overwhelm — indeed, the terror — our clients face when they think of, and wade into, the clutter of papers they sometimes feel will consume them. Whatever it is, we’ve been there, too. And we can help.
In the past, I’ve referenced my signature article, If You’re Drowning In Paper, Build Yourself a RAFT, which original appeared at OnlineOrganizing.com in 2002, and has been published in various forms since. Today, I’d like to expand on those concepts so that anyone experiencing that frozen-in-terror feeling at the sight or thought of their paper piles can gain confidence.
Close your eyes. Imagine your desk covered in papers. Is there more on your chair when you come back from the copier or the laundry room? Does every piece of paper represent something else to read? Write? Pay? Call about? When you think of your papers, do you feel like you’re struggling to keep afloat?
If you’re drowning, the solution is to build a RAFT — an acronym for the four simple steps applicable to your ocean of papers—Refer, Act, File or Toss.
If you’re like most people, you’re probably thinking that if you’ve never found the time to tackle all of your loose papers before, you certainly won’t have time to learn a new system for dealing with it. However, when you’re drowning, instead of flailing around, your survival depends on getting a sense of your surroundings and differentiating the deep water from the shallow and the sharks from the beach balls.
BATTEN DOWN THE HATCHES
Start by setting aside time to build your RAFT — it doesn’t have to be a three-hour tour. If you’re already feeling overwhelmed by tackling your papers, take it in small bites, perhaps 45-minutes at a time.
However long you plan to work, create an interruption-free zone. Turn off the ringer on your phone and let calls go to voicemail, turn off any auditory alerts for new email, and close your door. If music steadies your nerves, try a mid-tempo CD, preferably instrumental, so you won’t be distracted or tempted to drop your papers and raise your jazz hands. (Sit down, you’re rockin’ the boat!)
MAINTAIN YOUR COMPASS
To steer yourself towards organization, gather your supplies. For best results, you’ll want to collect:
- A calendar (paper or digital) to schedule essential tasks
- A tickler file to slot papers for dates papers will be acted upon
- A legal pad or notebook for keeping track of thoughts
- A box of one-third-cut manila file folders
- A Sharpie or label maker
WEAR YOUR LIFE JACKET
If the rising tide of papers has been developing for a while, one session will likely not be enough. To prevent you from losing steam on your most important or urgent activities, relocate your active documents (that you’ll need today or tomorrow) to a safe place, out of arms’ reach for toddlers (or paws’ reach for furry friends).
If you’re often thwarted by memory problems or distractions, put a sticky note on the room’s light switch or the computer monitor, reminding you of where you put these documents. This will prevent blind panic if you are interrupted mid-RAFT.
CALM THE ROUGH SEAS
Now, collect all other loose papers, un-filed file folders, floozies, business cards and notes from around your office or workspace. Don’t forget items taped to the phone and the monitor, unopened mail, financial statements, personal papers, receipts, computer manuals, and other “homeless” papers.
Pile the collection in a basket or photocopy paper box lid. If the pile is to high to see over, just “bail” the extra items “overboard” next to your desk to deal with when you reach the end of your first pile. If all the papers would equal more than a full-sized laundry basket, don’t be overwhelmed. Focus on the papers on your desk today. Tomorrow, you can handle the piles on top of the printer and filing cabinet. Then, the floor by the window…and so on. The clutter tide doesn’t rise overnight; don’t expect to reach calmer waters in one session.
BUILD THE RAFT
To get started, stick your oars in the water (and your hands into the paper stack) and:
1) Pick up whatever piece of paper is on the top of your pile-examine one piece at a time. Don’t hold one piece of paper and read another.
2) Identify what it is. It may be obvious why you have it — there may be many more like it, and you know how organizing means grouping “like with like”. For other pieces of paper, you may have to squint to make out handwriting, or you may not know why the piece of paper is in your possession. If you encounter a puzzle, something that takes more than a full minute to comprehend, set it aside in a mystery pile.
3) Ask yourself “What’s the very next step I need to take” with this item?
Once you have your answer, the decision of whether you will refer, act, file or toss it will be simple. The actual action will be taken later. Right now, you’re just sorting.
Most action-oriented papers tend to bring up all sorts of possibilities. They don’t trigger the idea of one task, but many; some represent whole projects. The idea of accomplishing everything associated with a particular piece of paper can be overwhelming. Don’t give in to the temptation to say “I can’t think about this right now…I’ll just put it down until I’ve gone through everything else.”
STOP! Remember, one of the first rules of organizing is “Don’t put things down. Put them away!” Away requires knowing where an item’s home is, and you can’t determine the home until you know what you need to do with it.
Dealing with only the next action or step reduces stress considerably. For example, a client memo requesting a detailed report can instill the same panic you had when you got assigned a term paper in ninth grade. It’s easy to be overwhelmed. Defining only the next step limits your concerns to what you can handle right now. The report represents an entire project—a series of tasks—but you need only determine the very next step to spur progress.
Refer
Now that you know the next task, who must complete it? Is it dependent upon someone else, such as research by your intern or a contract drawn up by your attorney?
Is it (or can it be) the responsibility of a support staffer, colleague, spouse or kids? With limited time and resources, you can only do so much by yourself. Delegating to staff or family teaches them that you trust them; what does refusing to delegate say about your faith in them?
If the next action need not be performed by you, bail it out of the RAFT! Affix a Post-it regarding to whom the item goes and set it by the door. If the work you’re delegating is time sensitive, make a note in your calendar to discuss it with them at some point between now and the deadline. Making sure you follow up helps ensure it won’t drown in their sea of papers. At the end of your RAFTing session, send these referred items out like messages in a bottle—or through those Dharma Initiative pneumatic tubes.
Act
If the next action is something only you can do, act on it. Certainly, we can’t delegate everything. So, if it will only take a minute to get it off your desk, sign your child’s permission slip and pin it to her book-bag. Sign off on your sales rep’s expense report, and then it becomes an item to refer to your business manager.
But acting doesn’t mean stopping the RAFT. Remember that planning is the most powerful action you can take. Having a clear sense of what you have to do before you do it eliminates redundancy, feeling ill-prepared and missing deadlines.
First, identify which action the item represents (e.g., call a client back, write a Thank You note, research wedding caterers, etc.) and place similar items in separate piles for each category (to call, to write, to read, to research, to deliver, etc.)
Next, determine when you can accomplish the similar tasks. Block off space in your calendar for time-specific work. Obviously, this will be dictated by a variety of factors, including differing time zones, other people’s schedules, your energy level patterns, etc. For time-flexible tasks, note them on your To-Do list so you have a master plan of what tasks remains. When you’re done RAFTing, you can methodically deal with each category of items, now neatly sorted, awaiting your attention.
In the likely event that all of your items to act upon will need more effort that you can attend to in one sitting, keep these papers (representing the tasks to be performed) in your tickler file, arranged by date, so you can attack each item/category with gusto on the scheduled date.
File
If a paper doesn’t require your attention but must be saved for tax, legal or reference purposes, file it, as we’ve discussed previously:
Family Filing—As easy as (eating) pie
Financial Filing—Scrapbooking snapshots of your money’s life
Mom, why is there a receipt stuffed in the turkey?
I Fought the Law…and the Paperwork Won!
Patient: “Doctor, it hurts when I do this.” Doctor: “Then don’t do that!”
Paper Dolls Live In Paper Households
I Hope Nobody Ever Writes a Nasty Tell-All Called “Paper Doll Dearest”!
Of course, filing doesn’t necessarily mean folders and filing cabinets. You can also “file” new insurance cards in your wallet, computer manuals in labeled magazine sorters and financial records in reverse-chronological order in three-ring binders. Save copies of print ads or publicity in a company scrapbook to display in your reception area. Scan artwork to archive it digitally.
The key to filing is working backward. Ask “Where would I look for this item if I needed it?” and place it there.
Toss
It’s common to keep papers “just in case”. The question that begs to be asked is “Just in case of WHAT?” If you no longer need items for reference or ongoing projects, toss them overboard (into the shredder, trash or recycling bin). Consult your attorney, CPA or professional organizer regarding records retention schedules, and if you still fear discarding an item, try to imagine a situation when it would be needed. Chances are, the information you are saving “just in case” can be easily retrieved via the internet or by making a quick call to the school, a friend, a vendor, client or other reference source.
Dealing with your papers doesn’t have to be like whitewater rafting, and needn’t make your stomach dip like a roller-coaster ride. Give yourself time, patience and the right supplies, and eliminating your paper can be smooth sailing.
(Oh. And sorry, Mom!)
Paper Doll Makes A Confession…and Reviews PileSmart Products
Regular Paper Doll readers know I write often about the importance of filing, of making sure that you’ve got a place for all your papers and aren’t letting floozies take over your life.
As a professional organizer, and previously in my career as a TV program director (when I was TV Doll), I’ve always reveled in the joy of creating order from chaos with clearly labeled, standing-at-attention file folders, neatly embraced by sturdy hanging folders. OK, maybe not reveled…but certainly enjoyed. For my own use, a good filing system is as essential to my happiness as George Clooney and Coffee Crisp candy bars.
I’ll admit, I’ve probably maligned the word “pile” a time or two, as a verb and as a noun. After all, when one says “pile”, what usually springs to mind? Messy mounds and hapless heaps of mismatched papers, all angled oddly, without rhyme or reason.
I haven’t always been a filer. In high school, college and beyond, long before there were colorful and stylish milk crates with rails for hanging folders, manila files didn’t fit into my organized world. Instead of files, I had piles.
Of course, I didn’t think of them as piles. They were my stacks. Stacks, at least, brought to mind an idea of order. Stacks of mail, towering from widest at the base to tiny picture postcards at the top. Stacks of magazines, with edges flush with the side of the table. Each mini stockpile representing a monument to tidiness. (Remember, always, tidy ≠ organized. Tidy is an aesthetic; organized is functional.)
In my mind, my desk was like the feng shui bagua (explained magnificently by Ann Bingley Gallops), with each stack representing a particular category, only instead of a stack representing the fame and reputation area, I stacked my graduate school letters of recommendation. Later, instead of a stack for wealth and prosperity, I had the programming department’s annual budget data. I stacked. C’mon, I piled. And yet, I’ve never spoken glowingly of piling.
Yes, I admit it, I’ve been a file snob. Worse, I’ve been a pile bigot. After all, there’s probably not a clear linguistic difference between piles and stacks, and my own background proves that piles don’t have to be sloppy. (Whew. It’s a relief to get that off my chest.).
And that’s why I was excited when I was approached recently and asked if I could be sent “a cool set of products that help people who pile instead of file get organized” for my review*.
PRODUCTS!
That was it, I realized: the germ of why piling gets such a bad rap. Filing looks organized with uniform systems of left, right and center tabs, color-coded manila folders and hanging folders in drawers and file boxes. Even though filing systems are just that, systems, dependent upon a logical naming system that allows us to keep our categories straight, filing has a better press agent. Clothes make the man; snappy folders and file boxes are the tuxedos and ball gowns of the paper world. Historically, there haven’t been products for pilers!
Hence, a blog post that admits my past snobbery, and shares options for those who prefer to pile with style.

The Pendaflex PileSmart Organizer Tray has two elements:
1) A clear, angled acrylic tray is the piling equivalent of a desktop file box, but it’s not the same old in-box. With a typical in-box, all of the sides are of equal height, requiring you to dig for any document that’s not on the very top. Plus, even with a typical in-tray (open on one side only), if you can’t spy the exact document you want, you have to reach for the stack, grab up the contents and begin sorting and searching. Without benefit of file folders, they flop, and it’s not easy to find what you want.
Conversely, the PileSmart Organizer Tray is open on two sides, enabling you to position the tray lengthwise or widthwise on your desk, depending on your available space and preference; the other two sides have a sort of Art Deco-esque downward angling swoop, to give the tray a little flair.
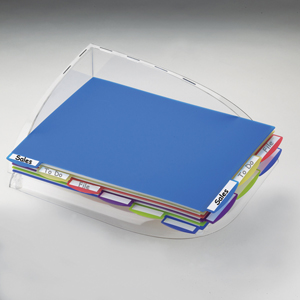
The base of the PileSmart Organizer Tray is angled so that the back corner (where the two swoopy sides meet) is lower than the opposite rounded corner (where the two open sides meet). This angled floor keeps the papers motionless so that shocks to the desk or vibrations don’t cause papers to shift or slide out.
When the products arrived, I wasn’t thrilled with the idea of an acrylic tray. First, I feared that it would squeak on the desktop, but Pendaflex has wisely added four smooth rubber “feet” to the base, preventing any fingernails-on-the-chalkboard sounds. I was also concerned that a swift slamming of a cabinet drawer would send the tray sliding, either away or off the desk, which sometimes happens with metal lattice in-trays. However, the rubber feet not only keep the base sturdy and squeak-free, but they strike a nice balance — you can manually slide the tray smoothly, without excessive friction, but vibrations have no impact. Slam any drawer you want — the PileSmart Tray stands firm.
2) Six sturdy, 8 1/2″ x 11″ brightly-colored, translucent plastic dividers make up the other element of the PileSmart Organizer Tray system, and enable you to lift and separate papers neatly. (I somehow imagine I’m the first blogger to compare the PileSmart system to the Playtex Living Bra!)
I see three distinct advantages to these dividers:
Colors allow for color-coding categories. Whereas filers color-code files, pilers (who tend to be visual creatures) haven’t had the benefit of color-coding their stacks and piles. I find the colors on the version I received for review to be reminiscent of Popsicles – blueberry, lemon, cherry, grape, lime…and a darker blue that lacks a frozen-treat parallel. (Pendaflex calls it Royal Blue.)
Label tabs on the tops and sides of the dividers offer more filing choice. The narrow edge of each divider echoes one-third cut folders, with 2 3/4″ left, center and right tabbing. The wide edge has six 1 7/8″ tabs.
The blank labels on the divider tabs are write-and-erase; however, if you prefer creating your own with your label maker, the default labels can be peeled off neatly without residue. Of course, whether filing or piling, you want your labels to be specific–succinct nouns to make clear what’s contained, or action verbs to tell you what to do next.
Sturdiness — The dividers are made of a hard enough plastic that you can lift any tab (even from one of the lower dividers) and the stacks will rise without any bowing or flopping. As you lift a tab, the stacks will either lean away from you (if you’re lifting a front-facing tab) or to your left (as if opening a book) — in both cases, the dividers and the angled design of the base join forces to keep papers from shuffling, sliding away or wrinkling. It’s not just tidy and organized…it’s smart!
PileSmart View Folders with Write-On Tabs add additional flexibility to the PileSmart system. Even pilers who aren’t fond of the verb file still find themselves needing the protection and portability of the noun file. They need something to hold their like-minded documents together when they take them on the road (or to the conference room).
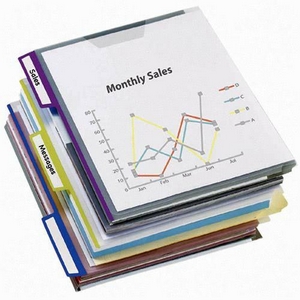
Enter the PileSmart View Folders with Write-On Tabs. They’re flexible poly file folders, suitable for use with traditional hanging folders or this new piling system. They’re translucent, like the dividers I referenced above, but because they are thin (even thinner than manila folders), they allow you to easily view the content within. They’re one-third cut, and come in a variety of colors — the set I received are grape (purple), lime-green and blueberry. Six folders and six write-on adhesive labels come in each package.
Pendaflex notes that the textured surface prevents piled files from slipping and have a capacity for 75 sheets of letter-sized paper. Paper Doll lacks the patience to count out 75 sheets, but can confirm that my 124-page August issue of Entrepreneur Magazine fits comfortably, with room to spare.
Unlike traditional file folders, these poly folders have some intriguing twists. Traditional manila folders are closed on only one side–at the bottom fold. These are closed on two (perpendicular) sides, open at the top tabbed end and along the fourth edge. In this way, the PileSmart View Folders fit perfectly with the Organizer Tray system. Additionally, the open (non-tabbed) narrow edge includes a poly tab to close (but not seal) that side, offering further protection from loss or the elements.
As a huge fan of the combined flexibility and protection of poly folders, I can definitely see myself using these. However, I wish they came in a wider variety of colors. I’d love to see some primary colors or pastels.
PileSmart Binder Label Clips round out the triumvirate of Pendaflex’s smart piling products. They’re alligator clips with a little extra panache–they have labels. To rise above the pitfalls of piling — letting smaller piles and loose documents get separated from their sister papers — pilers can clip associated papers and files together.
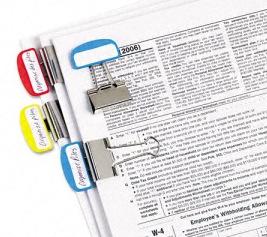
Plus, the binder clips have built-in write-and-erase labels — just write on them with a ball-point pen. Because the clip’s label piece is designed to extend outward from the clipped pile, you can view at a glance what that stack or pile represents, even when you have a tower of multiple clipped piles.
Unlike the divider and folder labels discussed above, these blank labels are part of the clip. Of course, if you’re not a ball-point pen person or prefer a typewritten label, you can still use your label maker and affix a label on the 1 1/2″ space.
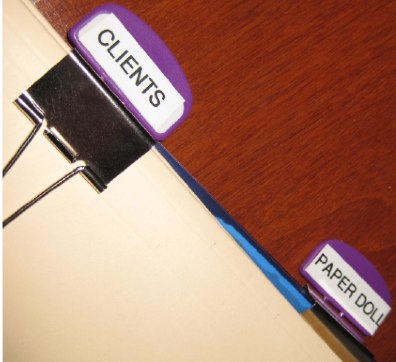
The PileSmart Binder Label Clips come six to a box, in either 1/4″ or expanded 1/2″ clips for larger capacity piles, in either of two color sets (red/blue/yellow or lime/grape/Royal Blue).
If you’re a piler, or even if you’d like to learn more about how to make the elements of the PileSmart products and system work for you, you can download the Pendaflex PileSmart Guide To Desktop Organization and you might want to follow Beyond Folders on Twitter and Facebook.
As always, whether you pile or file, you’ll find that creating a system with dependable labeling and categories will make your paper life more organized.
*In full disclosure, in return for writing this blog post by the end of July, I was offered a $20 Target gift card. Regular readers will find that this post is very much like all of the other product reviews I’ve done in the past, and the content and opinions are solely my own and have not been directed by any outside source. For those interested, Paper Doll intends to use the gift card to buy Boots #7 Protect and Perfect Beauty Serum, an item I covet at each visit to Target. That’s what I call full disclosure.
From Desktop to Mailbox (Part 2): Send Telegrams From Your Computer
In a world of 420-character Facebook updates and 140-character tweets, it’s easy to feel that we modern-day writers invented brevity. The truth, however, is that we’re about 120 years behind the original micro-bloggers.
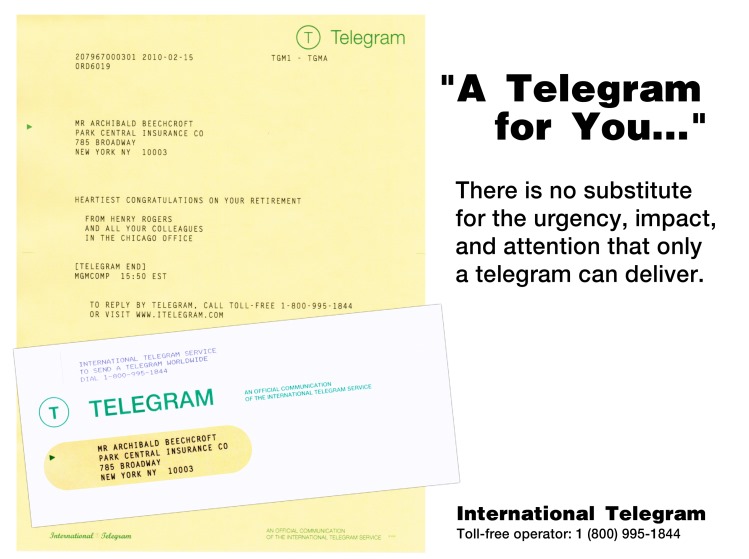
In a century before text messaging and email, in eras before faxes, and in epochs before telephone calls that didn’t require the shepherding and chaperoning of a long distance operator, there was a fast, semi-affordable way to get urgent messages across vast continents and oceans. Engagements were announced and wedding parties were congratulated, tragedies reported and inquiries made, all in a staccato priced-by-the-word, unpunctuated language of a hazy, far-off time.
Telegrams were as much part of cinematic lingo as calendar pages being torn away, and any viewer of World War II era movies knew what it meant when the telegram delivery boy’s bike approached a soldier’s family’s home. As family pictures turned from sepia to Kodachrome to digital, the world of the milk man, soda jerk and telegram delivery boy faded away.

Western Union, the heart of America’s telegraphy for about a century and a half, ceased of all of its telegram services in January 2006. It wasn’t a surprising business decision. In 1929, approximately 20 million telegrams were sent; in 2005, only 20,000. Western Union stayed afloat and still exists, but only as a financial services company. You can “cable” money through a Western Union wire transfer, but the glory days of messaging through Western Union are over.
Video may have killed the radio star, but the internet has not quite murdered the telegram.

Western Union sold its telegram service to iTelegram, an independent international communications company. Through iTelegram, you can send a Mailgram of up to 100 words for $18.95, which will take up to two-to-four business days to arrive–by mail. If you’re in a hurry and want your message to feel (and be delivered) like a real telegram, you can opt for a Priority Telegram for $24.95 plus 88 per word for same-day delivery in Manhattan, Los Angeles or Las Vegas, or next-business-day delivery in most other cities, and 12-hour delivery (including weekends) to hospitals, hotels and funeral homes. (Telegrams to Hawaii, Alaska, and rural areas take even longer.) Priority telegrams look similar to later-era (read: style-lite) Western Union telegrams.
iTelegram also provides a PhoneGram service, whereby you can call an operator, dictate your message and have it called directly to your recipient…for $9.95 for 30 words. Paper Doll wonders what could possibly be the appeal of having your voice message delivered by a stranger (Wait, Wait, Don’t Tell Me‘s Carl Kassel notwithstanding).
American Telegram does offer hand-delivered telegrams–for a whopping $28.95 plus 89 per word for next-day delivery or $44.95 plus 89 per word for same-day delivery — but note that the words in the recipients’ addresses count towards the word total! If neither time nor charm is important, 2- and 3-day ZipGrams are available ($19.95 plus 59/word or $15.95 plus 59 per word, respectively, with options to send FlowerGrams and CandyGrams.
The above options seem like a waste of money as well as paper. Somehow, Paper Doll senses the dapper spirit of Cary Grant growing melancholy at the thought of trying to send one of the above to the heroine as her ship steams across the ocean.
The romance of the telegram your great-grandmother received from her beau, as the train sped him ever closer to her side? It’s not so easy to recreate that frisson of delight using the above services, and their charmless solutions would seem to create more clutter than (sentimental) flutter. Mr. and Mrs. America and all the ships at sea just aren’t collectively hungering for the return of that kind of telegram. However, you can try to put a telegraph office on your desktop with the help of the following solutions.

Telegram Stop has developed a simple yet delightful site to send a traditional-style telegram via the internet.
1) Choose to send one basic message or opt for multiple recipients.
2) Craft your message. If you’re having trouble getting into the old-timey style, the site has suggestions to smooth any writer’s block and provides some insight into the tricks of growing your telegram mojo:
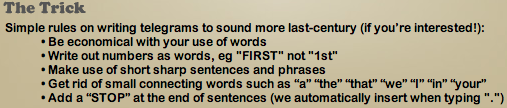
3) Fill in the pertinent details for the recipient and sender, and select the category of telegram (e.g., proposal, birth, anniversary, etc.).
4) Decide whether you want to the telegram sent immediately, or schedule a future arrival date.
5) You can also opt to send by registered mail and/or upload a photo to be printed and included with the telegram (perfect for baby announcements to great-grandparents who lack email…or just prefer old-time charm).
6) Preview your TelegramStop telegram*:
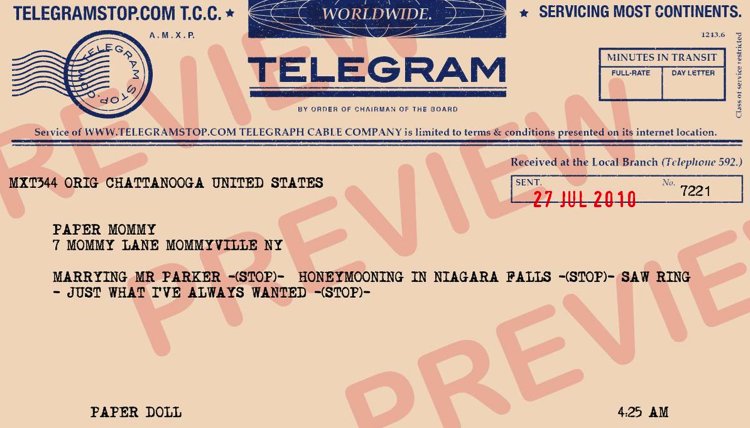
Either edit it, or pay the flat fee of $5.65 (by credit card or PayPal), no matter to what country you are sending.
These telegrams aren’t, of course, sent by telegraph, nor are they delivered by a gangly teenager on his bike. (Hey, at least you won’t have to tip him.) They are, however, sent by mail in old-fashioned envelopes with old-style fonts, evoking the days when women wore pearls to vacuum and Burma Shave signs passed for in-vehicle entertainment. Delivery can take 4-8 days, so again, the appeal is the retro nature and not speed. Given all the other competition, TelegramStop messages are also pretty reasonably priced.
Retro-Gram provides a similar blast-from-the-past communications experience, though perhaps as a paler imitation of already sun-bleached old-style telegrams. That’s because Retro-Gram sends snappily-designed Old-School telegrams, but delivers them via email. Of course, they’re free, which is always an advantage if you’ve spent all your money at the nickelodeon or malt shop.
1) Click on the picture of the askew telegram to get started. (There’s no obvious link — you have to intuit your starting point.)
2) Choose from among six telegram styles — the basic Retro-Gram (1930s classic style–purple type on a yellow background), an Electrogram (circa the 1920s), Electric Mailgram (a more formal 1930s version), Aethergram (19th century stylings), Worldwide Webgram (WWII-era) or Retro-Gram Nouveau (for a 1950s feel).
3) Retro-Gram feeds your information into a custom database and formats it in one of two basic vintage telegram styles, either ALL CAPS, like most U.S. telegrams, or in all lowercase to match the transcontinental Aethergram and Internationale designs popular before before WWI.
They generate a PDF combining your message with their Retro-Gram artwork and email the PDF to your recipient, whom, they assure you, will be “deeply impressed with your style and class.” Indeed.
If you like the style, but are craving something a little more tangible, Retro-Gram’s Deluxe service includes printing telegrams at high-resolution on “historically appropriate” aged paper and framing them…for $49.95.
(The site also offers a charming history of telegraphy and recommends Tom Standage’s The Victorian Internet.)

The UK’s Gratia Telegram Service provides a more continental feel with old world detailing.
1) Create an account to register and then log-in. (Gratia doesn’t seem entirely comfortable with newfangled browsers. Have patience.)
2) Click on “Send a Telegram” to select your design options from blue, black or burgundy detailing and backgrounds including vintage-era graphics and/or photos, ranging from 8.99-9.99.
3) Proof-read the PDF version of the telegram you’ve created:
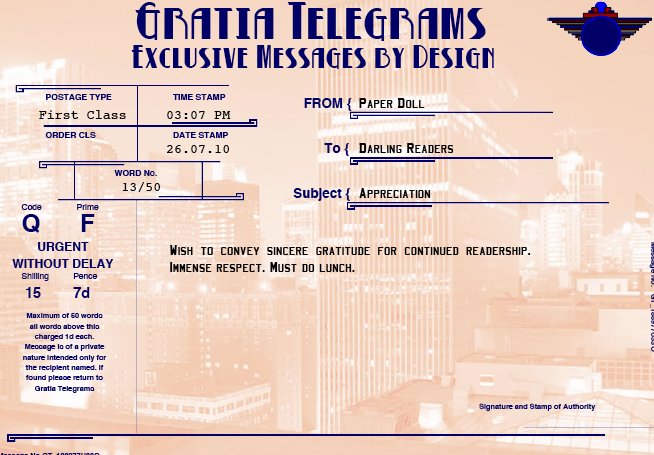
and either revise or pay.
With a wink to the modern era, you can also turn a tweet into a telegram with a Gratia Twittergram for 3.99, with just a few extra clicks.
And, you may choose a nostalgic-style or picture telegram to download as a PDF (ostensibly to send as an email or post on your own site) at no cost.

EZGram.com offers a services that’s a hybrid of the mail-from-your-desktop paper-free letters we discussed last week and the sense of urgency of a telegram.
1) Fill in the form with your return address, date, delivery address, greeting (e.g., Dear Senator Jefferson Smith–you heard about Mr. Smith going to Washington, right?), text of your message, and polite closing, just as you were taught in fourth grade.
EZGram knows not everyone is a natural writer, so the site includes templates for writing everything from letters of acceptance of employment to notifications of canceled weddings.
2) If you haven’t already done so, you’ll be prompted to sign up for an account in which to save your missives.
3) Preview your letter and either edit or continue.
4) Pay for your mail ($1 per letter, printed, stuffed, stamped and sent) by credit card or PayPal, or load your account with discounted EZDollars: $20 for 24 letters, $80 for 100 letters or $150 for 195 letters.
EZGram will send your message in a traditional-style AirGram envelope.
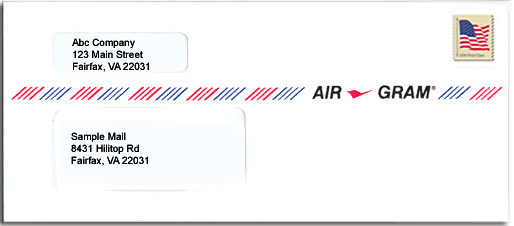
For addition fees, EZGram allows extra pages or color printing, will let you upload a PDF, enables international mailing and facilitates USPS Priority Mail.
Yes, this has all the (lack of) charm of the mail-from-your-desktop options we discussed last week. However, EZGram’s service isn’t focused necessarily on sending a letter to your Great Aunt Tilly. EZGram specializes in supporting the promotion of causes and makes it easy to contact your representation in Congress. Once you set up your account with your address, EZGram supplies the checkboxes to contact whichever senators and representatives you wish, from one central screen. You’ll save time and effort, and they’ll get AirGrams that make clear your stand on the issues.
While the days of snazzily lo-fi and affordable telegrams are sadly over, the stories live on. Two of my favorites:
The first is often-quoted, though many are unaware it was drafted as telegram. In 1897, when an American newspaper mistakenly published Mark Twain’s obituary, he dashed off a telegram from London, saying, “The reports of my death are greatly exaggerated”. Perhaps the same may be said of telegrams.
Irish writer Oscar Wilde is widely known for his impressive and pithy turns of phrase. Let’s face it, the guy invented snark. But he’s also known for having joined in the shortest telegram conversation ever known. While living in Paris, Wilde sent a telegram to his publisher in Britain to gauge the success of his new book. Without even the need for one -STOP-, he inquired: “?”
With exuberance at the sales, his publisher cabled back: “!”
*Mr. Parker was Paper Doll‘s imaginary husband, circa 1971 -STOP- He disappeared into the mist in the crowded hallways of Maple West Elementary School. -STOP- If you have any knowledge of Mr. Parker’s current whereabouts, please reply by return cable ASAP. -STOP-
From Desktop to Mailbox (Part 1): Send Real Mail Without Paper or Stamps
No matter how much technology we have or how often we invoke the philosophy of a paperless society, I don’t believe we’ll ever get past the appeal of paper mail for personal correspondence. Sure, we’ve talked about how companies like Zumbox can make it possible for us to receive paper mail digitally, but there’s still something delightful about walking out to the mailbox and finding a personal letter.
In Paper Doll‘s ideal world, everyone would have a stationery wardrobe and a dedicated drawer in the desk or a desktop tray for stamps, return address labels, envelopes and maybe even an old-time little black (address) book. However, I recognize that there are times when organizing rituals fall behind and traditional mail resources are hard to locate.
Or maybe you’re in bed with the flu, or there’s a blizzard, and you won’t be getting out any time soon to buy cards or stamps to send that personalized “Good luck on the LSATs” note. Even when not ill or snowbound, there are other situations for writers for whom sending a real letter is preferable but not entirely convenient:
–Travelers to exotic international locales may want printed mail to get to North American recipients quickly, but are flummoxed when mail service ceases due to political upheaval.
–Deployed military personnel may have access to the web but little (or no) speedy, dependable mail delivery to send a message that a third grader can take to show-and-tell two days from now.
–Forgetful travelers suddenly realize they need to get birthday messages to their web-unsavvy grandparents ASAP.
–Environmentally-conscious people strive to use less paper but may have contacts who can only communicate Old School.
In any of these circumstances, the internet can combine the utility of digital solutions with the tactile appeal of receiving something hand-delivered by the postman. Keep your communications efforts organized without
…stamps
…having to unearth envelopes or stationery
…worrying about empty ink cartridges
…trips to the post office in the rain or snow or sleet
by providing a way to create messages on your desktop and have them, at minimal cost, show up in your recipients’ mailboxes.
If you’re searching for a feature-rich solution that you’ll use all the time, you’ll probably want something like the popular Send Out Cards. However, if you don’t want to be wedded to one solution, don’t want to pay an annual fee, and only need a web-to-mailbox solution occasionally, the sites in today’s post may be just what you need.
(Unless otherwise noted, all of the following sites mail paid orders within 24 hours.)

Postful lets you generate full-color letters and postcards using either your own email program or Postful’s web forms. You can send plain text, PDFs, HTML documents, digital photos, documents from MS Office or Google Docs, and more. You create the digital version, and then Postful prints, folds (if necessary), stuffs, stamps and delivers your message to the post office, where it heads onward to your recipient.
Sign-up is simple. Provide your email address, create a password and set up the physical return address (which you may change at any time) for your account. Once you agree to the terms of service, you’re ready to send your letter. For a quick ad hoc letter:
1) Send an e-mail from any email program to quickletter@postful.com, putting the recipient’s name and mailing address in the subject line (e.g. “Ms. Paper Doll, 1313 Paper Doll Avenue, Organized, TN 37421”).
2) Check your inbox for a confirmation e-mail with a link to a PDF preview of your letter.
3) If it’s acceptable, add money to your account and send the letter. If not, cancel the letter and make modifications for your next attempt.
If you think you might use Postful often, you can set up a Postful mailbox with a list of frequent contacts to enable speedy sending, direct from the web site.
Letters mailed to U.S. addresses are 99 for the first page, and 25 for each additional page. For international mail, it’s $1.49 for the first page and 39 for each additional page. For 59, you can upload your own photo and mail a 4 1/4″ x 6″ postcard! The pricing includes First Class postage, full-color print, photo handling and document proofing. You can add money to your account using your credit card, Paypal or Google Checkout. If your account runs low, you’ll be contacted after you arrange to send your letter, and will be given an option to top off your account.

Snailmailr is even simpler — there’s no registration. For 99, you can mail up to two pages of text, and each additional page is only 25.
1) Fill out your return address and recipient’s address:
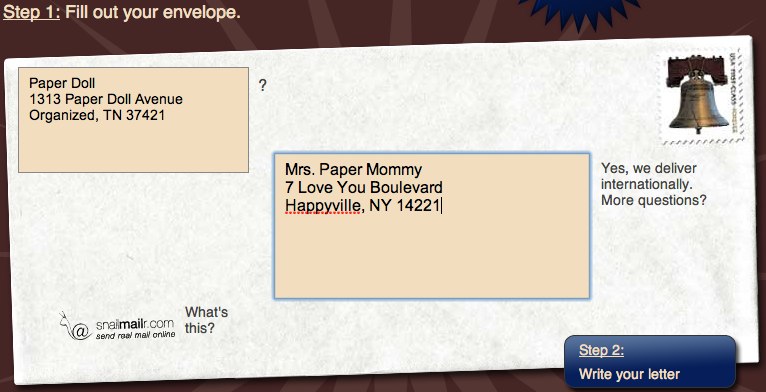
2) Click on “Step 2” and a drop-down text editor appears so that you can type your letter as if you were writing any word processing document.
3) Get fancy. You can bold, italicize or underline your text, change the font, font size or text color, add bullets or numbering, change to left, right or center alignment or even upload and insert a photo in PDF, DOC, PPT, RTF, TXT formats, all at no additional charge. Or, you can opt to hide the text editor and upload an attachment-only email.
4) Verify the accuracy of everything you’ve entered and pay for your mail. You’ll see exactly what it will look like, down to the snail logo on the envelope (which, for 15 you can remove) and the next day’s postmark date. You pay through Amazon Payments.
Snailmailr.com uses 100% recycled paper for the letters and 100% recycled business envelopes.
At first, Snailmailr only processed domestic (U.S.) letters; however, in 2009, they announced that they’d allow international mailings at no additional charge for an indefinite period of time.

MailWriter is another simple, no-registration, online-to-mailbox solution.
1) On the front page (before you actually click on Step #1, to write your letter), fill in your recipient’s address. Small quirk: you must type the street name first, followed by the house/street number in the second small box and/or apartment/suite number in the third field. Click “Preview”.
2) The next screen will provide you with a text editor to create your email. It has all the typical choices, plus some nifty HTML options for anchors and emoticons:
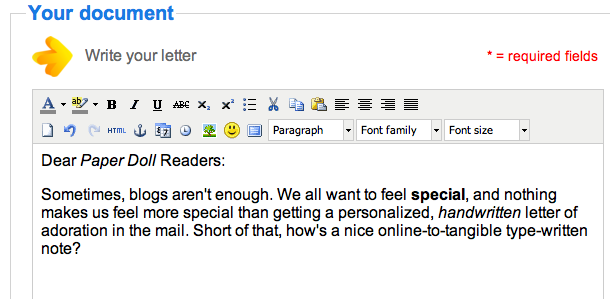
Write your letter. Start by filling in the text and adding formatting. If desired, attach a PDF, Word, Excel, or PowerPoint file, add a URL, revise the details of the recipient’s address or add your return address. You can also add multiple recipients in one letter.
3) Preview your letter for accuracy and edit anything you need to change. As you work through the process, your tally of charges show up in the bottom right corner of the screen, to let you know if you’re within budget.
4) Send your letter. After one last preview, agree to the terms of service, select whether you want a C-5 (sheets are folded once) or C-4 (sheets remain unfolded) envelope, and decide whether you want the MailWriter logo to appear on the page or not. (There doesn’t appear to be a discount for keeping it, nor an extra fee for removing it.)
Payments are via Paypal. You can use the Mailwriter price calculator to get a sense of your costs, which seem quite a bit higher than some of the other options reviewed in this post. For example, to send one page to one recipient, unfolded in a C-4 envelope, the price is $2.96; folded, in a C-5 envelope, costs $2.32.

Mail A Letter ties with snailmailr as my favorite low-frills option. After a quick and simple registration, you can begin composing letters:
1) If you haven’t used the site before, you’ll start by creating a first contact and/or importing contacts from your email address book or other contacts program.
2) Compose your letter in the easy-to-use text editor, and then choose to save a draft or mail the completed document. You can also upload a letter drafted on a digital version of your own letterhead.
3) With a click of your mouse, you may choose to add service options with additional fees, including a self-addressed stamped envelope ($1), Certified Mail with Return Receipt service ($6), Express Mail ($24.50) or Registered Mail with Return Receipt service ($20).
Mailing one page domestically costs 99; each additional page is 25. Mail A Letter provides international mailing for a flat fee of $1.99 for the first page, and 25 for each additional page.
You may pay via credit card, Paypal or Google Checkout, and users can either pay per mailing or maintain a MailBank account (in standard $10, $25, $50 and $100 blocks, or in any multiples of $5), from which purchases are debited. For $500 and $1000 bonus accounts, account users get $50 and $150, respectively, in free mailing credits.
There’s no mention of Mail A Letter in the letters themselves. The envelopes contain “Sent via www.mailaletter.com” under the return address, but this can be removed, at no charge, by a request email.
Users may compile or upload a mailing list of names and addresses, and Mail A Letter even has an option for mail-merge at no additional cost, though the process does require assistance from Customer Service.

Australian L-Mail has charmed users with a variety of services from bases in 30 worldwide locations, making delivery of tangible international mail more cost effective. While you can choose to send single letters, each individual letter carries a $1.53 surcharge. Avoid the fee and gain multiple benefits by opening a standard L-Mail account and making a minimum deposit of $15.30, from which future charges can be debited.
L-Mail has unique advantage over other services — users can send Braille and audio letters. Type an email, and L-Mail turns it into a recorded “talking” letter sent on CD or cassette.
1) Begin by adding names and addresses to your L-Mail address book. L-Mail will designate a special email address for each entry.
2) Compose a letter by clicking a name in your L-Mail account (the text editor appears after you’ve entered all of your text) or send an email to one of the specialized addresses, using your own email editor.
3) Choose from the available print locations and pay.
Pricing is based on the destination and the printing location. Sending three pages to a U.S. address will cost $1.07. There’s an 11 fee if you want to remove the L-Mail logo from correspondence and also a 61 fee for using a debit card instead of a credit card.
Other international digital-to-mailbox services include:
 ViaPost in the UK
 PixelLetter in the European Union
 E-Post (part of India Post) in India
Unfortunately, the site with one of the most visually appealing interfaces, Canada’s SnailMailMe, seems to have ceased operation. Although all of the set-up and composition elements appear to work, the site is no longer sending tangible mail, and a notation on the screen states that the site will be relaunching “in Summer 2009, 493 days ago”. This does not bode well for future operation.
These are just some of the desktop-to-mailbox options for creating the Pony Express 2.0. Next time, we’ll look at how you can turn your computer into a modern-day Western Union telegraph office. Until then, keep those cards and letters coming!



Follow Me