Archive for ‘General’ Category
From Desktop to Mailbox (Part 1): Send Real Mail Without Paper or Stamps
No matter how much technology we have or how often we invoke the philosophy of a paperless society, I don’t believe we’ll ever get past the appeal of paper mail for personal correspondence. Sure, we’ve talked about how companies like Zumbox can make it possible for us to receive paper mail digitally, but there’s still something delightful about walking out to the mailbox and finding a personal letter.
In Paper Doll‘s ideal world, everyone would have a stationery wardrobe and a dedicated drawer in the desk or a desktop tray for stamps, return address labels, envelopes and maybe even an old-time little black (address) book. However, I recognize that there are times when organizing rituals fall behind and traditional mail resources are hard to locate.
Or maybe you’re in bed with the flu, or there’s a blizzard, and you won’t be getting out any time soon to buy cards or stamps to send that personalized “Good luck on the LSATs” note. Even when not ill or snowbound, there are other situations for writers for whom sending a real letter is preferable but not entirely convenient:
–Travelers to exotic international locales may want printed mail to get to North American recipients quickly, but are flummoxed when mail service ceases due to political upheaval.
–Deployed military personnel may have access to the web but little (or no) speedy, dependable mail delivery to send a message that a third grader can take to show-and-tell two days from now.
–Forgetful travelers suddenly realize they need to get birthday messages to their web-unsavvy grandparents ASAP.
–Environmentally-conscious people strive to use less paper but may have contacts who can only communicate Old School.
In any of these circumstances, the internet can combine the utility of digital solutions with the tactile appeal of receiving something hand-delivered by the postman. Keep your communications efforts organized without
…stamps
…having to unearth envelopes or stationery
…worrying about empty ink cartridges
…trips to the post office in the rain or snow or sleet
by providing a way to create messages on your desktop and have them, at minimal cost, show up in your recipients’ mailboxes.
If you’re searching for a feature-rich solution that you’ll use all the time, you’ll probably want something like the popular Send Out Cards. However, if you don’t want to be wedded to one solution, don’t want to pay an annual fee, and only need a web-to-mailbox solution occasionally, the sites in today’s post may be just what you need.
(Unless otherwise noted, all of the following sites mail paid orders within 24 hours.)
Postful lets you generate full-color letters and postcards using either your own email program or Postful’s web forms. You can send plain text, PDFs, HTML documents, digital photos, documents from MS Office or Google Docs, and more. You create the digital version, and then Postful prints, folds (if necessary), stuffs, stamps and delivers your message to the post office, where it heads onward to your recipient.
Sign-up is simple. Provide your email address, create a password and set up the physical return address (which you may change at any time) for your account. Once you agree to the terms of service, you’re ready to send your letter. For a quick ad hoc letter:
1) Send an e-mail from any email program to quickletter@postful.com, putting the recipient’s name and mailing address in the subject line (e.g. “Ms. Paper Doll, 1313 Paper Doll Avenue, Organized, TN 37421”).
2) Check your inbox for a confirmation e-mail with a link to a PDF preview of your letter.
3) If it’s acceptable, add money to your account and send the letter. If not, cancel the letter and make modifications for your next attempt.
If you think you might use Postful often, you can set up a Postful mailbox with a list of frequent contacts to enable speedy sending, direct from the web site.
Letters mailed to U.S. addresses are 99 for the first page, and 25 for each additional page. For international mail, it’s $1.49 for the first page and 39 for each additional page. For 59, you can upload your own photo and mail a 4 1/4″ x 6″ postcard! The pricing includes First Class postage, full-color print, photo handling and document proofing. You can add money to your account using your credit card, Paypal or Google Checkout. If your account runs low, you’ll be contacted after you arrange to send your letter, and will be given an option to top off your account.

Snailmailr is even simpler — there’s no registration. For 99, you can mail up to two pages of text, and each additional page is only 25.
1) Fill out your return address and recipient’s address:
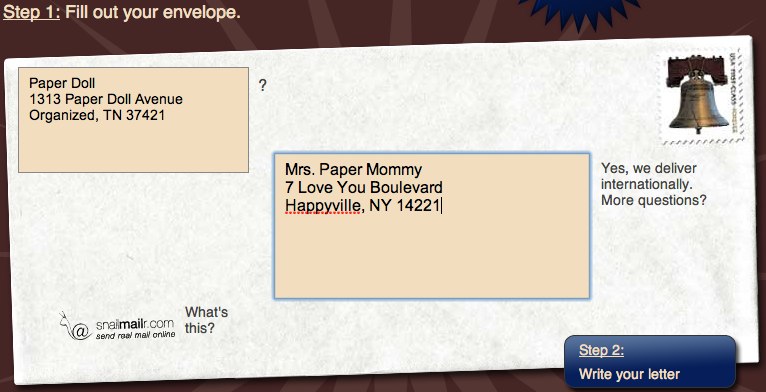
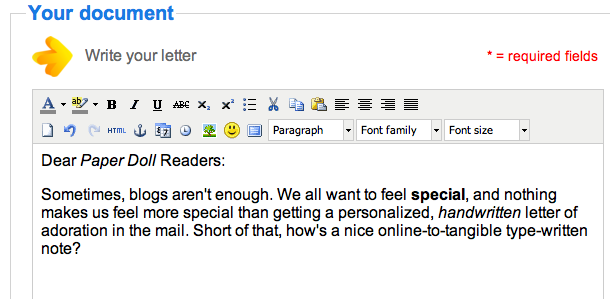
2) Click on “Step 2” and a drop-down text editor appears so that you can type your letter as if you were writing any word processing document.
3) Get fancy. You can bold, italicize or underline your text, change the font, font size or text color, add bullets or numbering, change to left, right or center alignment or even upload and insert a photo in PDF, DOC, PPT, RTF, TXT formats, all at no additional charge. Or, you can opt to hide the text editor and upload an attachment-only email.
4) Verify the accuracy of everything you’ve entered and pay for your mail. You’ll see exactly what it will look like, down to the snail logo on the envelope (which, for 15 you can remove) and the next day’s postmark date. You pay through Amazon Payments.
Snailmailr.com uses 100% recycled paper for the letters and 100% recycled business envelopes.
At first, Snailmailr only processed domestic (U.S.) letters; however, in 2009, they announced that they’d allow international mailings at no additional charge for an indefinite period of time.
![]()
MailWriter is another simple, no-registration, online-to-mailbox solution.
1) On the front page (before you actually click on Step #1, to write your letter), fill in your recipient’s address. Small quirk: you must type the street name first, followed by the house/street number in the second small box and/or apartment/suite number in the third field. Click “Preview”.
2) The next screen will provide you with a text editor to create your email. It has all the typical choices, plus some nifty HTML options for anchors and emoticons:
Write your letter. Start by filling in the text and adding formatting. If desired, attach a PDF, Word, Excel, or PowerPoint file, add a URL, revise the details of the recipient’s address or add your return address. You can also add multiple recipients in one letter.
3) Preview your letter for accuracy and edit anything you need to change. As you work through the process, your tally of charges show up in the bottom right corner of the screen, to let you know if you’re within budget.
4) Send your letter. After one last preview, agree to the terms of service, select whether you want a C-5 (sheets are folded once) or C-4 (sheets remain unfolded) envelope, and decide whether you want the MailWriter logo to appear on the page or not. (There doesn’t appear to be a discount for keeping it, nor an extra fee for removing it.)
Payments are via Paypal. You can use the Mailwriter price calculator to get a sense of your costs, which seem quite a bit higher than some of the other options reviewed in this post. For example, to send one page to one recipient, unfolded in a C-4 envelope, the price is $2.96; folded, in a C-5 envelope, costs $2.32.
Mail A Letter ties with snailmailr as my favorite low-frills option. After a quick and simple registration, you can begin composing letters:
1) If you haven’t used the site before, you’ll start by creating a first contact and/or importing contacts from your email address book or other contacts program.
2) Compose your letter in the easy-to-use text editor, and then choose to save a draft or mail the completed document. You can also upload a letter drafted on a digital version of your own letterhead.
3) With a click of your mouse, you may choose to add service options with additional fees, including a self-addressed stamped envelope ($1), Certified Mail with Return Receipt service ($6), Express Mail ($24.50) or Registered Mail with Return Receipt service ($20).
Mailing one page domestically costs 99; each additional page is 25. Mail A Letter provides international mailing for a flat fee of $1.99 for the first page, and 25 for each additional page.
You may pay via credit card, Paypal or Google Checkout, and users can either pay per mailing or maintain a MailBank account (in standard $10, $25, $50 and $100 blocks, or in any multiples of $5), from which purchases are debited. For $500 and $1000 bonus accounts, account users get $50 and $150, respectively, in free mailing credits.
There’s no mention of Mail A Letter in the letters themselves. The envelopes contain “Sent via www.mailaletter.com” under the return address, but this can be removed, at no charge, by a request email.
Users may compile or upload a mailing list of names and addresses, and Mail A Letter even has an option for mail-merge at no additional cost, though the process does require assistance from Customer Service.

Australian L-Mail has charmed users with a variety of services from bases in 30 worldwide locations, making delivery of tangible international mail more cost effective. While you can choose to send single letters, each individual letter carries a $1.53 surcharge. Avoid the fee and gain multiple benefits by opening a standard L-Mail account and making a minimum deposit of $15.30, from which future charges can be debited.
L-Mail has unique advantage over other services — users can send Braille and audio letters. Type an email, and L-Mail turns it into a recorded “talking” letter sent on CD or cassette.
1) Begin by adding names and addresses to your L-Mail address book. L-Mail will designate a special email address for each entry.
2) Compose a letter by clicking a name in your L-Mail account (the text editor appears after you’ve entered all of your text) or send an email to one of the specialized addresses, using your own email editor.
3) Choose from the available print locations and pay.
Pricing is based on the destination and the printing location. Sending three pages to a U.S. address will cost $1.07. There’s an 11 fee if you want to remove the L-Mail logo from correspondence and also a 61 fee for using a debit card instead of a credit card.
Other international digital-to-mailbox services include:
![]() ViaPost in the UK
ViaPost in the UK
![]() PixelLetter in the European Union
PixelLetter in the European Union
 E-Post (part of India Post) in India
Unfortunately, the site with one of the most visually appealing interfaces, Canada’s SnailMailMe, seems to have ceased operation. Although all of the set-up and composition elements appear to work, the site is no longer sending tangible mail, and a notation on the screen states that the site will be relaunching “in Summer 2009, 493 days ago”. This does not bode well for future operation.
These are just some of the desktop-to-mailbox options for creating the Pony Express 2.0. Next time, we’ll look at how you can turn your computer into a modern-day Western Union telegraph office. Until then, keep those cards and letters coming!
Organizing With Post-it® Notes: Revenge of the Floozies
Longtime readers of Paper Doll know that I have a love-hate relationship with small pieces of paper. Too often, people scribble notes on the corners of napkins, on the backs of envelopes and on sticky notes, without any workable system for displaying, preserving or accessing the information they’ve compiled. In a very early Paper Doll post, Stay Far From Floozies: Avoiding the Loose Paper Trap, I coined the notion that random pieces of loose paper, like persons of loose morals, were floozies, and I’ve railed against them ever since.
This is not to say that I don’t appreciate the genius of the Post-it. I think the little multi-color sticky notes have tremendous and ingenious uses in the organizing process…just not as a substitute for creating a central hub of information-gathering and time management, whether that’s your legal pad, Evernote account, tickler file or smart phone.
In honor of this year being the thirtieth anniversary of the Post-it Note, I’d like to share my favorite uses for the classic three-inch squares, and I hope you’ll share yours in the comments section.
YOUR WALLET
Safeguard Your Credit Cards–Part 1
A few days ago, a friend regaled me with a story about how she’s recently had to replace quite a few credit cards. She confided that it’s not uncommon for her to get distracted, and either forget to retrieve her credit card from a cashier or fail to put her card back into her wallet after making a purchase. She said it as if it were a fait accompli–she’s busy, always in a hurry, and just tosses it back in her wallet. Of course, this makes it all the more likely that her card could be lost or stolen without her awareness.
Because I know what’s going on in my friend’s life, I emailed back:
You’re overwrought. Misplacing stuff and memory lapses are common during times of high stress. Slow down. Wrap a sticky note around each credit card you use. On it, write “Get me back!” with a thick Sharpie! When you pay with a credit card, un-stick the sticky, and hold it in your hand until you get the card back; then stick it back on, and return the card to your wallet. It’ll slow you down.
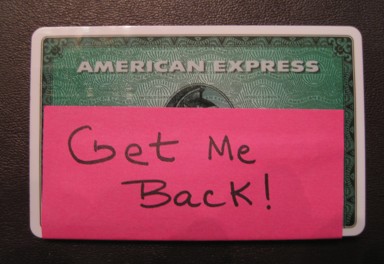
Modern life moves quickly. Sometimes the only way to ensure that you’ll slow down to the speed of life is to put a speed bump in your path. By wrapping a sticky note around your card, especially with a reminder message, and holding it in your hand, you’re ensuring you will realize if you’ve missed a step.
Safeguard Your Credit Cards–Part 2
The same trick works wonders as a speed bump against hot-rodding your spending. It can be hard to keep track of your financial goals, like reducing credit card purchases or even just reducing purchases overall. Affix a sticky-note to your primary credit card and write yourself a message that will give you pause before spending.
If you’re paying down debt on that card, write your current balance on the note. After you pay the next bill, cross out the prior number and write the new (hopefully lower) balance. Seeing the numbers get smaller should motivate you to stick with your shopping diet:
$4,426
If you’re saving for a big-ticket item, use the Post-it to remind you of your goal, like a family vacation, new car or class tuition.
Make Your Library Card a Smart Card
If you’re a bibliophile, your house may be overrun with books. We’ve previously covered getting your books organized, but one of the best precautions is to borrow books from the library. This allows you to read what you want without adding titles to your permanent book clutter collection.
However, if you tend to forget which books you want to read by the time you get to your branch, keep a Post-it affixed to your library card. When friends give you recommendations or you read a book review that captures your interest, jot down the title and author on the note and wrap it around your library card. This works two ways:
1) At the library — Use the list to find the books you want, and then discard the sticky note during checkout. If a title on your list isn’t available yet, put it on reserve.
2) At home — Most public library web sites will let you reserve books online, but you need to use your library card number to place the hold. When you grab your card, you’ll already have your reading list close at hand. If a book isn’t in your library’s collections, put it on your Amazon or other bookstore wish list.
YOUR PROJECTS
Project management may not be the first thing you think of when faced with a stack of sticky notes, but professional financial organizer Nanette Duffey of Organized Instincts has helped Paper Doll see the awesome possibilities of Post-it Notes as project planners.
Weddings — Nanette explained that when planning her wedding, she used her hallway as a massive whiteboard, and sticky notes for creating a down-to-the-minute timeline of events, not only for the months leading up to the wedding, but for the key activities of the big day. From the early morning to the ceremony, and up through the reception and leaving for the honeymoon, the timeline captured it all.
The concept is fabulously simple. She and her beloved wrote each task and activity on a sticky note, complete with dates, times and details, and affixed each note to the wall. As new activities came into focus, notes were added; as they were completed, the stickies were removed. Sequences of events could be modified in a jiffy.
I asked Nanette if she colored-coded activities, but her wedding was long enough ago that the rainbow of possibilities skewed pale fluorescent yellow. Nowadays, however, it’s easy to envision color-coded task notes, with the bride’s dress fittings on pink notes and tuxedo fittings on blue; other colors could be matched to significant players in the planning process.
Pre-College Summers — College-bound students and their parents don’t get a free pass once the application and acceptance process is over. Students need to outfit and organize their dorm décor, clothing (especially if they’re moving to a different climate) and school supplies. Some schools assign reading to pre-freshman, and most require transfers of medical and other records. A sticky-note weekly timeline on the college-bound kid’s bedroom door could be just the ticket to planning the projects and divvying up tasks.
Entertaining — Nanette also shared Post-it project planning tips from when she was new to entertaining and hosting big dinners. For party meals she prepares herself, she creates sticky notes for each menu item, and then identifies and matches up the right serving piece(s) for each, ensuring that nothing gets forgotten.
For potluck dinners, she suggests that if you know what each person is bringing in advance, you can create a sticky note for each. Clear your buffet, serving table or kitchen counter and affix the sticky notes for each menu item. Then, when guests arrive, they’ll know where to place their platters, and you, as host or hostess, can attend to other tasks without worrying about set-up.
One can imagine that visual sticky-note timelines, color-coded or not, would work for project planning in small offices, classrooms and families, and for planning anything from events to vacations to training for marathons.
YOUR OFFICE
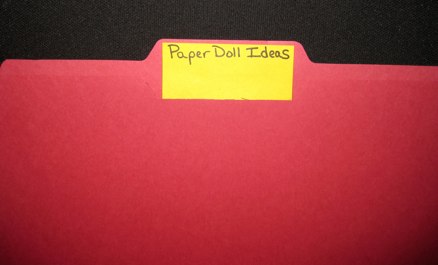
Temporary File Folder Labels — To begin the paper organizing process, I always advise clients that If You’re Drowning in Paper, Build a RAFT where RAFT is the acronym for the basic steps: Refer, Act, File and Toss. If you’ve got a backlog of papers and no (working) file system, however, you may lack the pre-labeled files with the categories to get you started. I’ve seen lots of people procrastinate on setting up a filing system for fear of labeling the folders “wrong” by selecting a category title that is too broad, too narrow, or just plain doesn’t work. If your paper sorting suffers from perfectionist procrastination, sticky notes let you take an ice cream sample “taste test”.
Take a sticky note and write your category title at the top. Then affix the sticky part of the note to the file tab of your manila folder (with the rest of the note continuing downward, into the folder). This way, if you want to work with your system for a few days (or weeks) before making a final decision on labels, you’ll still have a working system with labels that are easy to read.
How great is this idea? So great (and obviously, so not unique to Paper Doll) that 3M has come up with Post-it Durable Tabs for file folders.
Intense Focus To-Do List — Post-it Notes yield the ultimate in simplified productivity. Each day, go through your tickler file and your towering To-Do list to find the three most essential tasks. They may be whatever will yield the most revenue, or save you from having to pay a fee or fine, or fulfill an important obligation or deadline. You decide.
Ask yourself “If I could only get one thing done today, what would it be?” Put it on the list. Lather, rinse, repeat…until you have all three spaces filled. Then hunker down, focus, and complete those items.
We all fight the To-Do List battle on a daily basis, but interruptions and difficulty putting aside distractions keep us from focusing on priorities. Picking just three things and putting that Post-it on the corner of your desk or in your eye-line on the wall helps remind you that if it’s not related to items 1, 2 or 3, then it’s not to be done!
Obviously, once you’ve completed the three tasks, whether it’s ten minutes or ten hours later, you can move on to other projects (or create another 3-item sticky note).
Keep Your Workspace Clean — Post-it Notes can clean between the keys of your computer keyboard. The spaces between keys seem to fill up with bits of fuzz, crumbs, and the dusty detritus left behind after slicing open an envelope. A carefully wielded sticky note, adhesive-edge pointed downward, inserted vertically between rows of the keyboard can pick up some of the ickiest offenders. A keyboard free of goop means your keys will be less likely to stick, and you can be more productive.
YOUR DORM ROOM/STUDY AREA
Bookmarks — Use a sticky note as a bookmark, positioned at the end of a homework or reading assignment. Students, whether kids or adults, tend to get overwhelmed by the big picture, but a visual representation marking a stopping point gives reluctant readers a goal towards which to aim.
Learning Tools — Stick a Post-it inside the front cover of a book to write down unfamiliar words or concepts for later research. Dictionaries, teachers, and even the internet may not be immediately accessible, and students may not always read with a notebook at hand, but a tiny running list at the front of the book offers a fighting chance to revisit the issue later.
Footnotes — Sticky notes are also great for marking key points in borrowed or library books. Optimally, students should get in the habit of researching with a notebook handy, scribbling down citations and reference information in line with notes. When this isn’t possible or practical, a Post-it lets the student mark the starting line of reference text, provides a square of space for noting a fleeting but brilliant idea, and allows a small flag-like marker for the page.
(Note: There is some disagreement regarding whether the acids in note adhesives will damage books in the short term. Paper Doll has comfortably used 3M’s Post-it Notes since their creation without detriment, but while I’m loathe to be a brand snob, some generic sticky notes do seem to leave behind a residue after a few days. In the interest of caution, please avoid using sticky notes on primary research documents, first editions and antique books.)
In 2008, 3M ran a contest to see how many alternate uses people could invent for Post-it Notes. Their goal: one million uses! Though the winners have long since been selected, people are still submitting intriguing alternatives to the Post-it YouTube channel, from halting auto-flush public toilets to creating stop-motion art movies.
What are some of your favorite ways to organize your life with the help of Post-it Notes?
Site-Saving Bookmarklets: Keeping Up With Online Reading While Reducing Paper Clutter
When I help clients sort and purge their excess paper, a trend emerges. A major source of paper clutter, not to mention a slow environmental assault, comes from the web articles they print in hopes of reading later when there’s more time. Whether read or not, even if the story is out of date or the topic ceases to matter, the client will hesitate to let go of it, as if committing ideas to paper has somehow made them more valuable or sacred. And so, the piles rise.
And you? Perhaps you may think you’ll come back to articles in a few minutes or hours, so you keep keep multiple open browser windows or tabs. Not only does this eventually slow down your computer, it presents a conundrum when you get to the end of the session and want to shut down the computer. Then you think: Bookmarks!
Those new to bookmarking are delighted to learn how bookmarks help them create a digital thumbtack in the bulletin board of their web experiences. Eventually, they become adept at organizing bookmarks into folders, to maintain collected sites and articles as easily (and functionally) as they might (with a little help from their professional organizers) with paper files.
For the rest of us, old hands at bookmarking, the bloom is off the rose. Power users of computers can come across dozens of save-worthy items a day, quickly loading up the browser with sites and articles we might never get back to reading. Over the course of time, excessive bookmarking can lead to slower browser performance, and unless we stay on top of bookmark labeling, purging and organizing, it’s easy to end up with an endlessly scrolling tower of bookmarks that are as hard to maneuver as piles of paper printouts.
A possible solution? Bookmarklets, little scraps of JavaScript programs stored as bookmarks, that work their own bit of site-saving magic!
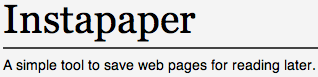
Instapaper is a free, quick and easy one-click method for saving web pages for later. The up-front work is minimal:
1) Sign up for a free account in seconds. Either use your email or a user name you create yourself. Using an email address prevents you from forgetting your user name and will grant access to future email-based features.
2) Drag the ![]() icon (a bookmarklet) from the Instapaper window to your browser’s bookmark toolbar.
icon (a bookmarklet) from the Instapaper window to your browser’s bookmark toolbar.
That’s it. Now, imagine you’re on Twitter and come across a link to an article or blog post on a topic that interests you. You start to read, but realize it’s longer than you expected, and you’ve got deadlines to make! What do you do?
Just click on Instapaper’s bookmarklet to save any page for reading later. The pages of the article are then saved to your Instapaper account. Within a split second, a popup window hovers on-screen, ghosting the alert “Saved!” before disappearing. When you’re ready to read what you’ve left to “read later”, the site’s interface is clean and straightforward:
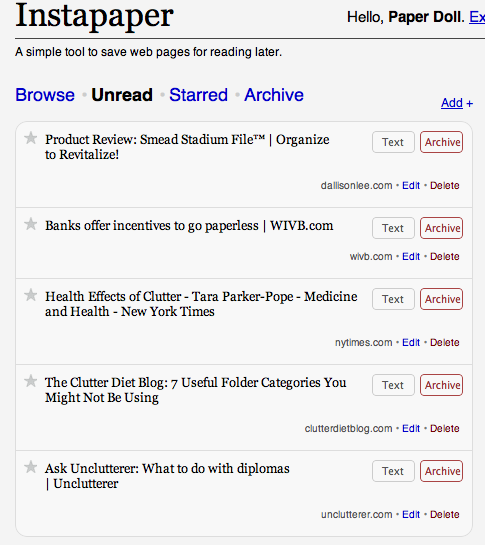
Access any article in plain text, without distracting ads, then either delete or archive it when you’re done reading. Instapaper saves the original links, so you can, if you choose, visit the original web page with one click from your account.
If you prefer, you can get an RSS feed for your Instapaper account, so the articles will then be delivered to you in your RSS reader (or via email), allowing you to read them at your convenience (just as you do with blogs to which you subscribe). Instapaper’s extras include an iPhone app and interoperability with multiple feed-reading and social networking apps.

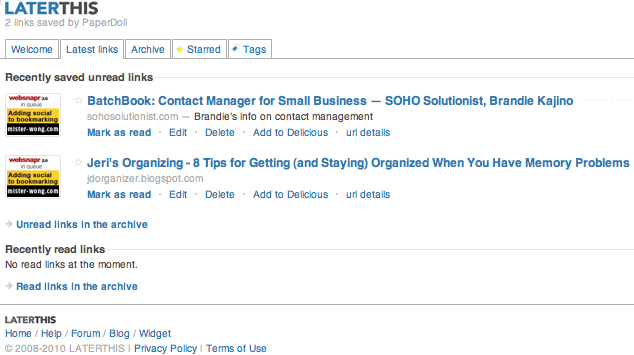
LaterThis is similar to Instapaper, with one nifty feature that should make power bloggers happy — the ability to use tags! Let’s say you blog about, or just generally have a lot of interest in, paper organizing. Or bird watching. Or the San Marino football team (the one with the world’s worst record, and Paper Doll‘s favorite, as it ensures I’ll never have to sit through even one World Cup game: “Sorry, I only watch when my team plays!”).
Tagging lets you identify keywords related to a particular saved URL, so you needn’t scroll through oodles of bookmarks to find what you want–just those with the keywords you need. Categorize your links by entering a “Tag” when creating the link. To quickly find a link, simply go to the “Tag” tab and click on the appropriate tag to display the narrowed, and more likely, options!
LaterThis also uses tabs to help organize saved links. Upon saving, LaterThis stores your links under the “Latest Links” tab. Then, you can archive older links as long as you want, just as you would with bookmarks on your computer, but you don’t have to worry about a drag on your system. To highlight or prioritize favorite links, click the star (just like favoriting works in Twitter). Once you archive a link, it moves to under the “Archive” tab, and starred favorite links are stored under the “Starred” tab.
Signing up takes a tad longer than with the other sites under review:
1) Provide your email address, a user name and password, then pass a CAPTCHA two-word test, and agree to the Terms of Service.
2) Install any of three bookmarklets in your toolbar. “LATERTHIS” opens a screen in your current browser window, auto-populates it with an editable version of the article title, and lets you add comments and tags directly. “LATERTHIS quick” opens a pop-up window to allow one-click saving. And “my LATERTHIS” bookmarklet can also be added for one-click access to your account, but that seems like overkill.
The saving process is simple, though if you choose the non-quick option, you can easily get bogged down by the very tagging and commenting features designed to speed up your later access. Paper Doll is mystified by the odd icons that appear to the left of the links, and found that the auto-population of the article title sometimes reverts to the website’s name instead of the article name.
LaterThis also comes with built-in support for use on the iPhone and iPod Touch.
![]()
Laterloop is another free account for one-click saving of web material for later, only it’s designed to be maximized for use on cell phones. Avid readers often complain that they’ll be surfing the web on a desktop or laptop, bookmarking articles for later reading, and then find that their biggest chunks of available reading time come while waiting to do something else: see the doctor, board a plane, idle in the carpool lane. However, unless they conscientiously use social bookmarking (a topic for another day), the stuff they want to read is only on the computer originally used.
Laterloop bypasses this problem. It’s especially optimized for use on smart phones (like iPhones or Blackberries), but it also has a sharp, clean web interface for use with your favorite browser on your desktop or laptop, too.
Gain access via your Google login; if you don’t have any Google accounts or prefer not to use yours, you may create a Laterloop account with a user name, password and email address. Drag-and-drop the “Save for Later” bookmarklet to your bookmark toolbar and in two seconds you can import your other bookmarks or start saving your first links.
Of all the bookmarklets I tested, Laterloop had the fastest “save” interface and felt the least like an interruption. If you’ve ever been looking at your Facebook timeline when new updates shimmer into existence, then you’ll be familiar with the Laterloop “save” experience. You click “Save for Later” and it does — no muss, no fuss, no distractions.
Paper Doll doesn’t use a smart phone, but I can attest to the clean lines of the interface. However, although you can change the sort order of the links from newest to oldest or oldest to newest, or use the shuffle function, there’s no tagging or true ability to organize links.
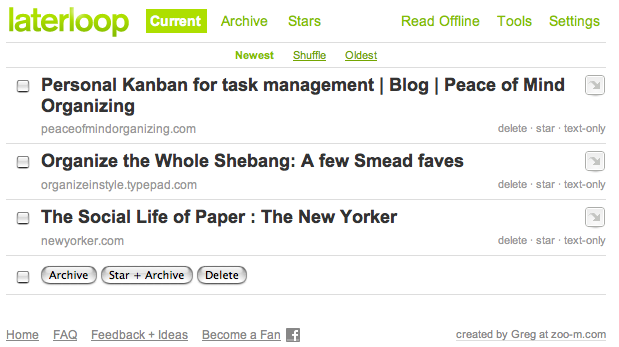
However, it does offer one-click archiving, starring of favorites and deletion, and both your total collection of links, as well as your starred links, are published to easily-accessed but private Laterloop URLs based on your created (or Google) username.
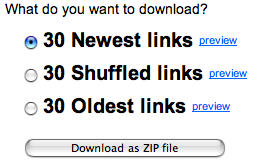
Laterloop’s biggest plus is its Airplane Mode, which allows you to download a zip file of your links and read them offline, when you lack access to the internet. (To save bandwidth, only text is download and not images.) Airplane Mode could not be easier to use — just select your preference and download:
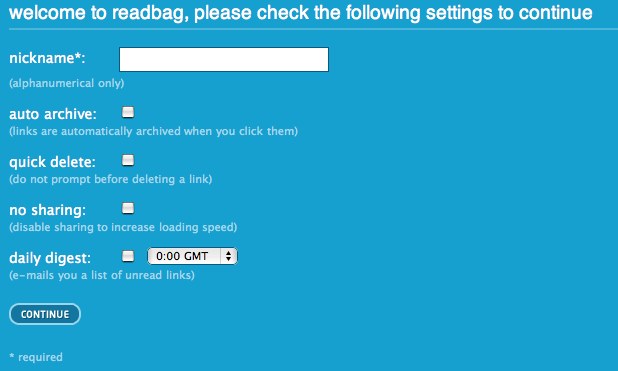
Readbag is another read-it-later resource, with the same small but distinct advantage of Laterloop: you don’t have to create a new account. You can sign in with your Google account, because it runs on the Google App engine (although its not affiliated with Google). To sign up, click that you wish to sign-in, and you’ll be taken to your Google account sign-in. (Of course, if you don’t already have a Google account, Paper Doll urges you to create one to access the wonders of Google Docs, iGoogle, and the related yumminess within.)
Once logged in, fill in a quick-to-use settings screen:
Next, you’ll get a page from which you can drag and drop the Readbag bookmarklet to your browser. Whenever you find a link you want to save for later, just click the bookmarklet, as in the above examples.
Readbag also lets you log into your account from anywhere and manually enter a new link. While not the most elegant option, if you find yourself at a strange or public computer and want to quickly bookmark something for later use, this is probably speedier than logging into the web version of your email account and emailing yourself the link. Unless, of course, if you use Gmail; then, it’s a wash.
Readbag also lets you import links from other sites, like del.icio.us. Just add the RSS or Atom feed link that contains all of your other links and click “import”. Readbag also has a Firefox extension that allows for one-click direct posting and access to your Readbag account (skipping repeated Google logins), as well as integration with Google (RSS) Reader.
The main disadvantage of Readbag? There’s no Help screen. If you don’t already know what you’re doing, or don’t feel comfortable ambling around, you’ll have to email the support team.
All of the preceding services presuppose that if you don’t have time to read an article online, you’ll save it to read later…online. However, one of the reasons many people print piles of pages of web content is that they just don’t like how browsers display sites. People tend to be more at ease reading their email, probably because the font and font size tend to be uniform and at their control.
ToRead offers an email-based bookmarklet service. To register, just provide your preferred email address, and click an opt-in link in ToRead’s introductory email.
The How-To screen walks users through the basics, like dragging and dropping the bookmarklet to the browser. For speedy saving, the [toread] bookmarklet will do; if you prefer to add comments to your saved content, use the [toread+] bookmarklet.
Surf the web as usual, and when you find something you’d like to read later, click the bookmarklet. Your page will quickly refresh, and within seconds, you’ll receive a cached version of the page in your email account, with all text and graphics.
If you plan to use ToRead, consider setting up an email rule with a separate inbox folder, so all email from info@toread.cc will go be routed there. This will keep your inbox from overflowing, and will contain all of your planned reading in one location.
Save some trees, reduce your print clutter, and give give these bookmarklet alternatives a try. And please report your experiences to Paper Doll!
Shredding the Documents: Find Your Shredding Solution
Outside of the organizing world, shredding has a few different meanings. To the Beautiful People, it’s Jillian Michaels’ (agonizing) 30 Day Shred, creating abs to die for (a process which might kill some of us). Snowboarding and skateboarding stars revel in their ability to shred when displaying extreme sports prowess. To the Guitar Hero set, shredding means kicking butt (musically) with super-speedy electric guitar, as displayed during Stephen Colbert’s Shred-Off
  , preceded by the famed Countdown to Guitarmageddon. (Haven’t you always wondered how this blog would sound if narrated by Henry Kissinger?)
But to professional organizers, shredding has the magical properties of alchemy. Instead of turning base metals into gold, shredding turns the fodder for identity theft into Kryptonite, keeping our privacy safe and our data secure.
Last week, we talked about why I feel stampers are inferior to shredders in almost every practical regard, and we’ve discussed time and again how protecting your identity by shredding sensitive documents is key to organizing your financial life.
Yet many people still aren’t shredding. There are two main reasons why those who know they should shred, don’t shred:
- They don’t know what to shred.
- They don’t have a way to shred.
To conquer the first, consult a strong records retention schedule and shred whatever documents no longer need to be retained and which contain personally identifying information. Today’s post addresses the second conundrum.
DO IT YOURSELF
In most cases, consistent use of a medium-sized shredder for your home office or small business should suffice to keep the backlog at bay and keep your papers from piling up. If you don’t yet have a shredder, or are in the market for a new one, some of the basic things to consider are:
Shred Size — You want a cross-cut or micro-cut shredder. The older style strip-cut shredders offer less protection against prying eyes. Cross-cut shredders reduce your paper to hanging chads. Micro-cut shredders pulverize papers even more finely, but may be overkill (in terms of both function and cost) for personal use.
Capacity — There are three key criteria:
1) How many sheets of paper can you feed at one time? While shredders are generally rated by number of sheets shredded contemporaneously, Paper Doll believes many manufacturers are a bit too optimistic in self-reporting. Aim for the highest capacity shredder in your budget range.
2) How much paper can you load in any session without the motor pooping out on you? This won’t generally be listed on the box, so take some time to read user reviews at Amazon and elsewhere online.
3) What else can you shred besides paper? While not everyone will have a need to destroy CDs/DVDs, the shredder you select should, at the very least, be able to handle stapled paper and credit cards.
Ease of Use — The main concerns are an adequate-width feeder and an easy-to-empty receptacle or bin. The nicest shredders have a removable bin that slides out like a drawer or tips out like a laundry chute, but these tend to be more expensive than the budget versions, where the shredding mechanism lifts off to reveal a metal or rubber receptacle. Avoid the low-rent shredders that only provide a mechanism to set atop a trash can — these are usually ill-fitting, poorly balanced and lead to a flurry of shreds on your carpet.
Aesthetics — While the design of a shredder shouldn’t be your main concern, an overly noisy or ugly shredder may be a deal breaker. Whenever possible, test a friend’s shredder or ask a sales associate help you test a floor model. The noise a shredder makes isn’t exactly pleasant, but some have more vibration or grinding than others.
Features — Any decent shredder should have an auto-start function, such that as long as your shredder is turned on, you should be able to insert documents to shred. A “forward” function keeps the motor running whether you are shredding or not. The “reverse” function is important for helping you clear paper jams quickly, especially when you feel immediate friction and realize you’re trying to shred too much paper at once.
Size Matters
Clients purchase desktop mini-shredders in hopes that the small size and convenience of easier access will make them more inclined to routinely shred junk mail. However, I find most desktop shredders lack the gravitas needed to handle daily work.
One inconvenient aspect is that the feeders tend to be too small for ease of usability. Typical mail is 8 1/2″ wide, but even smaller paper generally has to be folded in order to fit into desktop feeders. Perhaps Paper Doll is spoiled, but the ability to shred a short stack of 5 or 8 pieces of paper without having to fold or spindle in order to mutilate is essential.
Mini-shredders are not designed for power-shredding, but even applying relaxed standards, they still tend to overheat quickly, either from lumpy paper gumming up the works or over-exhaustion. One major desktop shredder notes, as a feature, that the shredder “runs for 8 minutes on before needing 80 min off for down time”. Eight minutes of service, followed by an hour and twenty minutes of rest? Nice work if you can get it!
One client aptly described the desktop shredder that she returned it to the store: “It’s cute, but compared to a regular shredder, it’s kinda like an Easy-Bake Oven vs. a regular stove.”
Size REALLY Matters
For anyone with some extra cash lying around and a quirky decorating sense, Pigeontail Design’s Papervore Coffee Table offers an intriguing, outsized shredding solution.

Measuring 31 inches wide by 16 inches deep by 15 1/2 inches high, the hand-cranked Papervore is made of bent powdercoated aluminum with a mahogany and oak shelf. The fully-removable shredding receptacle is acrylic. (Watch the Papervore video.)
The Papervore has a big personality, and an even bigger footprint. It might be for you if you’d be delighted to have an ever-changing kaleidoscope of colors (depending on what you shred) as part of your dcor.
Of course, the main appeal of a shredder is that it does all the work for you, so if you’re the type of person who eschews using a pepper mill, stick with traditional, electric-powered shredders. (If mini-shredders are Easy-Bake Ovens, the Papervore is a stylish hand-cranked Model T Ford.)
CALL THE PROFESSIONALS
No matter how great a shredder you have, there may be times when your device is not up to an enormous job. In those instances, you might want to turn to a professional document destruction company.

When one of my clients and I processed her elderly mother’s home, we ended up with dozens of cardboard boxes filled with thirty years’ worth of documents containing personally identifying information. Even with the best of personal shredders, it would have taken eons to shred. Instead, we consulted the National Association for Information Destruction and searched their database for certified member companies in our locale that could shred efficiently and cost-effectively.
Document destruction companies generally offer services via two methods. Customers can have their confidential documents shredded on-site at their homes or offices via mobile shredding trucks. The company will shred documents in front of you, in the truck, at your location, and provide you with a certificate of destruction. Most companies also offer an office drop-off service, wherein customers bring their boxes of paper to be shredded; this option often costs somewhat less.
SHOW SOME COMMUNITY SPIRIT
Some people have too much paper for a home shredder, but not enough to rationalize using a professional document destruction company. Luckily, widespread support of anti-identity theft efforts has led to the popularity of free shredathons.
These community events tend to be sponsored by credit unions and hometown banks, legal service companies, law enforcement agencies and shredding companies. Some government agencies do a great job in spreading the word about events. For example, the Washington State Office of the Attorney General keeps citizens apprised with calendars and maps of statewide shredding events. Similarly, some document destruction companies promote community shred event participation on their web sites. For example, national document destruction company Pro-Shed posts their community shredding events, while Shred-It lists Canadian and U.S. community shred events and offers a toll-free number (1-877-60 SHRED) to find local events.
Unfortunately, there’s no central clearinghouse for shredathons, so you’ll have to be creative and diligent in your searches. Try calling some of the better known document destruction companies in your community to ask if they are participating in any upcoming community shreds events. Also, consider setting a Google Alert with the name of your community and the word “shred” or “shredathon” in the search parameters, and have appropriate searches emailed to you.
SPARE SOME CHANGE
![]()
If there are no upcoming community shredding events in your area, but you don’t have oodles of paper to shred, there’s finally a convenient and relatively inexpensive consumer option available. Office Depot has developed their Document Shredding While You Wait program.
For 99 cents per pound, you can bring in a container of papers to any participating retail location, and your papers will be shredded while you wait, after which you will receive a certificate of destruction. They are also able to shred stapled documents, credit cards and CDs/DVDs. For an additional price, they can scan your documents to CD prior to shredding, if you’d prefer to go digital.
![]()

If you don’t live in an area served by Office Depot or an affordable document destruction company, ShredNations’ Express Paper Destruction Service also offers the option of shipping your shred-able paper to them at limited cost or effort. You fill out an online form, print a Fed-Ex label and affix it to a box of papers, either up to thirty pounds for one price, or up to 65 pounds for a second pricing level.
ShredNations arranges for the pick-up, shreds the papers and forwards you a certificate of destruction. Costs vary slightly by distance from service locations. For example, Paper Doll can send up to 30 pounds of papers for $31.96 (including shipping from Chattanooga). Up to 65 pounds would cost $47.27, distinctly less per pound than even Office Depot would charge!
Finally, Paper Doll should note that it is almost impossible to write about shredding without hearing the John Hiatt song Shredding the Documents on an endless loop in my head. Feel free to hum along.
Stamping Out the Evidence: Are Stampers a Viable Alternative to Shredders?
Some of the best ideas come from readers. Not long ago, E. emailed to say:
I recently found out there are stampers available that are supposed to obliterate your address and allow you to recycle paper that would ordinarily be shredded.
E. asked if I might review the various stampers for quality, and even provided links to multiple products like Plus ID Guard Stamp, XStamper’s Secure Stamp and ExcelMark’s Theft Protection Stamp) in case I might have an opinion on features or brands.
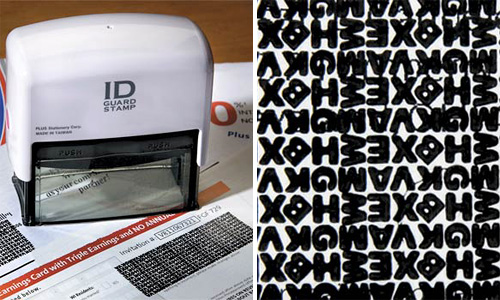
As I drafted my reply, I apologized in advance, because I knew my answer was probably not the one E. wanted to hear. More than anything, these stampers reminded me of the Unitasker Wednesday feature on Erin Doland’s excellent Unclutterer blog. They do one thing only, and not as well as an obvious alternative.
STAMPER VS. SHREDDER
First, I generally wondered under what conditions might one want to use a stamper to make a piece of paper recyclable, when shredding a piece of paper would accomplish the same thing with no fear of a reversal of the process (as happens with check washing). A good cross-cut shredder makes it impossible to recreate the original document’s information (and therefore, renders the paper useless to identity thieves, corporate espionage workers or the spies on Chuck), whereas inks can often be removed by an industrious thief.
Next, putting aside the question of recycling, I wondered under what circumstances I’d advise using a black-out stamper rather than a shredder to maintain the integrity of some of the written material, while making the rest opaque. This is done well by various governments, for example, when portions of documents are redacted to protect an individual’s privacy or to maintain classified information:

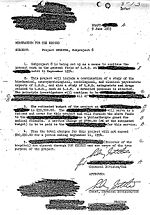
Nowadays, the government redacts documents electronically. Just as Paper Doll might use the highlighting function with a yellow background, one can redact the digital text with a black background like so: I bet you’re wondering what this says.
However, I’m dubious that this is a product that those of us not involved in government service or responsible for top secret information would find useful or help us be more productive. It’s far more likely that if we want to keep a document, we’ll want to see all of it, and if we no longer need it, we’ll be willing to destroy it in full.
I noted to E. that an address is a matter of public record, so obliterating it, alone (when there’s no Social Security or account number to hide), does little for protection against identity theft. Anyone can generally access that data as a matter of course via Google, SpokeO or any of a variety of search engines.
Finally, the idea of hand-stamping each convenience check sent by banks and credit card companies is exhausting. Feeding a short stack into the shredder and letting it nibble up 12 checks (and the accompanying hard-sell tactics) at one time seems eminently more appealing.
DO STAMPERS WORK?
Beyond the relative merits of shredders vs. stampers, there are practical considerations raised. I have three initial concerns:
1) Washability — A common type of fraud is check washing, where ink is removed from checks with the application of simple solvents like isopropanol or acetone, such as is found in nail polish remover. There are relatively few commercial inks that are not “washable”, which is why there is so much concern about check washing for identity theft purposes.
If a typical dye-based ink is used in the stamp ink, a determined thief can access the information below. Check washing, itself, can be averted by using gel-based inks that are not washable, but the makers of identity protection stampers don’t generally make known the contents of their inks, so it’s difficult to judge the merits of their formulas.
2) Adherence — At least one of the major brands even admits that their ink will not adhere to glossy paper, which eliminates the ability to obscure names and addresses from magazines covers, which are generally labeled electronically directly on the magazines, rather than on adhesive labels.
One of the major stamp manufacturer’s web sites states:
Not recommended for use on the following surfaces: Sealed postcards, coated paper, glossy paper and photo paper.
3) Security of Obscurity — The purpose of the ink is to obscure the text beneath. Even if the ink cannot be washed or wiped off, stamper ink is not exactly akin to blocking Superman’s X-ray vision with lead. Application of different wavelengths of light can render the obscured text visible. Sometimes, even a flashlight or light table (such as is used for viewing negatives or slides) will work.
One of the better-selling brands of privacy stamps promotes the product by saying, “Specially formulated ink ensures that addresses will not bleed through.” However, in an online review, a user states that she:
Another review of the same product stated that that ink could be wiped off glossy pages within 24 hours.
Treated paper (i.e., anything that is not fibrous, allowing the ink to soak into the paper), in general, can’t be easily sullied by stampers. So, the inking won’t obliterate information on glossy paper, and though it may do so on things like contracts or other legal or financial paperwork, a diligent identity thief might be able to wash the ink and get at the desired information. And again, if the written information were of a sensitive enough nature to keep private, you’d likely want to keep it intact in a safe deposit box or shred it completely once you no longer needed to maintain the complete document.
So, we’ve generally come full circle. Except…
A CAVEAT: PAPER DOLL‘S SHORTSIGHTEDNESS
When I originally replied to E.’s letter, I was thinking inside the (paper) box. Although E. did not state it, further research indicates to me that she might have been concerned about the wisdom of recycling shredded paper. According to Ecocycle.org, there are some lesser-known drawbacks to shredding:
- The length of a paper fiber determines its value, because longer fibers can be used to manufacture higher-grade papers and can be recycled more times. Thus, the tiny confetti-esque bits of cross-cut paper that do so much to protect our privacy aren’t necessarily stellar with regard to protecting the environment.
- The paper mills that purchase paper for the recycling process must do a “quality sort” before sending paper on to the giant paper-munching machines. Because it’s difficult to judge the quality of the smallest bits, they are often discarded and sent to landfills rather than processed for recycling.
- Recycling facilities often use filters to remove non-fibrous contaminants (like chunks of dirt, metal or plastic). Although this improves the end-quality of the recycled paper, due to the small size of shredded paper, the tiniest bits may be grabbed by the filters and discarded rather than recycled.
Because of these issues, it’s true that some communities will not recycle shredded paper, and some environmentally-minded consumers prefer not to shred if the paper can’t be recycled. However, other communities are happy to accept shredded paper to mix with other low-quality paper supplies. And, of course, Corporate America must, by virtue of operational security and various types of legislation, shred paper, such that document destruction companies like Shred Nations report recycling 10,000 tons of shredded paper each month.
Given the above, Paper Doll believes that if we did have to choose between ensuring high-quality protection against identity theft (via shredding) which might make recycling more difficult, and a lower-quality protection (via stamping) with what seems to be a negligible benefit in the enormity of the recycling process, shredding beats stamping. No contest.
However, as with most things, there is a middle ground to consider. First, check to see if your community is able to recycle the shredded paper you discard — you may be pleasantly surprised. Second, residential shredding refuse is minimal compared to that used by businesses, meaning that the impact of shredding your household’s documents is a drop in the ocean compared to the impact of big business.
If you are concerned enough about the environment to be considering stampers in lieu of shredding for environmental reasons, why not contact local business-oriented document destruction companies in your area to see whether they currently recycle the paper they collect and shred?
SPECIAL CIRCUMSTANCES
Let’s say you were thinking about donating a magazine to a medical office, hospice or homeless shelter, or somewhere else where a number of persons unknown to you would have the opportunity to view your name and address. While the likelihood of opportunistic identity theft is always greater than zero, it’s easily avoided. Before donating magazines, simply cut out the address label portion. It prevents people from knowing your name and address if all they have is the magazine, and always works, unlike the stampers, which will not work on glossy or film-based paper. The reverse of the cover page is almost always an advertisement, eliminating any chance you’ll reduce the next reader’s enjoyment.
Sometimes, you might wish to obscure personal data in order to post scans or photos of mail or documents to a blog or website. If you’re involved in these types of creative endeavors, I’d encourage you to scan the item first, then use photo software or applications (like MS Paint or iPhoto) to “spray-paint” and blur or cover the data you want hidden.
SUMMARY
Going back to E.’s original inquiry then, I maintain that there’s relatively little reason to obscure information like a name and address, anyway, but no matter how remotely sensitive the information you hope to conceal might be, identity protection stampers seem like a particularly weak and non-permanent solution. In essence, then, Paper Doll feels that a simple, portable and less expensive option, a black Sharpie, will succeed in doing all that these stampers can (if you’re merely trying to hide information from a casually curious observer), while a decent shredder will provide so much more protection against any intentional ne’er-do-well.
It’s a rarity that Paper Doll speaks ill of a product; I usually keep silent if I don’t have anything positive to say. But, because I was asked, I have to say that I found little to endear me to privacy stamps. However, I invite readers to comment and let me know if you think I might be off-base. Please feel free to stamp out my opinion, and share your own.
Follow Me