Seven Steps to Conquering “Receipt Clutter Flutter”
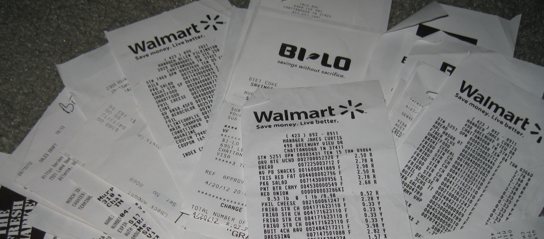
Most homes and offices have them: fluffy piles of loose, crumpled papers on desktops and filing cabinets, in drawers, and spindled and somewhat mutilated on those desktop spires. Any brisk movement past the desk yields receipt clutter flutter.
Most of this kind of backlog, as well as new incoming papers, can be handled with relative ease using a pretty Old School treatment of receipts at three points in time.
At the register:
–Check receipts for accuracy.
–Neatly place receipts (folded, if necessary) behind the cash in your wallet.
At your home (or office, if these are business receipts) each evening:
–Remove the receipts.
–Discard/shred the receipts that needn’t be kept (see below).
–Tuck away the receipts that you need to keep in an envelope or file folder with the current month labeled on the outside. Keep the envelope or folder in a top desk drawer or the front of a file riser — the goal is to make it immediately accessible but keep the receipts safely tucked away.
At your home or office on a monthly basis (scheduled on your calendar, if necessary):
–Check the receipts against your actual bank or credit card statements.
–Discard the receipts that are no longer necessary to keep after 30 days. (See below.)
–Archive the rest. Easy-peasy, eh? Sure, there’s a little more to it, like knowing what receipts need to be kept. I advise that you:
1) Keep cash receipts for things you might return, and for the duration of the return period only. A Double-Mocha Venti With Foam that you paid for with cash? Unless it’s somehow a business expense, toss the receipt. If you purchase toys or clothing for cash and the store’s return policy is a firm 30 days, discard your receipt after that period.
2) Keep all receipts for big ticket items (set your own benchmark — it could be $50 or $500, depending on your lifestyle), no matter how you paid, and credit card receipts for things you might return, until the return period has expired (and #5, below, has kicked in). Even if you set a relatively high benchmark for how BIG a big-ticket item might be, I suggest you save receipts for all automobile-related part purchases in a Car Maintenance file. This information will prove useful if a part is ever recalled, and a full repair history (usually printed on big auto repair receipts) creates value-added appeal if you choose to privately sell your car instead of trading it in.
If you’ve purchased really big big-ticket items, note that the IRS allows taxpayers to choose between deducting state income tax and sales tax; use the IRS sales tax calculator to see what works best for you. The default amount is usually your best bet, but if you bought a house, car, or other major purchase, you’ll want proof of that big ticket deduction.
3) Keep all receipts for tax-deductible expenses such as charitable donations and medical expenses in your Tax Prep folder until you’ve completed your tax return. You won’t know until the end of the year whether you’ve accumulated a high enough percentage of your adjusted gross income to deduct medical expenses, so err on the side of caution. However, most pharmacies will print a summary of all prescription purchases, so you can shred most prescription receipts. Just hang on to the ones you get from when you’re on vacation or using a drugstore other than your usual one. Be sure to check with a tax professional regarding any state- and municipal-tax reasons to maintain other receipts. For example, states like Louisiana and Minnesota allow residents to deduct K-12 educational expenses.
4) Keep receipts for all items for which you are due reimbursement until you get paid. Most often, this will include purchases submitted on your expense reports at work or on invoices to your clients, if you’re self-employed. Less regularly, you’ll submit receipts to your insurance company for repairs done to your home or auto, or for medical procedures where the doctor’s office won’t file on your behalf. Occasionally, you’ll even have to submit the receipts to someone else’s insurance company if the other party was at fault. If you have to turn in the original, keep a scanned copy for your records.
5) Keep credit card receipts, deposit slips and ATM withdrawal tickets until your credit card or bank statements have arrived. Reconcile the receipts against the statements, and if the receipts don’t fit any of the above-mentioned categories, it’s generally safe to shred them. These five basic Old School tips work great when you’ve received your receipts on paper, such as when you’re in a grocery store, clothing shop or restaurant. In the short term, you’re dealing with deadlines that last about a month — waiting for return policies to expire and bank or credit card statements to appear.
For other paper receipts, you’re dealing with tax or reimbursement issues, and your paper file system should accommodate you. But what if you’re dealing with Receipts 2.0? What if you get an electronic receipt from a taxi driver, as I did when I attended this year’s NAPO Conference?
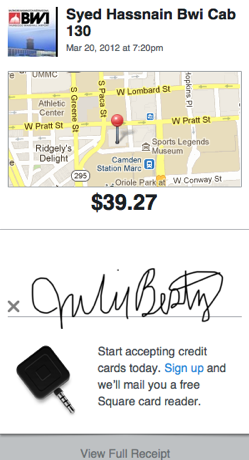
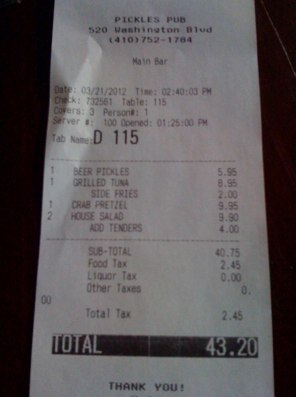
What if you make an online purchase and the only receipt you get comes via email or as a page in your browser? Or what if you split a meal with colleagues where one puts the bill on her card and you all pay her in cash, as I did with my pal Krista Colvin, at that same NAPO conference? (Krista was kind enough to snap a photo of the receipt with her phone and email it to me.)
Increasingly often, purchases are made in ways that were atypical, or even impossible, just a few years ago. At a recent visit to a shoe store, I found that credit card sales were “rung up” on an iPad; service people and mobile vendors have embraced using Square, PayPal Here, and similar devices, allowing more and more small and micro-businesses to accept electronic payments and provide electronic receipts. What then?
6) For receipts you get via email, create a special sub-folder in your email system. For example, in Outlook or Entourage, select “New” and then “Folder” from under the File menu. In Apple’s Mail program, go to “Mailbox” in the menu bar at the top of the screen and select the “New Mailbox” option. In Gmail, select “Create New Labels”. Label the folder “Receipts” — if you want to get fancy, you can then create sub-folders for each year (to make it easy when separating receipts that arrive late in December vs. early January) and even sub-sub folders for categories like books, clothing, transportation, services, and so on. If you like fine detail or need it to help you prepare your business taxes, you can get granular; otherwise, just a big Receipts folder can suffice. Whenever you get a receipt by email, just drag or move it to your Receipts folder.
7) For online receipts that yield no email but just a browser screen, you have a few options. You can:
- Email the web page to yourself
Some browsers have an option to email a whole page. In Safari, select “Mail Contents of This Page” from the File menu and a copy of the page will be sent to you like any other email. In Internet Explorer, select “Send Page By Email” from the File menu. If you use Firefox, add an extension like Email The Web.
- Save the web page to your hard drive
Every browser has an option to save the contents of a page. Mac users can generally create a PDF just by selecting the Print option from the File menu and then printing “to” PDF instead of to a printer, yielding a PDF that can be saved in a Receipts folder anywhere on the hard drive. The easier it is to navigate to the folder, the more you’ll be inspired to use this option. For reference, recent versions Mac OS X even have a pre-created Web Receipts sub-folder in the Documents folder, but of course, you can move it anywhere, including your desktop. If you’re on a PC and are not able to create a PDF, you can still save the contents of a web page receipt. Each browser behaves a little differently, but look under your File menu for something that looks like “Save Page As” or “Save As” — your browser will then ask if you want the resulting page to be saved as HTML (i.e., as a web page) or as text.
- Take a screen capture of the receipt.
No matter what browser you use, you can always take a picture of whatever’s on your screen. On a Mac, select Command ()-Shift-4 — it will yield a little bullseye. Place it at the upper left corner of what you want to capture, click, and drag to the lower left until you’ve highlighted what you want. When you let go, a snapshot of that section, in .png format, will be sitting on your desktop. If you want a screen capture of the whole screen, use Command ()-Shift-3. It’s not quite as easy on a Windows-based PC because there’s an additional step to get the screen capture off of the clipboard. To grab a shot of the whole screen, use the Print Screen key; for just a selection, use Alt-Control-Print Screen, highlight the item and then copy and paste it into Microsoft Paint or a similar program. Remember to save it. (Windows 7/Vista users can employ the built-in Snipping Tool.)
Whichever options you choose, be sure to select a useful title that identifies whatever elements will be essential when accessing the receipt later on. You’ll already be able to sort and search by the date the receipt was created, so think in terms of a name that quickly identifies the store and product or purpose (e.g., Kohls-PinkSweater or Amazon-iPad3). Finally, you may be wondering, what if you’re trying to go paperless (or paper-light) and wish all your crinkled paper receipts could magically be made digital? Or, what if you want to avoid the whole process of dealing with tangible receipts in the first place?
Next time, we’re going to look at an abundance of digital resources, including those shown below, for combating receipt clutter and streamlining your financial information. Be sure to subscribe to the RSS feed (above right, under my photo) or follow me on Twitter or Facebook, so you don’t miss one nifty tip.


Follow Me