Archive for ‘Medical’ Category
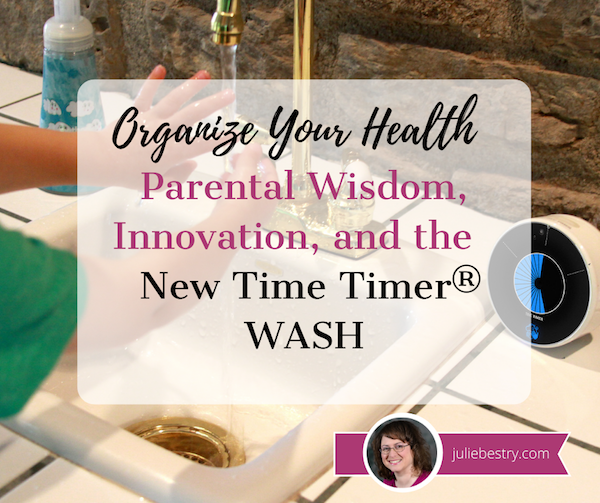
Organize Your Health: Parental Wisdom, Innovation, and the New Time Timer® Wash
POOR, UNAPPRECIATED PARENTS
A few decades ago, my best friend called me with a “You’re not going to believe this!” tale of woe. A mom of four, she’d spent her little ones’ formative years teaching them, in age-appropriate ways, the essential life skills, including hygiene tasks like tooth-brushing, bathing, and hand-washing. She always explained how each helped keep them healthy, never stinting on science but also focusing on the “what’s in it for me?” aspect necessary to persuade tiny humans to do anything.
Her little daughter, however, was always reluctant. No matter how much my friend tried to bring home the concept of germ theory in keeping everyone healthy, she still had to remind, cajole, wheedle.
Fast-forward a bit to the day my friend called me. Her daughter had just returned from a day of kindergarten, and, as kids often do, held forth breathlessly on the delights and fascinations of learning something new. My BFF’s daughter solemnly, gravely spoke to my (college-educated in the field of child development) friend as if she were a dim stuffed animal and reported, “Mommy, my teacher said that we have to always wash our hands. There are little invisible bugs that if we touch them and then touch our faces, we could get sick, and if we touch someone else, we could get them sick. It’s very important that you do this!”
Huh. Really?
Mothers the world over know the sad, universal truth. You can’t make someone believe (or do) something, even for their own good, until they are ready. My friend’s daughter had to hear it from an authority figure who wasn’t her mom. Someone who made it interesting and fun in a non-mom way. Her daughter had sagely nodded along in class to earn the approbation of her teacher, and only then did the facts matter to her.
Sometimes, even we know something is good for us and everyone around us, it doesn’t matter who tells us; we just don’t do it. We don’t recycle. Or we don’t back up our computers. Or we don’t assign homes to objects and put things away, and instead toss bills on top of the microwave, where they gather dust.
Some people need to avoid the stick; others need the carrot. Organizing new health behaviors is no different.
WE NEVER WANT TO HEAR THE WORD “UNPRECEDENTED” AGAIN
Early in the COVID pandemic, we were repeatedly told that the best things we could do to avoid exposure to this dangerous virus were:
- Wash our hands.
- Don’t touch our faces.
- Maintain a 6-foot or greater distance from others (AKA: “social distancing”).
- Wear masks.
Many of us got good at figuring out how far apart six feet was. For me, I pictured two shopping carts. CNN had a post called Social Distancing Means Standing 6 Feet Apart. Here’s What That Actually Looks Like with almost giddy cartoon depictions like, “Two Labrador Retrievers standing nose to tail” and a “Man Wearing a Top Hat.”
MOM, HE’S TOUCHING ME!
Some pieces of advice were easier to follow than others. I mean, if you have had the chicken pox or poison ivy, you know it’s hard to keep from scratching an itch. But before COVID, did you ever give thought to keeping yourself from touching your face?
It’s hard! I mean, as an organizing and productivity professional, I can tell you how to turn off notifications on your phone to keep yourself from being distracted, but short of tying your hands to your chair, there’s not a lot of good advice for keeping your hands off your face.
A few weeks into the pandemic, Mike Bodge, Brian Moore, and Isaac Blankensmith developed Do Not Touch Your Face, a machine-learning, in-browser app that, once you granted camera access, would shout, “No!” at you when your hand got close to your face.
We made a little site that will yell at you… whenever you touch your face. Hope it helps you learn to stop touching your face! Try it out: https://t.co/IGNEQZIFAX Made with @mikebodge @lanewinfield #donottouchyourface #coronaoutbreak #COVID19 pic.twitter.com/jL5Ids9UV0
— Isaac Blankensmith (@Blankensmith) March 4, 2020
Weird but helpful, it worked when you were sitting in front of your computer, but not when you were anywhere but there.
Eventually, University of Hawaii Professor Kim Binstead designed the JalapeNO app for Fitbits (and soon, Apple Watches) to help people keep their hands off their faces.
WHO WAS THAT MASKED MAN?
Back in March, who (except doctors) owned a mask, unless it was part of a Grey’s Anatomy cosplay costume? With a shortage of N95 masks and the need for them to get to healthcare workers, entire cottage industries have grown up around creating reusable masks for the rest of us. (A big thanks to friend-of-the-blog Jacki Hollywood Brown and her daughter for the gorgeous masks in Paper Doll‘s theme colors!)
Your favorite sports team? There’s a mask. (Go, team!)
Your alma matter? There’s a mask.
Masks that match your outfit? But of course!
A mask with some snark from regarding your favorite 19th century author? Is a single man in possession of a good fortune in want of a wife? I mean, come on, it’s universally acknowledged!

 TIME TIMER WASH
And now we’ve come full circle. Hand washing. In those first few weeks, we learned we probably weren’t washing our hands long enough, even if we were washing them often enough. We’re grownups, we assume we know how to wash our hands, but then the CDC came out with this somewhat daunting 11-step graphic:
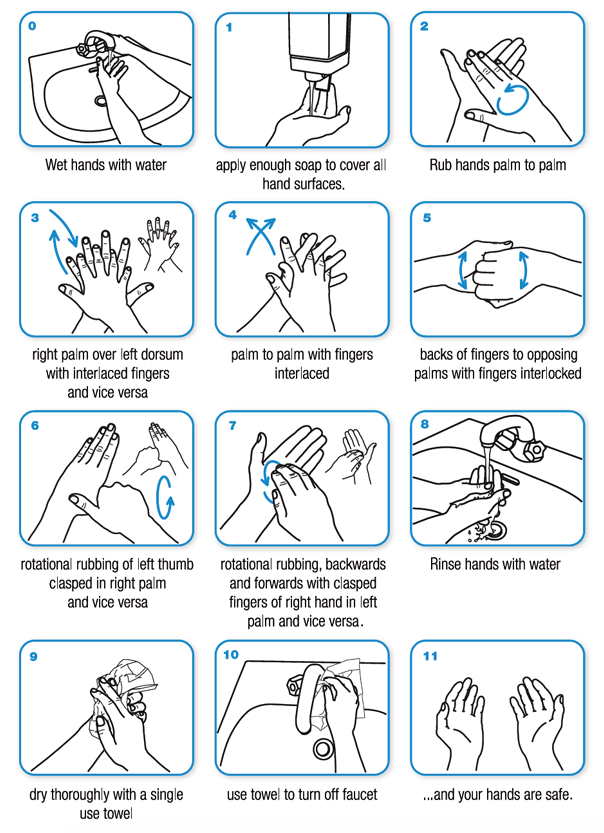
Some people were singing “Happy Birthday” to make sure they were doing it long enough, but that got old. I’ve been studying Italian for the past few years, so I started counting in Italian to accompany the ritual. Quattordici. Quindici. Sedici…Venti-due. Venti-tre. Sigh.
So, I was surprised (but delighted) to learn that one of the companies beloved by professional organizers and productivity specialists, Time Timer, had joined the fight for clean hands. The same company I’ve praised in these pages previously (and previously, and previously) for how they help children and adults visualize time has created a special timer to make hand-washing, well, if not fun, per se, less of a chore.
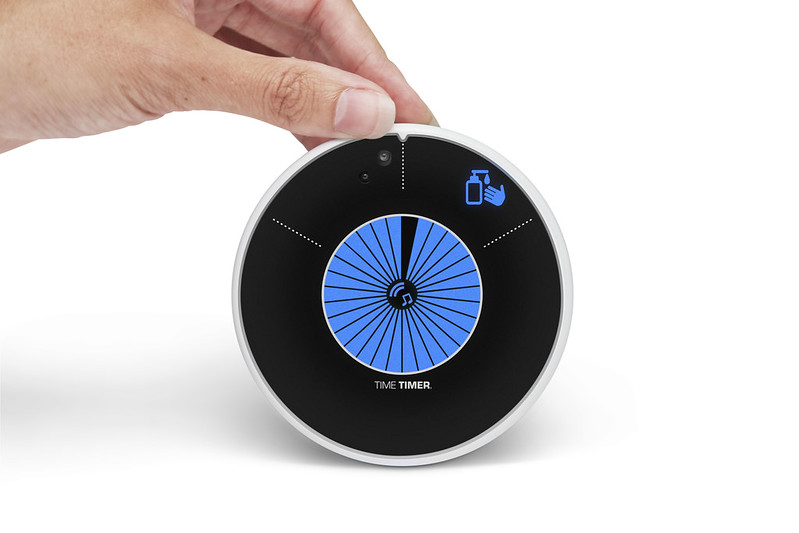
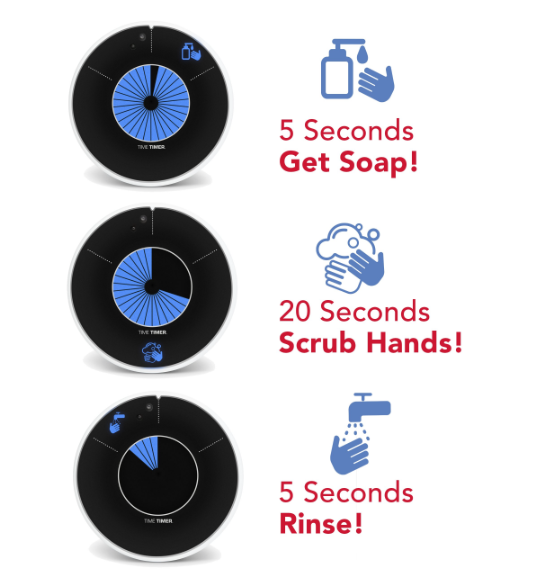
The Time Timer® WASH is a touchless, water-resistant visual timer for hand-washing.
The Time Timer WASH gives kids, impatient grownups, and anyone who isn’t great at judging time a clear, easily understood resource for getting hands germ-free. It’s not exactly a video game, but the lights and sounds encourage children (and anyone who needs a nudge) wash hands for a long enough period to kill germs.
Time Timer has paired advice from the (CDC) and the World Health Organization (WHO) regarding the recommended duration of hand-washing time with Time Timer’s classic “disappearing disk” to help show the passage of time.
- It’s touchless, so there’s no transfer of germs to the timer, and consistent use conditions kids (and, y’know, everyone else) to wash hands for the length of time that’s truly necessary.
- There are no numbers on the dial, so children who haven’t learned to read or tell time can still grasp the concepts of elapsed time and time remaining.
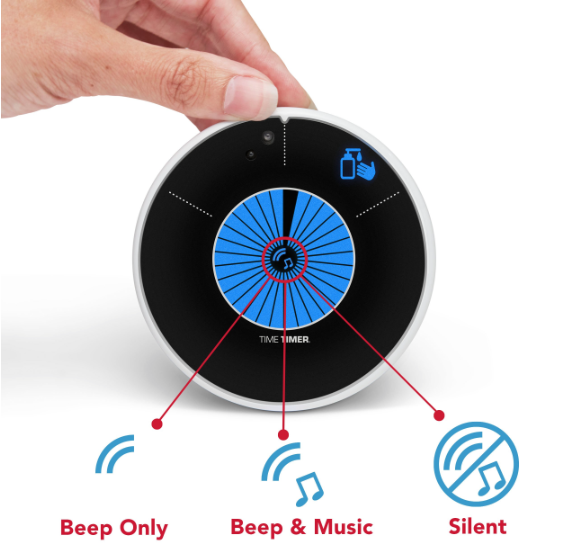
- Research shows that sound can help reinforce behavioral steps but the WASH timer’s music and sound cues are optional, so you can operate it silently in “sound-sensitive” environments (like a pre-school during nap time) or with individuals for whom sound may not be appropriate.
It’s easy to see it being used in bathrooms and kitchens, but also in classrooms and in certain workplaces, like labs, restaurants, anywhere yucky stuff might be encountered.
Start the Time Timer WASH by holding your hand (or slowly waving it) in front of the Timer. There are visual cues from the LCD light-up disc and auditory cues (music and beeps) for the different stages of hand-washing:
- Soaping up (5 seconds)
- Scrubbing (20 seconds)
- Rinsing (5 seconds)
The Time Timer Wash has a variety of placement options. It can stand alone or be hung on the wall, and comes with a suction cup, which can be placed on either the bottom or back of timer. It does requite three 3 AA/1.5V batteries, which aren’t included.
It comes with a one-year 100% Satisfaction Guarantee. Per Time Timer, “If you’re not completely satisfied, return your Time Timer to us within 12 months for a full refund or exchange. No questions asked.”
Time Timer WASH is available for pre-order now for $26.95.
See it in action:
If you’re a parent or teacher, please note that Time Timer is offering a free downloadable Activity Guide to help education elementary-aged children in the importance of handwashing. Per TimeTimer:
This Curriculum-based Activity Guide contains 5 interactive activities for teachers or parents to use with children while teaching about proper handwashing techniques and includes worksheet and activity templates throughout. Adaptions for distance learning and in-home schooling are also noted.
ONE LAST THING
Remember my best friend’s daughter? She’s in her third year of medical school now, working in a hospital while doing rotations through pediatrics, internal medicine, endocrinology, and so on. She washes her hands…a lot!
Affiliate Disclaimer: This site uses affiliate programs to help generate a supporting income which allows us to continue our work and provide you with the best overall experience and valued information. If you have any concerns, we suggest you do not click on any affiliate links found throughout the website or blog. If you are uncertain as to the resulting link’s destination, you may hover your cursor over the linked material to see where it goes. We will always provide you with a company or agency name, which you can type into any search engine in order to reach the site independently of our links. For more information, please see the Affiliate Tracking section of this site’s Privacy Policy linked at the bottom of each page.
Paper Doll Post:

Paper Doll on The Truth(s) About Standing Desks
Are you sitting down?
That’s what we ask people when we’re about to share upsetting news. Well, if you’re sitting down, and if you tend to be sitting down much of the time, this may not be news if you’ve been paying attention the past few years, but it’s certainly upsetting.
Spending too much time at our desks, plopped down (and probably hunched over), is pretty bad for us for a number of reasons, including those illustrated in this adorable TED-Ed Talk:
Articles like Sit Less, Live Longer and Too Much Sitting May Thin the Part of Your Brain That’s Important for Memory point out the major physical and cognitive problems associated with remaining seated.
But this doesn’t get into the latest and perhaps most important research. According to science writer Gretchen Reynolds, a recent Swedish study published in the British Journal of Sports Medicine suggests that when you sit all day, your telomeres (the tiny caps on the ends of DNA strands) get shorter. Apparently, this is NOT A GOOD THING! As telomeres get shorter, the rate at which the body ages and decays speeds up. Conversely, the study found “that the telomeres in [those] who were sitting the least had lengthened. Their cells seemed to be growing physiologically younger.” Obviously, we all want young cells!
The Push for Standing Desks
So, the experts have said, STAND UP! Why? Well, they figured that for each thing that sitting does to you that’s bad, standing can reverse it.
Let’s start with ergonomics and posture. You can still slump a little when standing, but not to the same extent as when you’re sitting in a chair. So, standing can help you strengthen your core, tighten up your glutes, and strengthen other muscles. There’s also such a thing as Upper and Lower Cross Syndromes, which, when you spend too much time sitting, can lead to tension headaches, shoulder strain, and that oogy feeling of becoming one with your office chair. When you stretch your leg and torso muscles by standing, you’re a bit more fit. Or so the theory goes.
Then there’s your cardiovascular system. Standing while working increases metabolism (vs. sitting down), and the theory is that just by standing, you can reduce your risk of heart disease by increasing your blood circulation. Well, maybe.
The physical advantages of standing vs. sitting make sense. But some researchers have posited that standing has other advantages related to productivity, creativity, and cognition.
With regard to productivity, studies note that while standing, more nutrient-rich blood, more mood-enhancing hormones, and more oxygen can get to the brain. More nutrient-rich blood and oxygen means more cognition, per The Economist, and unless you’re that Danish prince, Hamlet, more thinking means more productivity. (Hamlet, however, really needed a Disney vacation, or at least a mindless afternoon Kardashian-TV.) And more mood-enhancing hormones should, logically (and up to a point), yield more creativity. Whoohoo!
Finally, while a celebrity endorsement doesn’t necessarily imply wisdom, there have certainly been some famous desk-standers, including Ernest Hemingway (who famously said, “Write drunk, edit sober,” so you have to imagine him leaning more than standing), Vladimir Nabakov, Thomas Jefferson, Charles Dickens, Virginia Woolf, and Benjamin Franklin. Good company to keep – though, come to think of it, a number of them were tipplers and likely leaning like Hemingway.
The Tide May Be Turning
Up until recently, everyone had gotten a bit rah-rah about standing desks. There’s money to be made from standing desks, and health and productivity to be gained from standing, per se, so why not try it? Well, standing is well and good, but there’s some doubt as to whether standing desks do that much for you.
Boston Public Radio rather dramatically declared Throw Away Your Standing Desk after interviewing Arthur Caplan, Director of the Division of Medical Ethics at NYU Langone Medical Center about the minimal benefits of just standing while working. (Enjoy the audio for some jokey byplay.)
Further, there’s some shocking reportage that standing desks could be making you dumber! Apparently, a recent study in the journal Ergonomics found that while “due to concerns about excessive sedentary exposure for office workers, alternate work positions,” were studied, but they found that prolonged standing may have negative “health and productivity impacts” and that while creative problem-solving did improve, “reaction time and mental state deteriorated.” Yikes.
So, the answer is, STAND UP, but don’t expect that standing desks are going to yield that many benefits.
The Best of Both Worlds
Use a standing desk if you want (but keep an eye out for muscle fatigue, swelling in your legs, ankles, or feet, and decreased in cognitive function). If your back needs more support, sit at your desk, but set a timer or use an app to remind you to get up from your desk every 45 minutes or so.
Take a brisk walk around the office, do some wall push-ups, or go outside to make a client call and enjoy some fresh air. It’s said that Aristotle’s followers, the Peripatetics, engaged in all of their philosophical discussions while ambling about the Lyceum in ancient Athens. Why not take a page out of their books (scrolls?) and propose West Wing-style walking-and-talking meetings with your colleagues instead of traditional sitting or recently-in-vogue stand-up meetings?
Chances are that movement, rather than just standing, will have a more positive effect, and a change of environment will jump-start your creativity.
Shopping for Your Solution
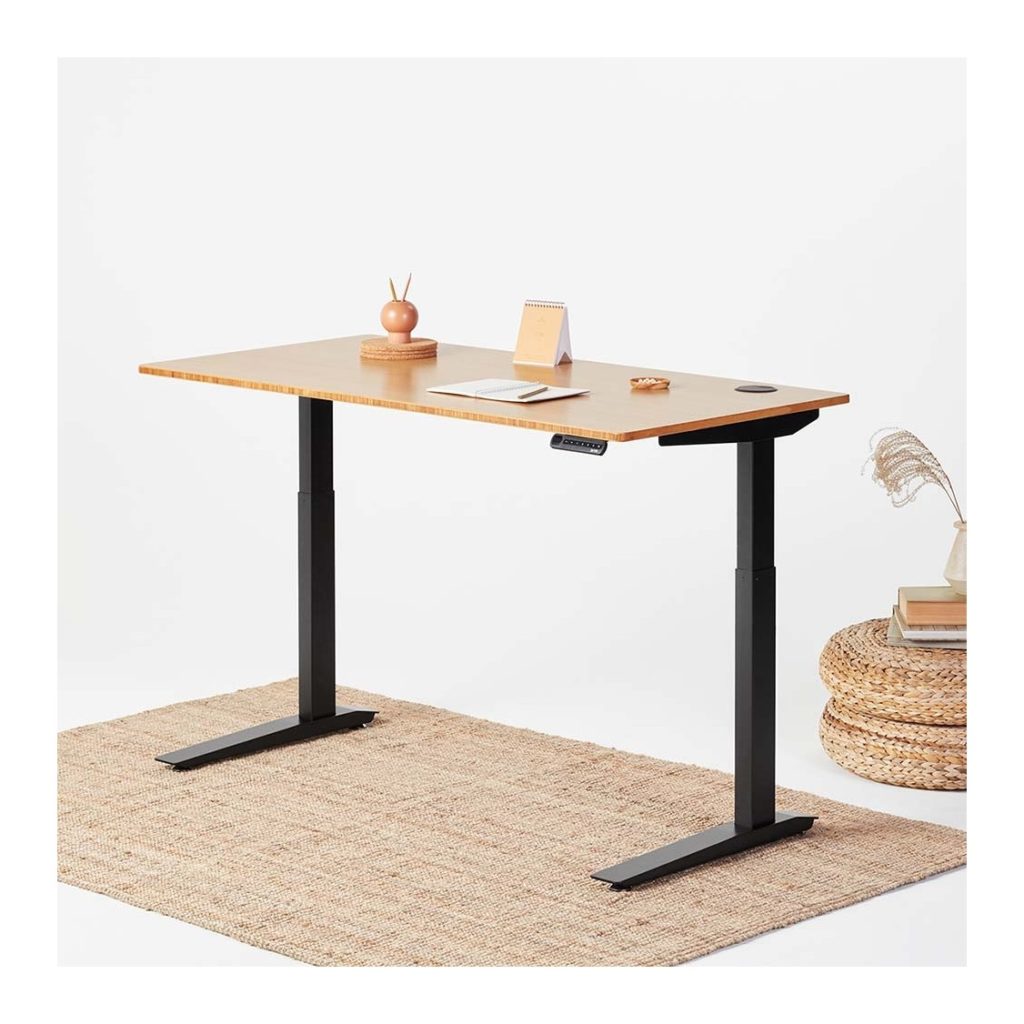
If you decide you must have a standing desk, Paper Doll has you covered. Really smart consumer sites like Wirecutter like the Fully line of adjustable standing desks, particularly the highly-rated Fully Jarvis Bamboo adjustable standing desk.
Of course, as with all furniture, prices range from high-end adjustable desks like those of Bush Business Furniture’s Stand 80 series to the DIY standing desk options and ideas on Pinterest.
Perhaps you’ve already got a desk you love. You could try what Paper Doll thinks of as a desk-topper (like a mattress pillow-topper), like HumbleWorks. The spine of the HumbleWorks has multiple slots, making it entirely adjustable. No matter your height, you can put your monitor and keyboard shelves at the correct ergonomic position for appropriate eye level and height.
The “spine” piece folds flat when not in use, so it’s easy to store.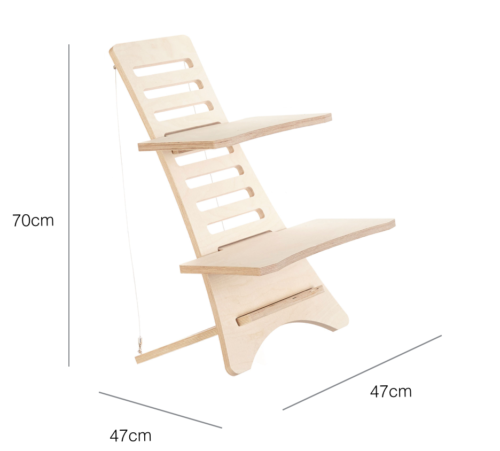
Compare different versions of the HumbleWorks standing desk. For example:
- Stan 1 is compatible with Macs and PC laptops with screens up to 15″, is made of 18mm birch plywood, and is reinforced with steel suspension cables and pins.
- Stan 1.5 is compatible with Macs and PC laptops and desktops with screens up to 17″, is made of 18mm birch plywood, and is reinforced with steel suspension cables and pins.
- Stan 2 is compatible with Macs and PC laptops and desktops with screens up to 27″, is made of 22mm birch plywood, and requires reinforcement.
If you like the wood look but want an alternative that’s more portable (and more price-sensitive) investigate the StandStand, which weighs less than many laptops and can be assembled in minutes. Versions come in bamboo or birch with varying finishes, and in multiple styles (for laptop, laptop-and-mouse, or for two monitors).
Not sure how you feel about the whole standing desk kerfuffle? Not ready to plunk down money for something that may not have a profound impact? Why not start small?
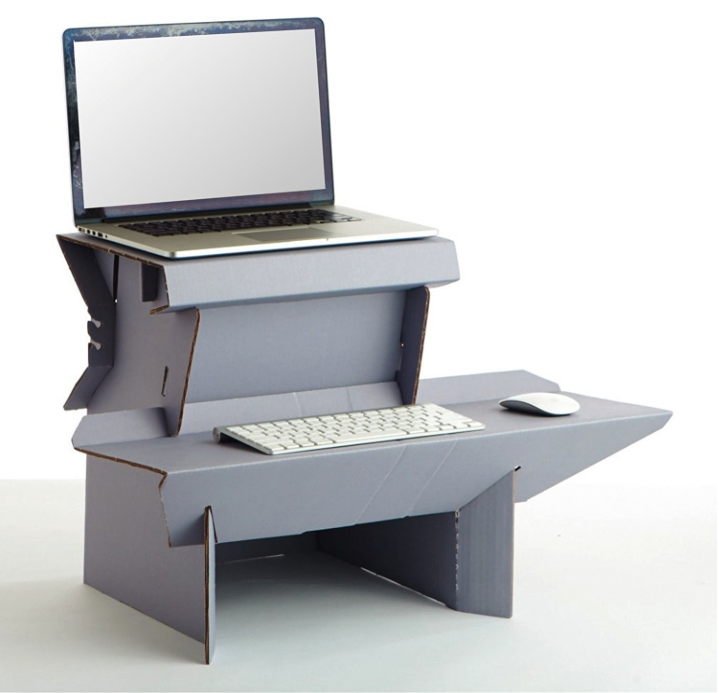
Recently, friend-of-the-blog and Professional Daily Money Manager Nanette Duffey shared her experience with the Ergodriven Spark, a sturdy cardboard standing desk that will only run you $25! It’s not gorgeous, but it gives you plenty of room for your laptop, an external keyboard and mouse, and even a knick-knack or two.
What if you want the best of all worlds? Do you want something fairly portable and full-size? Then your best bet is Refold, a sturdy, stand-up desk made out of thick cardboard! At 14 pounds, it’s not as lightweight as the Ergodriven, but it’s a free-standing desk and will hold 187 pounds! The Refolds come in three sizes: small for petite types (5’2″ and under), medium for those from 5’2″ to 6′, and large for those tall drinks of water over 6 feet.
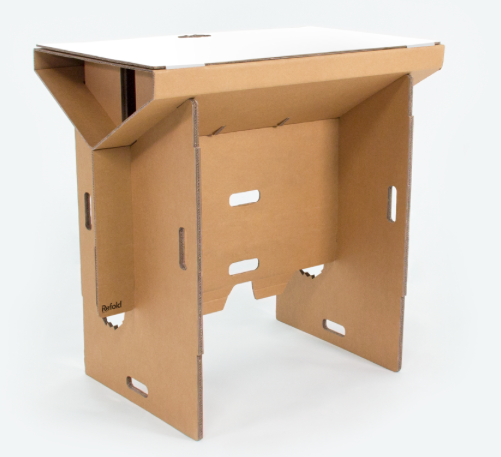
The Refold can have a cardboard or (for a teeny bit more money) a waterproof surface, can be painted or drawn on to customize it, and is fully recyclable. You can also purchase optional legs to turn it into a sitting desk for those days when you just can’t stand it!
One fairly significant note: the Refold is made in New Zealand, meaning that in addition to the $120-$190ish US dollars (depending on your product choice and the exchange rate), you’ll be paying some serious shipping charges.
Safety First
If you decide to keep on sitting, sit safely. Review these essential ergonomic tips for sitting, including:
- Sit with your feet flat on the floor.
- Keep your monitor at the same height as your line of vision.
- Sit so that your elbows are at a 90-degree bend when your hands are on the keyboard.
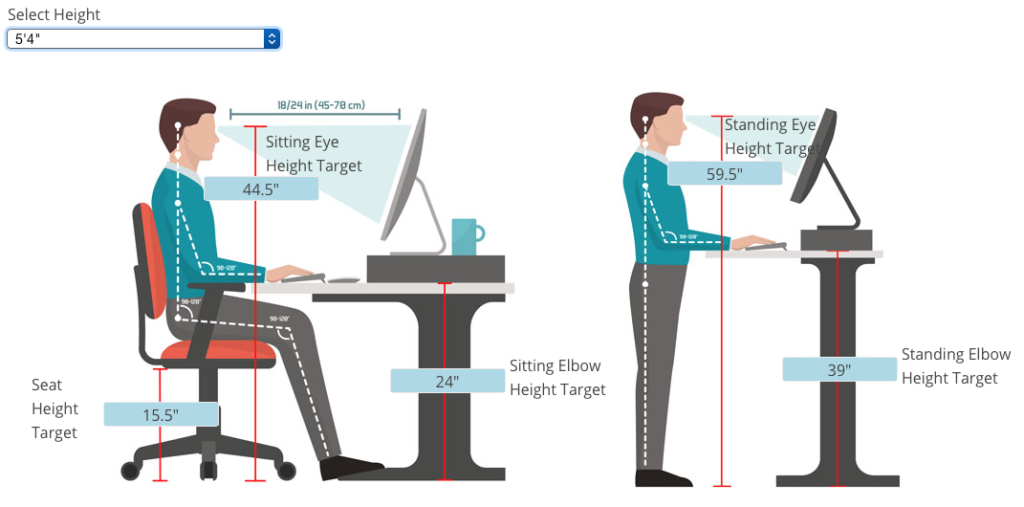
Finally, whether you decide to sit, stand, or work using a combination of both, make time to check that everything measures appropriately for your height. The NotSitting.com website has created an interactive sitting/standing-height desk calculator so that if you input your height, you can see the appropriate heights (whether sitting or standing) for your eyes and your elbows, and know how far your seat should be from the ground and how far your eyes should be from your monitor. For example, the following graphic shows what Paper Doll‘s ideal sitting and standing situation should be.
You’ve been reading this post for a while. Why not stand up, stretch, and take a walk to think about what you’ve learned?
Paper Doll Post:

Organize To Help First Responders: The Yellow Dot Program
Most of us spend time thinking about how to prevent medical emergencies. We try to exercise and eat healthily. We make doctor’s appointments, get all of the appropriate medical screening tests for our age group and gender, and we learn how to manage our health conditions in hopes of preventing complications.
Nobody likes to think about medical emergencies, but for the same reason we buy insurance (whether auto, home, health, or, in the worst case scenario, life insurance), we need to prepare for the unexpected. And when the unexpected does happen, we depend on first responders, particularly emergency medical technicians and paramedics, who have the training necessary to help us get safely treated.
So why not help the helpers?
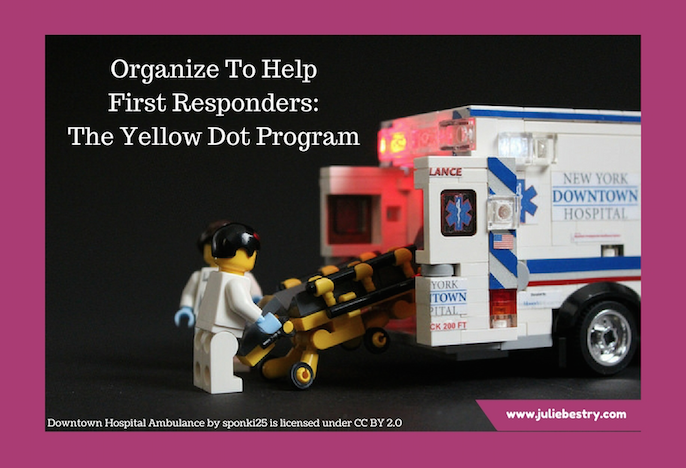
“Downtown Hospital Ambulance” by sponki25 is licensed under CC BY 2.0
In our next two posts, we’re going to look at two resources to organize essential medical information so that first responders can render aid when we need it, whether we’re out and about, or at home.
YELLOW DOT PROGRAM
At a DiabetesSisters meeting a few years ago, someone mentioned the existence of Tennessee’s Yellow Dot program, but almost nobody in the room was aware of this life-saving project.
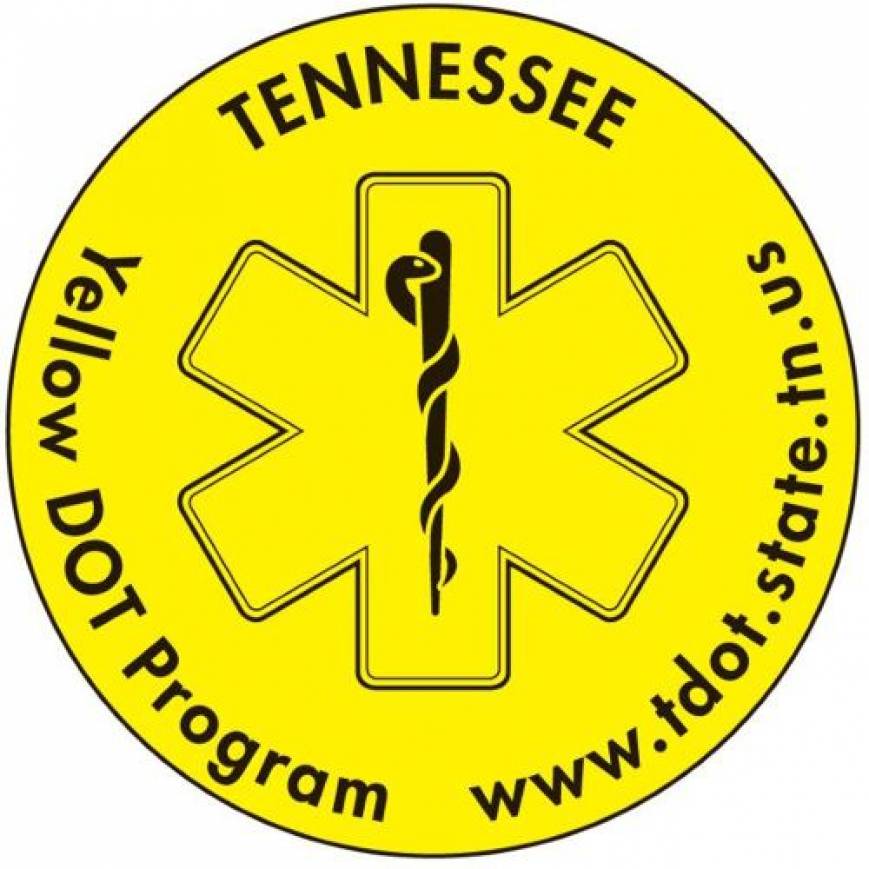
The Yellow Dot Program, available at no cost to participants, was initially developed as a regional program in the early 2000s. It is now a national program sponsored and funded by the United States Department of Transportation as a result of the work of the 113th Congress, the bill having been introduced by West Virginia’s Senator Joe Manchin III.
The purpose of the program is to help automobile drivers and their passengers communicate vital information to medical personnel (as well as police, firefighters, and other first responders) during road emergencies, like car accidents.
In case drivers or passengers are incapacitated, in shock, or are otherwise unable to communicate about their medical conditions, car owners can affix yellow stickers to their rear windshields to alert first responders that occupants of the car may require specialized medical attention. (Smaller stickers are available for motorcycle use.) Although state programs tend to accent Yellow Dot for use by senior citizens, anyone with a serious health condition or atypical health situation should consider making use of the program.
The stickers let first responders know to look in the glove compartment for a kit: a yellow plastic folder, container, or envelope. In it, they will find information regarding:
- the medical conditions, allergies, recent surgeries, and special needs of anyone riding in the car who might require special care
- lists of current prescriptions, dosages, and prescribers
- emergency contact information
- a photograph of the person so that he or she can be quickly identified as needing special attention
The Yellow Dot Program maintains no centralized database at any government or community level, so individuals concerned about privacy breaches should feel at ease. The information is maintained in the glove compartment and is not accessed by anyone (except the owner or passenger of a vehicle) unless there is an emergency situation.
At the meeting where I first learned about the Yellow Dot Program, we talked about the importance of police and medical personnel knowing that someone in the car might be suffering from hyper- or hypoglycemia, which can appear to the untrained eye to resemble drunkenness, stroke, dementia, or other health conditions.
Research shows that 90,000 to 100,000 individuals die each year due to adverse drug reactions, some of which result from standard treatments “in the field” to which an individual may be allergic. Similarly, an accident victim who has had a recent surgery may be at greater risk for complications, and first responders need to know that.
HOW TO PARTICIPATE
If you know someone who has a medical condition that might require special on-the-scene treatment by EMTs and paramedics, encourage them to sign up for the Yellow Dot Program. Management of the program varies by location, and though it’s overseen by state Departments of Transportation, management often occurs at the county level.
While some programs allow online sign-up, other communities require that participants come to an enrollment station or registration center (often at the nearest DMV, although some local businesses sponsor the printing of Yellow Dot stickers and kits and help enroll participants). Help your loved ones gather the vital paperwork – including medical and prescription information and a current photo – to put in the yellow folder to be kept in the glove compartment, and make sure you or they actually put the sticker on the rear windshield!
Although the Yellow Dot Program is funded nationwide, it is voluntary, and many states have declined to participate; other states have shown interest but have not yet rolled out their programs. If your state is listed (below) without a link, there is likely no centralized program in your state, and you will need to call or search for your county’s transportation department or division of aging services. (Yes, Paper Doll feels this is all very disorganized at the state and federal levels! Harrumph!)
Iowa
Kansas
Massachusetts (search “Yellow Dot Program” and the name of your town rather than county)
Minnesota
New Hampshire
North Carolina
Note: In 2017, Illinois mysteriously canceled participation in the Yellow Dot Program, but encourages all drivers to register with the state’s emergency contact database, which serves a similar function.
If yours isn’t one of participating states listed belong, contact your state’s Department of Transportation to inquire if and when the Yellow Dot program will be available for you. While you’re waiting, you can purchase an unofficial National Yellow Dot Program kit (with stickers and standard or folding pockets) directly from retailer StoreSMART in various batch sizes (from 2 to 2500) or in packages of five from Walmart.
In addition to the stickers and kits, StoreSMART has free, downloadable PDF medical forms. (You can also review the websites of the participating states, above, as many, such as Alabama, have their own downloadable medical forms, accessible to all.)
COMMUNITY OPPORTUNITIES
Various communities have found opportunities to use the yellow dots beyond private vehicles. Adult day care centers for senior citizens and people with disabilities, as well as traditional day care centers for children, can make use of the program by helping individuals in their care (and caregivers or parents) develop a person-specific packet, and make copies for family vehicles, program/center vehicles, and care centers.
Next time, we’ll be talking about the Vial of Life program, and how to ensure that first responders can locate your essential medical information when they attend to you at home. Until then, be healthy, be safe, and be organized.
Paper Doll Post:

Paper Doll on the Smead Podcast: How To Get Organized When You Have a Chronic Illness
It is health that is real wealth and not pieces of gold and silver. ~Mahatma Gandhi
You’ve heard me say it before: being organized can’t always prevent emergencies, but it can make catastrophes less catastrophic. In the past, we’ve talked about all the ways to organize for medical emergencies and put plans in place to create a softer landing when things go wrong. Other classic posts have looked at solutions for organizing your health information (a topic Paper Doll intends to update in the coming months).
Vital Signs: Organizing For A Medical Emergency–Part 1
Vital Signs: Gathering Information During/After A Medical Emergency–Part 2
Vital Signs: Maintaining Your Family’s Medical Records–Part 1 (Paper)
Vital Signs: Maintaining Your Family’s Medical Records–Part 2 (Digital)
A lot has happened since I wrote those posts in 2009 after my own medical emergency experiences. For example, in 2011, I was diagnosed with diabetes, and became active in DiabetesSisters, a support group for women, and now serve on the board of directors for Partners and Peers for Diabetes Care, a Chattanooga-based non-profit.
Then, a little over a year ago, Paper Mommy had a freak conflagration while stripping and changing the bed, seriously dented an upstairs wall, and ended up wrapped in plaster and with her neck in a brace. Although always amusing, she was not amused.
The great lady healed well, thank goodness, although she couldn’t drive for five months. Then scarily, she had unexpected surgery in August, and a long recovery (none of which prevented her from keeping hospital staff and visiting nurses in stitches (if you’ll pardon the pun)). Paper Mommy‘s experiences, along with those of many of my clients with diabetes, MS, lupus, and other chronic conditions, increased my interest in looking at the factors that go into organizing to make life easier when our health fails us for longer than the duration of the flu.
In the last few weeks, I sat down with the wonderful John Hunt for Smead‘s Keeping You Organized video podcast to chat about this very topic. For anyone who has read the Paper Doll blog before, you know that brevity is not my greatest strength, and I had so much to share that our conversation extended to two podcast installments. Take a peek:
How to Get Organized When You Have a Chronic or Extended Illness: Part 1
How to Get Organized When You Have a Chronic or Extended Illness: Part 2
If organizing fascinates you (and why wouldn’t it?) and you like going down a rabbit hole (in a good way!), clicking to watch one video podcast after another, you might want to head to the Smead Keeping You Organized podcast page for each of the two shows:
Once you’re on those pages, you can even opt for the audio-only version of the podcasts, in case you want to take us with you while you’re running errands in the car (or just plain running).
Over the course of 2018, you’re likely to see me post more often about issues that relate to organizing and health issues, including topics like:
- How to organize your home to support your health and recovery
- How to organize your tangible resources, like medications and medical devices, to maximize efficiency, including key strategies and innovating storage solutions
- The importance of health-related legal documents like health care proxies and medical directives
- Ways to evaluate your options for organizing, storing, accessing, and sharing your medical information
- How to use health portals to access your medical information
- Tools for organizing your health-related finances
- Ways to save money and stretch your health-care dollars
- How to organize resources for emotional support
- Getting support for caregivers and family members
After you watch the videos, let me know in the comments if there are healthcare-related organizing questions you’d like answered or topics you wish to see covered in the blog.
Until next time, I wish you good health!
Paper Doll Post:

Vital Signs: Gathering Information During/After A Medical Emergency–Part 2
Last week, we talked about how essential it is to get all your ducks in a row long before you experience a medical emergency. Having the information you’ll need (whom you can call, where to go, etc.) to get you quick assistance and that first responders will need (about pre-existing medical conditions, allergies, current prescriptions) to begin treatment, builds the foundation for medical experts to give you the care you require. That’s life-saving organization.
Once you arrive at the hospital, information will fly around quickly, and aside from the insurance paperwork you’ll fill out for the hospital’s benefit, little data will be in paper form for your benefit. Today, we’ll look at some of some of the best ways to gather the information to ensure that you can be your own patient advocate.
LOG EVERYTHING
Paper Doll is an impatient patient, so I’ve learned not to sit idly while awaiting tests or meds scheduled for a particular time. But in order to advocate on your own behalf (or that of a loved one), you have to track all the information you can. The best tools to allow you to do this? A legal pad and a pen. 
Why so old school? That fabulous laptop or smart phone or tablet on which you take notes for everything else in your life faces two troubling constraints. First, you may run out of juice before you run out of ER wait-time; second, if you’re dependent on the web, you may be disappointed to find neither cellphone signal nor Wi-Fi (free or otherwise) in your emergency room or even your hospital room.
Legal pads, on the other hand, allow you to take real-time notes linearly, require no batteries, can be flipped over to the reverse in the unlikely event that you fill all the page fronts before being assigned a room, and replacement pens are easier to come by than computer-compatible chargers and a free electrical outlet. (You definitely do not want to unplug any of the machinery in an ER or hospital room without permission.*)
Right now, you’re thinking “But Paper Doll, if I’m in the ER, I’m probably in pain. I could be panicking. How can I possibly know, let alone remember, what to write down? If my child or some other loved one is in anguish, how can I stop to write about what’s going on?”
Excellent question.
Obviously, if your ER visit involves agonizing or painful experiences, you’re not going to have the desire, dexterity, or diligence to write down what’s happening. That’s why it’s so important to have someone with you in the Emergency Room and when you’re first admitted. That’s also why it’s so important, as noted last week, to think carefully about who will take you to the hospital.
As for what you can do for a loved one, know that collecting information is probably one of the most beneficial things you can to do help the patient. In some cases, it’s not even safe for you to offer ice chips, but acting as their patient advocate, their eyes and ears and medical secretary when they can’t do so themselves, is an invaluable service you can provide.
So, what should you note?
- Write down the name (and position) of every person who comes in to “do” something to you.
In most hospitals, each staffer wears an official badge saying something like “Dr. Carter– Emergency Physician” or “Kiki–Patient Transport Specialist.”
If badges are flipped backward, ask them to identify themselves. Case in point: A young woman came into my ER “curtain area” and started asking me questions about my insurance and trying to verify my Social Security number. She was wearing jeans and a fleece jacket and no discernible identification. I asked her, politely, who she was and could she show me her identification badge. To her credit, she apologized for having it covered up. (Paper Doll figures that if you’re wearing a hospital gown that leaves little to the imagination, the hospital staffers should at least have to show their ID!)
- Write down what they tell you they THINK has happened.
If you have a broken arm, your diagnosis will be fairly obvious to you. However, if you’ve come in with symptoms that could indicate any of a number of conditions, especially ones which will require more testing to verify, ask them to explain the possible diagnoses. This will help you ask better questions and better understand why certain tests are performed. It will also help if/when you talk to your medical circle. (See below.)
- Write down what they tell you is GOING to happen.
If a resident or attending tells you that you’ll be undergoing tests, being hospitalized, having an IV inserted, or anything else, ask them if these orders have been/will be written, and when they believe the action will take place. This doesn’t guarantee anything will happen according to plan, but it will help guide your actions regarding whether you send your loved one to the cafeteria or if you will have time to place some phone calls.
- Write down the names of the medications, the conditions, the tests…
Get the details of any orders, including specific test/med names. This information is useful when trying to understand your treatment (again, when talking with your medical circle), but will also be helpful down the road when you are reviewing your itemized hospital bill. If you know what orders/treatments are planned, and which actually take place, you’ll be able to note any discrepancies later on.
Medical professionals are generally excellent, but they are also human. Being alert and aware (as much as one can be when emotions are heightened in such situations), and organizing/recording information, can help you make sure that everyone is on the same page.
During my ER visit, after I felt a significant time had passed, I asked the nurse to find out what was the delay in having my ultrasound. She stated that no ultrasound had been ordered. I was able to flip through my notes and find that at 2:45 p.m. Dr. Looks-Too-Young-To-Be-A-Resident stated the orders had been placed for an ultrasound, and ask the nurse could she either check the orders again or ask said resident to pop back in for a second. (Note: Paper Doll asked really nicely.) Magically, a patient transport person arrived within three minutes to whisk me off for that very same ultrasound.
Hospitals are busy places; sometimes instructions are given verbally and take time to be transferred to written or digital status. I’m not advising you to bug the doctors. But if you or your spouse-turned-patient-advocate can keep abreast of what’s allegedly supposed to happen, it’s more likely things will go according to plan.
- Write down the time anyone tells you anything, and when they tell you things may/should happen.
There’s a clock in every ER curtain area, for reasons too dismal to discuss. If you’ve watched ER or Grey’s Anatomy, you know why. At one point, I was told that a particular medicine would be given at a particular time, and that I’d receive a blood test at another specific time, and the times between them were somewhat important. The nurses were incredibly efficient during my stay, but once I noticed that more than a half an hour had passed since I should have experienced the oh-so-lovely blood test, I did ask specifically about the explanations the doctor had given regarding timing.
Paper Doll has a ridiculously, annoyingly good memory. However, an emergency room experience (let alone the tests and medicines) can have a dizzying effect on both the patient and his/her loved ones. When you or the person you’re attending is undergoing the emergency, keeping a log of every person with whom you have an important interaction is a good way to keep your idle hands (and brain) busy doing something useful. You’ll experience less anxiety if you have a linear sense of what is happening/has happened, and you won’t have to worry about whether you’ve forgotten or misunderstood something.
Of course, you can skip noting the comings-and-goings of cleaning staff (unless they unplug your IV) or the nutrition department (even though you’ll be expected to eat breakfast before 7 a.m., lunch at 11 a.m. and dinner at, I kid you not, 3:55 p.m.), but that legal pad can otherwise be a rich source of information and a way to get a handle on everything you’re hearing. It also lets the hospital know that you and your loved ones are really alert to patient care, and assuming you are kind and polite in every interaction, they’ll be happy to help keep you informed. So ask, ask, and ask again!
- Ask about your test results — what do they mean?
- Ask about your diagnosis.
- Ask about your prognosis. How might this effect your life short-term and long-term?
- Ask about what you should/shouldn’t do while in the hospital and upon release.
- Ask when your symptoms (if any) should subside and what you can (and cannot) do to ameliorate the situation.
- Ask about anything that is not clear. Write it down. Read it back.
Seriously. This is not the time to be embarrassed about not understanding a medical term or the reason why something is done. The more you understand, the better you can adhere to instructions. You’re not a robot, and you will be far more inclined and able to follow instructions that you comprehend fully.
YOUR MEDICAL CIRCLE
All of the foregoing helps you organize information during the emergency portion of your ER/hospital visit. Later, you’ll be surfing the web and getting anecdotes from friends who have had (or know someone who’s had) similar experiences.
Paper Doll trusts you that you will only take medical advice from your own physician! That said, it’s helpful to have your own medical circle.
Last week, after I proposed that you collect information regarding who you’d call in an emergency, it occurred to me that you’ll also want a list of people you can call after a medical emergency. Brainstorm names of people you know with medical experience — who not only may have more time to chat with you, but who know you well enough to explain things in a way that works.
For example, I remembered that my acupuncturist was also a nurse, but didn’t recall that a dear client’s wife (residing just around the corner), currently a pharmaceutical salesperson, was formerly an intensive care nurse. Two college friends are physicians (a pediatrician and a child psychiatrist — certainly helpful for when I act like a cranky toddler), and Paper Mommy has collected a lifetime of friends who happen to be in the medical profession.
I encourage you to make a list of everyone you know — relatives, friends, siblings and spouses of friends, pals on Twitter and Facebook — anyone who is or has been a:
- doctor
- nurse
- physician’s assistant
- pharmacist
- physical therapist
The point of this is not to get medical advice, per se, but to acquire comfort and guidance from someone who has the time and patience to sympathize with your boo-boos.
Store this list with your other organized medical records, a topic which we’ll be discussing over the next few weeks.
Stay healthy!
*The film Sparks was directed by a friend with whom Paper Doll went to graduate school. I’m pleasantly amazed that my paper-related blog has finally given me an opportunity to reference the short film…even if it did require a stint in the hospital to yield the inspiration.

Follow Me