Paper Doll
Emerson, Angelou, Ted Lasso, Tashlich & Zen Monks: Letting Go for a Fresh Start

THERE’S SOMETHING IN THE AIR
Officially, the summer doesn’t end until September 21st. But you just know that something is changing right now. For all intents and purposes, in the United States, Labor Day is the unofficial start of Fall (and pumpkin spice doughnut season at Krispy Kreme).

Growing up in New York State, we always started school the Wednesday after Labor Day, so you knew that the holiday weekend was the last time you got to stay up late, sleep in, goof around, and wear comfy summer clothes. Companies around the country that had lax Friday afternoon schedules went back to firm attendance expectations once the calendar flipped to September.
This year, sundown on Labor Day coincides with Erev Rosh Hashanah, the start of the Jewish New Year. (For those of you keeping track of such things, we’re ending the year 5781 and ushering in 5782.) And I think we can all agree that any opportunity to start fresh with a new year, whether it’s January 1st or a new school year, Rosh Hashanah or Chinese New Year, or the start of the new TV season (Monday, September 20th, the day after the Emmy Awards, baby!), is a good thing, psychologically.
Because of remote work, remote school, and nothing feeling remotely normal last year, it didn’t feel like we had a clean demarcation between summer and fall. This year, it’s shaping up, globally, to be another weird one.
But locally? As in — your job, your family, your little world? You can still have some control. You can embrace this period as the end of those fuzzy, mirage-like summer dreams and the start of a period of motivation, enthusiasm, and a bias toward action.
Speaking of which, before we get to the focus of today’s post, watch this TEDx talk about The Science of Taking Action to help rev your engines.
I encourage you to take the 9:47 to watch the whole video, but if you don’t have the time right now, know that Steve Garguilo‘s central lesson is, “Everything in life that is hard is just a series of things that are easy.” But you have to take that next step.
[FYI, Garguilo’s spontaneous foray in looking at a bias toward action began with some free Post-It Super Sticky Big Notes and a friend. They’re 11″ x 11″ squares, $6.49 for a 30-sheet pad in Bright Yellow, and great for brainstorming. (Friend sold separately.)
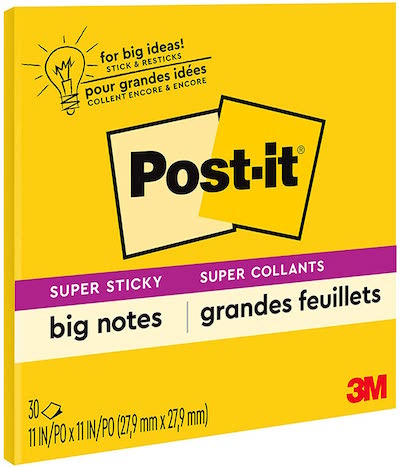
Though harder to find, Big Notes also come in Neon Green and Neon Orange, and in 15″ x 15″.]
But as usual, I’m getting ahead of myself. While you can always brainstorm, actually taking action requires a prior step.
To be productive and embrace new things, you have to let go of the old and unproductive ways of thinking and acting. In professional organizing, when my clients are dealing with tangible clutter, we have to do what I call a “Level 1 Purge” and remove as much excess as possible before grouping and containing what remains.
With time management coaching, this involves eliminating tasks and obligations that don’t resonate with someone’s values and goals so that they can say, “Hell Yes!” to the things that will bring more meaning to their lives and work.
And with everything, a huge part of letting go means decluttering mental and emotional clutter.
LET IT GO!
That tune from Disney’s Frozen isn’t just catchy. It’s good advice. (Well, at least the “I’m never going back, the past is in the past” and the part about letting go of perfectionism.)
It’s really difficult to start fresh with the weight of the past hanging over you. As I’m writing this over Labor Day weekend, I (and I expect, you), probably don’t want to be weighed down with heavy thinking and step-by-step instructions. Instead, we’ll look at approaches from different cultures and for different audiences — sectarian and non-sectarian, children and adults, highbrow and middlebrow.
Zen Meditations from a Panda Perspective
Many years ago, friend-of-the-blog Erin Doland introduced me to the 2006 Caldecott Medal–winner Zen Shorts by Jon J. Muth. In Muth’s books, three siblings meet Stillwater, an oversized panda bear carrying a red umbrella and speaking with a “slight panda accent.” In each chapter, Stillwater shares an anecdote with brothers Karl and Michael and their sister Addy to help them surpass an emotional obstacle. (The books have since been turned into an a delightfully soothing animated series, Stillwater, on AppleTV+.)
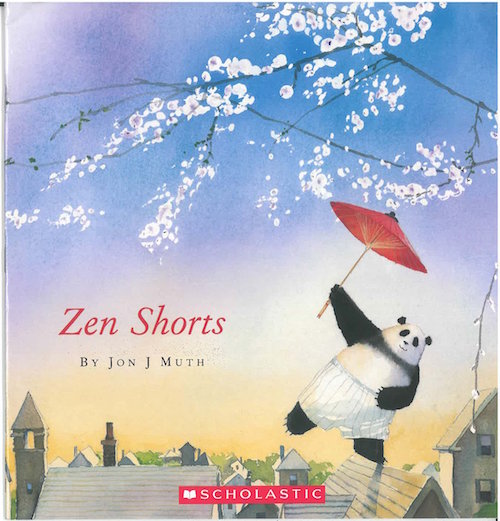
Muth’s telling of A Heavy Load is a version of my favorite Zen story. (I’ll summarize it here, but it’s absolutely worth getting the book, reading Muth’s words, and embracing the lovely illustrations.)
Two monks are traveling when they come to a swollen river that must be crossed. A wealthy woman’s servants attend to her belongings and thus cannot help her cross to the other side. Without comment, the older monk lifts the woman and carries her across, but after he puts her down, she doesn’t even deign to thank him. The two monks continue on their way, but his younger companion still ruminates on the woman’s rudeness and lack of appreciation. Eventually, the older monk says, “I set the woman down hours ago. Why are you still carrying her?”
Whoa.
When I was younger, I would do this. I’d ruminate and brood over indignities suffered at the hands of the “mean girls.” I’d kick myself over l’esprit d’escalier, the French term for thinking of the perfect reply, but just too late. And sometimes I’d be frozen in place by small errors, anything from typos to falling short on goals, even when nobody cared about those benchmarks but me.
It’s hard to let go, but sometimes rituals (actions) and mantras (sayings) can help us over the hump in letting go of counterproductive ruminations on our own shortcomings so that we can start fresh on a new project or class, or in a new season of life or a new “year” (however we define the year).
Tashlich
Tashlich literally translates to “casting off.” It’s a ceremony held in the afternoon on the first day of Rosh Hashanah. Jews who observe this ritual head the shores of a river or lake or a bridge over flowing waters, and throw in small pieces of bread* to symbolically cast off or throw away one’s “sins” or failings, the things they’ve done wrong in the past year.
*Bread isn’t good for the duckies and other wildlife, it seems, so there are a number of modern takes on tashlich that are more environmentally-friendly.

Tashlich is a physical ritual to representationally cast off what’s weighing you down. It’s not a magic hall pass. We’re still expected to apologize to those we’ve hurt in the past year and make amends to them between Rosh Hashanah and Yom Kippur, the next week. But Tashlich gives everyone who participates the opportunity to reject dwelling on our mistakes. We’re encouraged forgive ourselves and focusing on what we can do better.
Of course, you don’t have to be Jewish to develop your own ritual. Many faiths and cultures have “burning bowl” or similar rituals for writing your mistakes, your upsets, or as “Money Goddess” Morgana Rae teaches, “lessons you are done learning” (e.g., letting people stomp on your boundaries) on small pieces of paper and then burning them.
Paper Mommy doesn’t let me play with matches, so you could similarly write on a small piece of biodegradable paper and flush those troubles away. You can even teach children to let go of last school year’s mistakes or troubles by using sidewalk chalk to write or draw them out and then bring the river to them with a garden hose to wash everything away.
The point? Acting out such a ritual is more than just cognitive. It involves your whole body in saying, “I’m letting go of what I did wrong, what I let others do, and whatever stood as an obstacle to my moving forward.” Sometimes, our brains aren’t so smart until we get our bodies involved.
A (Famous Literary) Parent’s Advice to His Child
Starting fresh depends on being able to absorb the lessons of our mistakes while doing better the next time.
In 1854, Ralph Waldo Emerson wrote a letter to his daughter Ellen, who was away at school. In the 1880s, his letters were carefully preserved in a six-volume collection, and in 1939 (and again in 1943, 1959, and 1982), his advice was re-edited and re-punctuated. But the central notion of what he wanted his daughter to understand is this:
Finish every day and be done with it.
You have done what you could;
some blunders and absurdities crept in;
forget them as soon as you can.
Tomorrow is a new day.
You shall begin it serenely and with too high a spirit to be encumbered with your old nonsense.
It’s hard to argue with good old Ralph Waldo. Post this (or any of the various edited versions of his advice) near your desk, so you’ll see it before you close up shop on your work day, or on your mirror so you’ll see it before going to bed at night.
Give yourself permission not to be encumbered with your old nonsense!
Be a Goldfish!
Of course, not everyone wants or needs such a long message as Emerson’s to inspire letting go of self-imposed difficulties. If you need a short mantra to remind yourself to let go, Coach Ted Lasso has some advice that resonates.
Be a goldfish. Have a short memory for the times when you failed and things you can’t go back and change.
OK, in actuality, scientists have proven that goldfish can actually recall things for at least three-to-five months.
But the lesson holds true. Acknowledge what didn’t work, vow to do better, identify what specific steps you can accomplish to achieve your goals, create new systems (of which, more next week), and start fresh.
Oh, and an excellent way to let go is to embrace something that captivates and delights you. For me, an episode of Ted Lasso makes me grin until my face aches, fills me with unexpected laughter, and inspires me with lessons about forgiveness (and self-forgiveness). It’s a great show for reinforcing the idea of being supportive (and accepting support) so you can learn essential lessons and move forward.
Maya Angelous Wasn’t Speaking Only to Oprah
The amazing Dr. Maya Angelou is often misquoted or incompletely quoted on this topic of recognizing our past failings but moving beyond them. She actually focused on her own experience:
I did then what I knew how to do.
Now that I know better, I do better.
Of course, Oprah (being Oprah) managed to turn Dr. Angelou’s lesson around, turning it outward as actionable advice.
“When you know better, you do better.”
As you head into this “new year,” and start getting back into routines and begin making your ideas biased toward action, take the lessons you learned but leave behind the pain and the guilt.
And, as a bonus, directly from Dr. Angelou, here’s another great mantra to take with you after you’ve let go of what weighs you down:
Just do right.
Next time, we’ll look at more practical ways to get back into the swing of things. Until then,
Happy New Year!
L’shana tovah!
Have a great school year!
Enjoy fall!
And I’ll see you at Krispy Kreme!
Paper Doll Post:

Back-to-School Solutions for the Space-Time Continuum

According to the Einstein page at Stanford University covering questions about Special and General Relativity:
This new reality was that space and time, as physical constructs, have to be combined into a new mathematical/physical entity called ‘space-time’, because the equations of relativity show that both the space and time coordinates of any event must get mixed together by the mathematics, in order to accurately describe what we see. Because space consists of 3 dimensions, and time is 1-dimensional, space-time must, therefore, be a 4-dimensional object. It is believed to be a ‘continuum’ because so far as we know, there are no missing points in space or instants in time, and both can be subdivided without any apparent limit in size or duration. So, physicists now routinely consider our world to be embedded in this 4-dimensional Space-Time continuum, and all events, places, moments in history, actions and so on are described in terms of their location in Space-Time.
Whew. That’s a lot. But I’ve got good news. This won’t be on the test! (We’ll leave it to the physics majors.)
But as a professional organizer, I often have to solve problems that involve time (and the management of tasks) and space (and the excising of clutter and the rearranging of the molecules of what remains). So, in this second week of looking at solutions that help our students go back to school, I’m sharing two products I praise often for handling the “time” part of the equation, and a few new delights for the space aspect.
TIME AND RELATIVITY
Getting firmly back onto “clock time” is key to the back-to-school process, and not just for little kids. Parents, teachers, and college students are just as much in need of time management support as little ones.
Getting control over the clock, especially after the lazy, hazy, crazy days of summer (and whatever these last 18 months have been) means really having a sense of time as it passes. Getting the “feel” of how long a quarter hour or ninety minutes really is can be hard, not just for kids, but for people with ADHD and various executive function disorders, and for any of us who’ve had a “flexible” relationship with time over this recent while.
It’s not just kids (or adults working in loosey-goosey fields) who have trouble with time. I’ve worked with engineers and scientists — professionals for whom precision is essential — on their productivity skills. We’ve started with an exercise where I tell them to begin a task we’ve discussed, and I will stop them after they’ve worked for eight minutes. I’ve seen two things happen.
When doing administrative work, like expense reports or employee reviews, these clients struggle. 90% of them have looked up at me early, insisting that surely it’s been eight minutes already. For about a third of those, they are certain at least that much time has passed before even the five-minute mark! They may as well be kicking the back of my seat and whining, “Are we there yet?”
In contrast, when these same clients are set free to work on their passion projects, to delve into whatever science-y, engineering-y thing they love (think: the Professor from Gilligan’s Island), they are often shocked when I call, “Time!” Sometimes, in just eight minutes, they’ve forgotten I was even there! (I try not to be offended by this.)
I guess Einstein was really right about time being relative, eh?
When you’re not “in flow,” when you’re focused on the time but not enthusiastic about the task, time passes slowly. If you don’t get into the flow state, into the groove, you’re constantly checking on the time and not embracing the task with your whole heart and mind, a recipe for dissatisfaction and unfinished work.
Or, you find ways to self-soothe, to do anything but what you’re supposed to, and you get into a flow state but doing the wrong thing. An analog clock, one that shows you the time as it passes, can be a comfort, to assure your “monkey mind” that you won’t be forced to do something boring and distasteful forever. The clock makes time a concrete concept; if you can see that you only have to do your workout routine for 20 minutes, your brain will back off of the obsession with how long it’s taking to do those downward-facing dogs or lunges or whatever.
Conversely, if you are in flow (on work or homework and hopefully not scrolling through social media), it can be hard to effectively transition from what you’re doing now to what you’re supposed to be doing next. Again, an analog clock with a gentle alarm can help you do this.
Also, friend-of-the-blog Dr. Melissa Gratias has a great post, “What is a “Task Transition” and How Can It Make Me More Productive?” on this very topic, and while the advice is geared for grownups, you can modify the instructions to help students get better at transitioning between projects.
For more on flow, check out the “Sidebar on Flow and the Unpronounceable Mihaly Csikszentmihalyi” in my post from last March, Flow and Faux (Accountability): Productivity, Focus, and Alex Trebek or watch Csikszentmihalyi’s superb TEDTalk, below.
Longtime readers know how much my profession loves one particular kind of analog clock/timer.
Time Timer
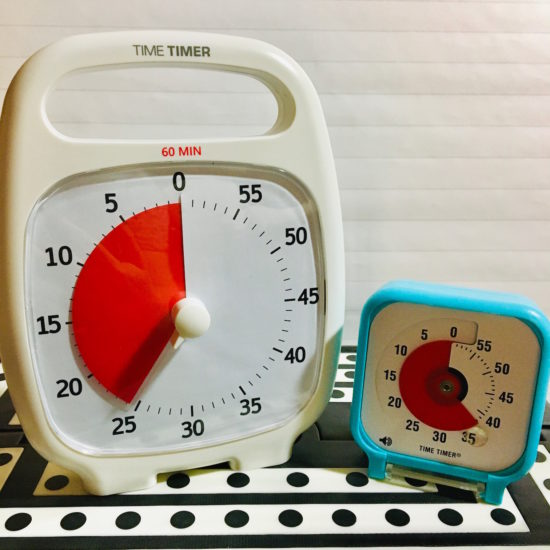
Time Timers aren’t just clocks. They have three important features:
- They’re analog. Most clocks and timers these days are digital, and for a lot of people, digital time is pretty amorphous. 11:12 and 12:11 don’t feel appreciably different.
- They’re visual. Digital clocks don’t show you the passage of time, they just show you numbers. You can ask Siri or Alexa to tell you when 45 minutes are up, but depending on where you are in the flow state, not really sensing the passage of time can lead to anxiety. But all of the Time Timer products (including the Original, the Plus, the Mod (my favorite!), the watches, and the apps) have a colored disc that shows the passage of time so you or your kids can have a more sensory experience and see time passing.
- They’re not distracting. You don’t hear Time Timers tick like most analog clocks or timers. There’s an optional audio alert when time is up, but otherwise, there’s nothing to steal your focus.
There are many different ways to corral the benefits of analog clocks, especially the Time Timer, into your back-to-school process. For example:
Busy parents are trying to get their kids up, get themselves put together, make sure some kind of breakfast is attempted, pack lunches, sign permission slips, and get everyone out the door. That’s a lot to do, and mornings can be a slog. Setting up a colorful Mod in the high-traffic kitchen keeps everyone’s eyes on the prize.
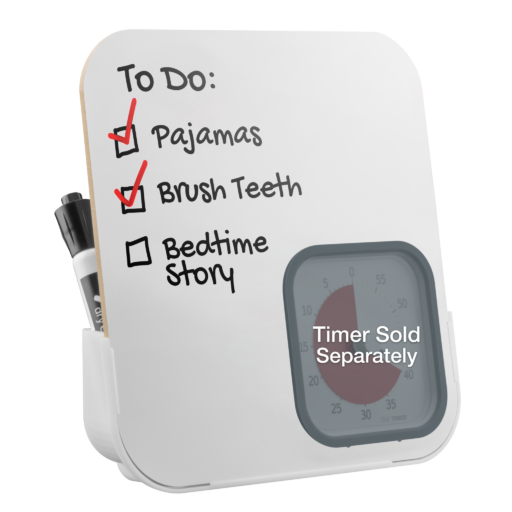
Got tiny humans who take way too long on morning grooming, meaning that making the bus is an iffy proposition? Setting the Time Timer PLUS 20 Minute on the bathroom counter will let them see that washing the breakfast off their faces, brushing their teeth, combing their hair, and getting dressed need to be accomplished in a bit more orderly fashion and look…that’s another five minutes or more of the red disc disappearing! It’s helpful at both ends of the day, because an orderly bedtime ritual (with a combo dry-erase board and TimeTimer) can make mornings flow better, too.
Note: I’m not sure what kind of societal norm we’ve developed to keep clocks out of bathrooms, but Paper Doll is coming out firmly against that. As someone who has occasionally been known to hold a book in my left hand while lackadaisically holding the hair dryer in my right hand, I think an analog clock, particularly a Time Timer, belongs in the corner of any bathroom countertop to keep our attention where it belongs. (Speaking of bathrooms, last November, when we were in the thick of the pandemic, I wrote Organize Your Health: Parental Wisdom, Innovation, and the New Time Timer® Wash. Given Delta, Delta+, Lambda, and whatever Greek letters might come our way, it’s worth revisiting.)
Are your older students (in high school and college) going to be taking standardized tests this year? SATs? ACTs? GREs? LSATs? M-I-C-K-E-Y-M-O-U-S-Es! (Sorry. Got carried away for a minute.) These timers are ideal for practicing timed sections of those exams.
And, of course, Time Timers are a great way for high school and college students, as well as office workers, to get (and stay) in the flow when using the Pomodoro Technique, whether you’re using the standard 25 minutes of focus/5 minutes of break method, or a modified 45 minutes of work/10 minutes of break approach.
For more ideas, check out how the Time Timer can be used:
- In education (for students, teachers, and administrators)
- At home
- At work
- In “special needs” circumstances
Academic Planner: A Tool For Time Management®
If you’ve been reading Paper Doll for even a little while, you should be familiar with the Academic Planner: A Tool For Time Management®, the brainchild of my colleague (and fellow Cornell University alumna) Leslie Josel of Order Out of Chaos. Last year, when Leslie’s latest book launched, I interviewed her for Paper Doll Peeks Behind the Curtain with Superstar Coach, Author & Speaker Leslie Josel.
Back in ye olden days (that is, when Paper Doll went to school), middle and high school students didn’t generally have planners. The more organized of us had top-bound spiral notebooks, as though we were junior reporters (or youthful spies) and we used them as assignment notebooks. Teachers recommended faithfully copying down each assignment before leaving the classroom. If these instructions were followed, you’d get home at the end of the day with a page or two of clear notes of what pages you had to read, what problem sets you had to complete, and what essays needed to be written.
Unfortunately, assignment notebooks are like to-do lists. They tell you what to do and when it needs to be finished, but provide no context. (Maybe students should read my post from last month, Checklists, Gantt Charts, and Kanban Boards — Organize Your Tasks?)
So, somewhere in the 1990s, middle and high schools started giving out school-themed paper planners for students to track their projects. It was an improvement, just like planners adults used. Those planners gave kids space to write due dates, but no guidance for keeping track of all the granular details of a complex teenage life—not just classes, homework, projects, and exams, but extracurricular activities, part-time jobs, and family obligations!
This is where the Academic Planner: A Tool For Time Management®, a Family Choice Award-winner, comes in. Leslie’s patented calendar layout helps students see their school assignments right along with their after-school activities so they can plan when they have time to get work done and not merely know that they have to get it done.
 © 2021 Order Out of Chaos
The planner has a wide variety of features and benefits:
- Instead of having to write course names over and over as assignments come up, the planner has unique subject pages at the front and the back so students only have to record class subjects (for which 7 subject boxes are provided) once! If it’s written once and always there, you can’t forget it!
- The planner has oodles of space to enter all Monday-Friday school/after-school activities from 2 p.m. until 9 p.m. as well as weekend obligations. This makes it easier for students to plan and manage their time and tasks.
- The pages of the planner line up with the grid of classes on a class-by-class basis, so it’s easier for students to record their weekly schedules and review them. (This is a plus for all those schools that use those weird modules so that every week’s schedule is different!)
- The planner lays out the days of the week horizontally across the top of the weekly two-page spread instead of putting half a week, stacked, on either side. This is much more like the kind of layout most adult paper planners use, and the grid format makes it easy to enter and view assignments and due dates.
- Because a weekly view gives a pretty constrained sense of what needs to be accomplished, the planner also has monthly pages and large pages for writing complex assignments and activities.
See it in action:
In addition to the planner itself, there are a variety of downloadable extras, including a project planning guide, a study planning guide, printable academic planning worksheets, and an accessories pack with a page marker, a monthly tab sheet and a sheet of student stickers.
The whole kit-and-caboodle is $19.99. (If you’re in the US, be sure to use the code FREESHIP60 when you check out to get free shipping on all orders above $60.) You can also get a pack of extra stickers and accessories for $10.79, if you’re so inclined.
Personally, I think adults would get more enjoyment out of their paper planners if they felt at ease buying stickers. In a cool stationery store in London in 2019, I bought a packet of stickers with motivational messages and cool graphics, like luggage tags to mark vacation days. Adult coloring books became a self-care powerhouse. Why not stickers?
Paper Doll thinks adults would get more enjoyment out of their paper planners if they felt at ease buying stickers. Adult coloring books became a self-care powerhouse. Why not stickers? Click To TweetFinally, as we wrap up the “time” section, I want to point out again that Leslie’s book, How to Do It Now Because It’s Not Going Away: An Expert Guide to Getting Stuff Done is top-notch for high school and college students needing support on time management and productivity. It’s one of only two books I recommend when parents ask for organizing advice for their students. The other is Donna Goldberg’s classic, The Organized Student: Teaching Children the Skills for Success in School and Beyond. It’s also superb, but was published in 2005, so unlike Leslie’s book, there are few tech solutions. (It’s also much more geared for tangible organizing vs. Leslie’s, which focuses on tasks, time, and overcoming procrastination.)
SPACE: THE FINAL (and limited) FRONTIER
Last week, in Vibrant and Vertical: Organizing Paper for Back-to-School, we looked at products for helping students of all ages manage their paper. Today, we’re focusing on organizing space, particularly for college students in dorm rooms, where space is in short supply.
Flat-Plug Power Strips and Surge Protectors
If you’ve moved a college student into the dorms, you’ve probably noticed two things about the space. First, it’s at a premium and you can’t afford to waste an inch of it. Second, the room wasn’t designed by professional organizers, which means that it’s not optimally functional.
For example, the built-in heater is right next to the desk, putting the expensive new computer at risk. The short cord for the mini-fridge limits where in the room you can actually put it. And the electrical outlets are all behind desks and beds, so a traditional extension cord plug needs up to two inches of space to accommodate the plug head!
Aha! But did you know there are power strips and surge protectors with flat-head plugs, so instead of poking straight out, they extend to the side, taking up minimal room, allowing furniture to sit, if not flush against the wall, much closer?
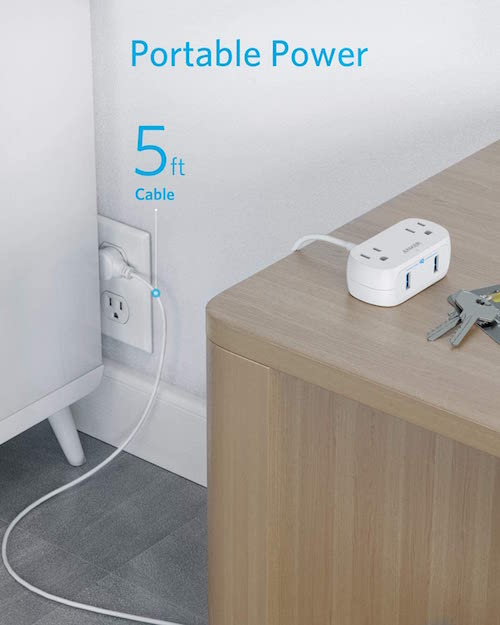
I like this tiny Anker Power Strip with USB PowerExtend. Not only is it designed with a flat plug, it has a 5-foot extension cord, two outlets, and two USB ports.
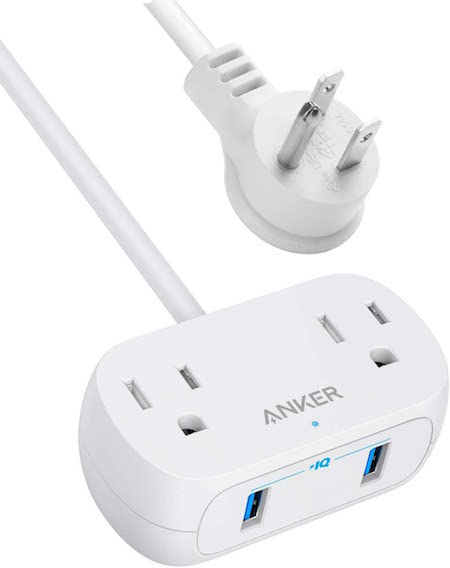
At only 3.3″ long and 1.8″ thick, this isn’t going to power everything in the room, but it’s ideal for bed-side or desk-top items you need to charge, and at $12.74 from Amazon, it’s an inexpensive solution to the “I can’t plug it in!” frustration.
The Anker Power Strip comes in black or white, and in 5′, 8′, and 10′ lengths, but for some reason, the black versions are more expensive than the white ones at every length.
If you want an actual surge protector and one that accommodates charging multiple devices, there are a variety of options. I like the style and functionality of this Tessan Power Strip Surge Protector.
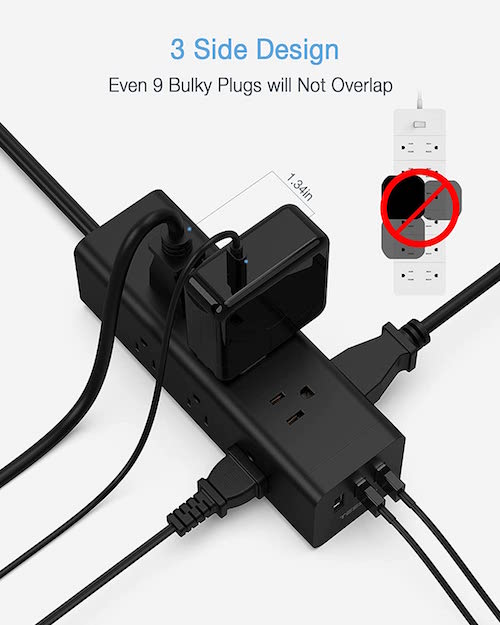 In addition to the flat plug, it has nine AC outlets and 3 USB ports, and a 6.5′ cord. But what appeals to me in particular is the functionality of the design in how the outlets and ports are laid out, with three outlets on the two sides and top of the surge protector, and the three USB ports on the small front end. By not squishing everything on the top surface, there’s more room to use those occasional oversized charging plugs. It’s $19.00, and in the reverse of Anker’s odd pricing, the white version is more expensive, at $24.99.
USB-USB-C Adapters
I recently purchased one of the gorgeous new 24″ iMacs. When I got it, I was so focused on the front:
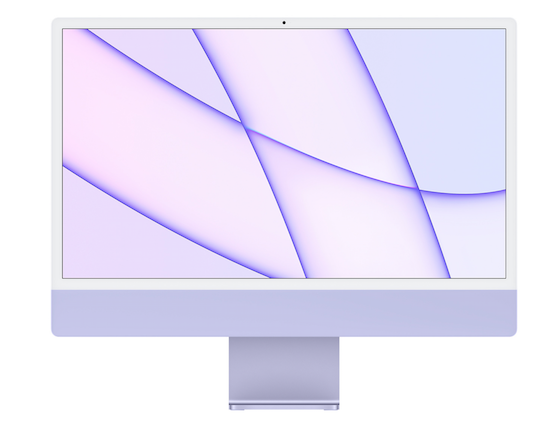
that I didn’t really pay that much attention to the specs or the photo of the rear view:
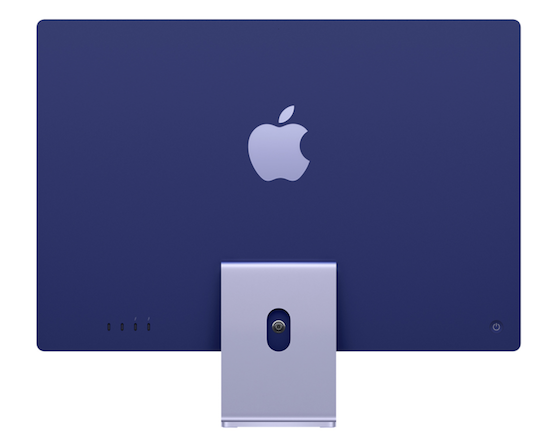
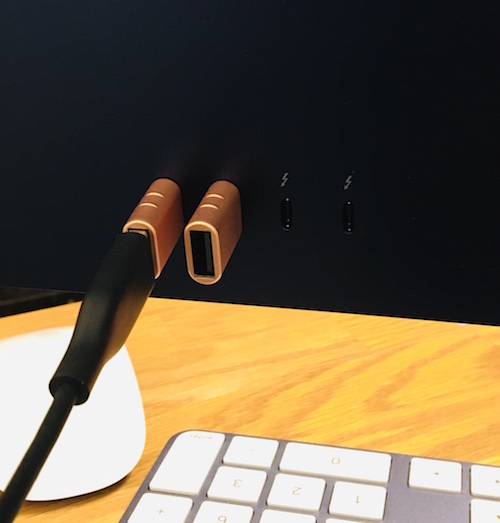
If you’re an old-time iMac user, you may (or may not) peek at the lower left corner of the rear of the computer and see the problem. You see, on my old iMac, I had four USB ports, two Thunderbolt ports, and an ethernet port. On the new iMac, I have just two itty-bitty, teeny-weeny USB-C ports and two ittier-bittier Thunderbolt 3 ports.
The problem? Computers don’t come with CD drives anymore, so I have an external one with a USB connection. And I have a 2TB external hard drive for backing up locally, also with a USB connection. I have a USB Fitbit charger, a little USB fan for hot days, and a USB podcast-quality external microphone. And now none of them fit my new computer!
Now, this isn’t a tragedy. I use an old-timey Space Bar monitor riser with two front-facing and three rear-facing USB ports, and two front-facing USB charging-only ports, and I just need to plug the new iMac into the old riser. But during the transition, I really need something to make everything fit in a tiny, tidy way. (And the Space Bar monitor riser is ancient, so I can’t count on it forever.)
So, if you’ve got a high school student or college student with a new computer and a lot of (slightly) older devices and chargers, you don’t need to rush to purchase a desktop space-hogging USB hub adapter. Instead, get a sense of how much your student needs to modify the space part of the space-time continuum.
There are miniature adapters, sans cables, you can plug in to the USB-C ports of your new devices and plug your older USB items into them. I purchased a Syntech USB C to USB Adapter 2-pack in Rose Gold (to coordinate with the purple iMac, of course) for $10.99.
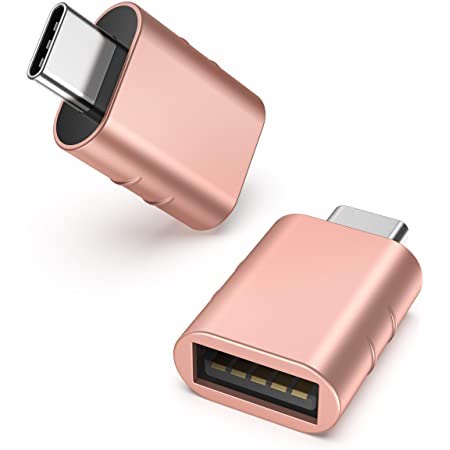
Instead of shelling out for a big hub that I probably don’t need, for a little more than $5 each, these little 1.08″ long x 0.65″ wide x 0.32″ high doohickeys save space and minimize the number of cables in my space.
If you’ve got a dorm-based student, looking for space-saving items for electronics, check out the wide variety of tiny USB-to-USB C options.
I hope you and your families have a great school year. Good luck taking up your share of the space-time continuum!
Disclosure: Some of the links above are affiliate links, and I may get a small remuneration (at no additional cost to you) if you make a purchase after clicking through to the resulting pages. The opinions, as always, are my own. (Seriously, who else would claim them?) For more information regarding how Best Results Organizing handles affiliate links, please see the affiliate section of the site’s Privacy Policy.
Paper Doll Post:

Vibrant and Vertical: Organizing Paper for Back-to-School
 What time is it? (No, this isn’t a follow-up to my Does Anybody Really Know What Time It Is? 5 Strategies to Cope With Pandemic Time Dilation from May 2020, though that may be worth a visit — for all of us.)
It’s Back-to-School Time! (If you said “Howdy Doody Time,” thanks for playing our Boomer Edition!)
THE ASPIRATIONAL PROMISE OF NEW SCHOOL SUPPLIES
After almost 18 months of weirdness and boondoggles, kerfuffles and plague-related malarkey, time has little meaning. But really and truly, it’s back-to-school time. And reminders are everywhere. Leaving aside the specific anxieties of returning to school in this (oh, man, I’m going to say it) unprecedented era, the new school year (whether you’re 5 and entering kindergarten or 55 and going back to finish a degree) holds both panic and potential. We may joke about it, but this tweet holds so much truth!
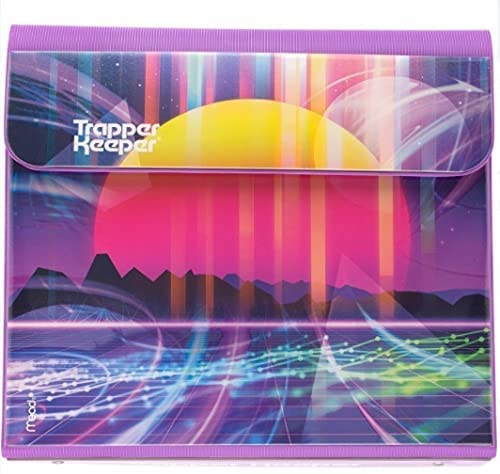
kids went shopping for school supplies and I am pleased to report the pure, uncut optimism of a new trapper keeper in a kid’s hands for the upcoming school year “is going to finally change EVERYTHING and keep me organized for once!” is still alive and well
— Matt Haughey (@mathowie) August 14, 2021
Yes, friends, Mead is still making those Trapper Keepers, the basis for so many our searches for perfect organizing systems in adulthood. Be honest, if you could find something that reflected your personality and offered the flexibility a three-ring binder, hole-punched two-pocket folders, a clipboard, and a Velcro closure, wouldn’t you carry it? Or drive it? Or marry it? (Just me?)
Personally, I always liked those back-to-school days, at least the ones in August, a full month before we Western New Yorkers went back. (Here in the Southeast, kids have been back at school a few weeks in 90° heat. Oy.) August was prime aspirational time. It was the back-to-school issue of Seventeen Magazine, with everything wool and plaid and new.
Our schools didn’t provide lists of what was required for class until the first day of school, but that didn’t mean I was willing to wait. I loved this time of year, and dragged Paper Mommy into the void — I mean, into the school sales. And I vehemently insisted on getting everything all-new every year, even these:

(You know you had them. You know that you probably have no recollection of how to bisect an angle and probably couldn’t figure out what to do with either the compass or the protractor right now, short of making a circle and then cringing when the point of the compass went skittering across the table, making that screechy noise.)
But anyway, do as I say, not as I did. Better yet, do as my colleague Amy Slenker posited in her excellent blog post, 7 Easy Ways to Get Organized for Back to School when she noted, “June scissors work in August, right?” Right!
Of course, as adults, we know that motivation can come in all shapes and sizes, and when the idea of sitting at our desks bring misery, a new set of never-before-used file folders and a snazzy new planner can ramp up our enthusiasm. Also right!
Somewhere in between buying all new everything (even though some things never left your cubby between September and June) and using the same-old, same-old, there’s a sweet spot. So today, we’re just going to look at a few things that might make back-to-school for students of all ages just a little more colorfully delightful.
OPT FOR WHAT’S VIBRANT AND VERTICAL
There’s lots of research showing that color can impact mood. Greens are calming, while reds are stimulating. Studies show that blue “encourages intellectual activity, reason, and logical thought.” Yellow is associated with happy moods, self-esteem and playfulness. While fashion designers may occasionally opt for greys and blacks to convey sophistication, unless your student is a goth (are there still goths?) adding a little vibrancy and color can open up some opportunities, motivationally-speaking.
Color grabs our attention, conveys meaning, and clarifies boundaries. It also just makes us happy. For example, what kind of feeling washes over you when you see this picture?
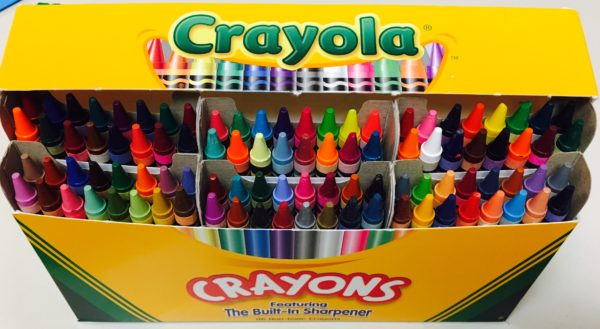
Optimism? Excitement for new beginnings? I took a new 64-box of Crayolas off to college with me in 1985, and I guarantee you I was not the only one!
In addition to the vibrancy of great colors, another boost for students, whether they’re in elementary school or grad school, is the advantage of the vertical hold. We’ve talked a LOT over the years about how vertical solutions aid in organizing, but the key is that when our resources stand attention, we pay attention to them and are less likely to let them get cluttered..
ORGANIZE PAPERS COLORFULLY
College students might appreciate something that keeps papers organized by class, fits squarely in a backpack, but can be displayed easily in a dorm room (their own, or their study-buddy’s) or an empty classroom.
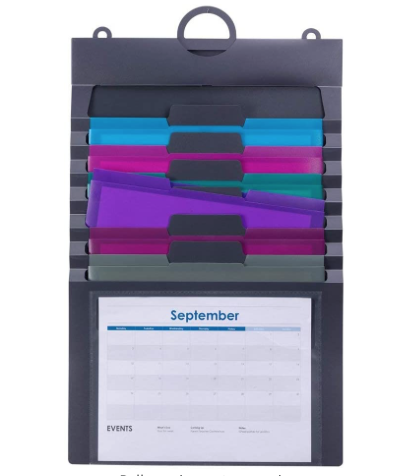
For something both elegant and bright, the Smead Cascading Wall Organizer might be just the ticket.
A revamp of the the classic version, this colorful Gen 2 organizer can hang on the wall or anywhere from a nail, hook (you sent your kid to college with a variety pack of Command Hooks, right?) or even a hanger to reduce clutter on the desktop.
In durable, bright, and easy-to-clean polypropylene, the six colorful (yellow, orange, fuscia, green, blue, and purple) letter-size pockets can be removed to take to class, the library, or an extra-curricular meeting. (Each holds 50 sheets.)
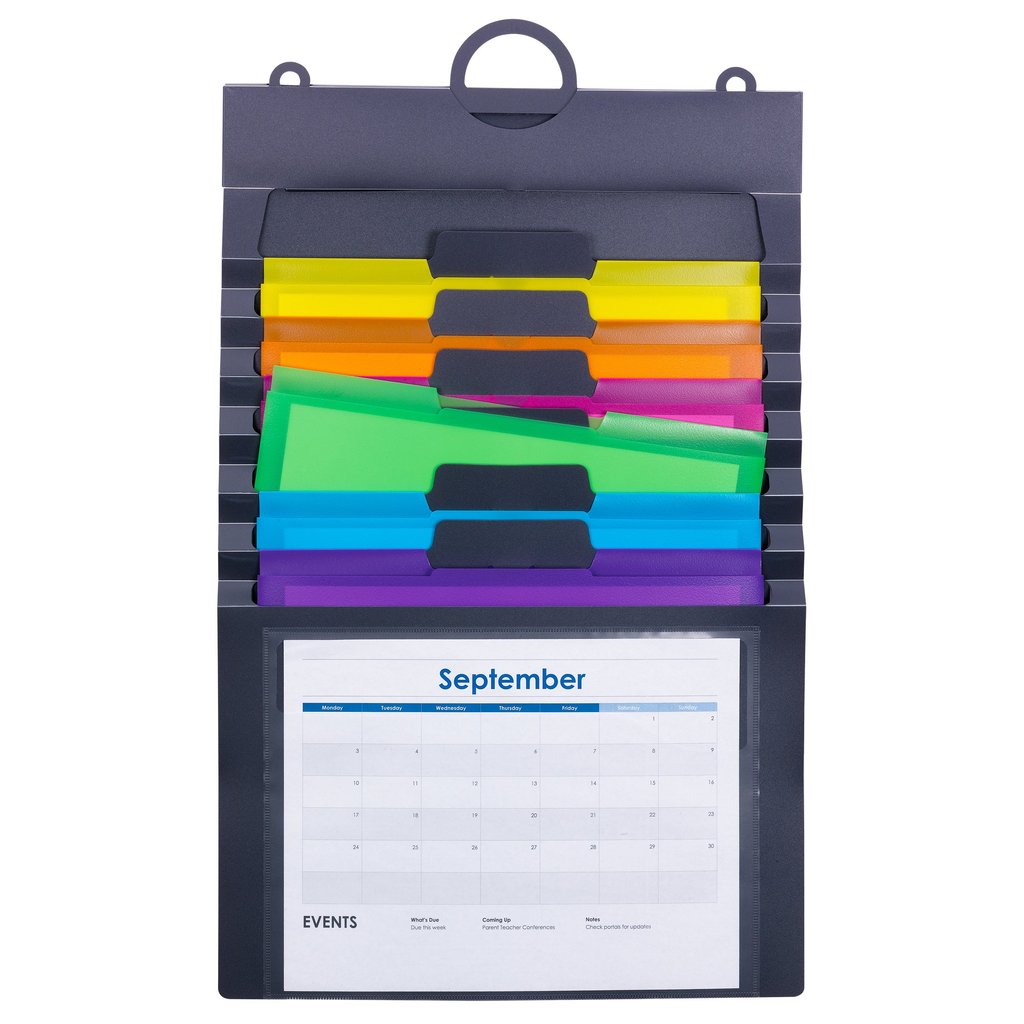
Use the clear front pocket to show the current month’s calendar, a project timeline, or a photo of far-flung friends. There’s a 3-part hanger (use one loop or all three), and an elastic cord closure for putting it all together and stowing it away.
The whole thing is PVC-free and acid-free, and measures 14 1/4″ wide by 24″ high (when fully expanded). Available directly from Smead for $17.99, or you can find it on Amazon for $11.29.
There are two variations on the theme if these brights are too vibrant for you or your student. There’s a pastel version of the Cascading Wall Organizer (well, it’s translucent, but the folders are pastel), also $17.99 at Smead or $13.78 at Amazon:
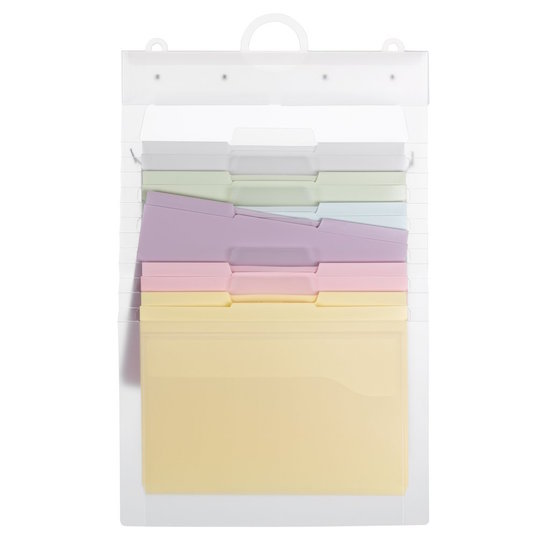 as well as one with jewel tones for $13.99 (which is Paper Doll’s personal favorite, in case you were wondering).
The Container Store has a similar product, its Multi-Color Cascading 6-Pocket Letter File Wall Organizer Tote.
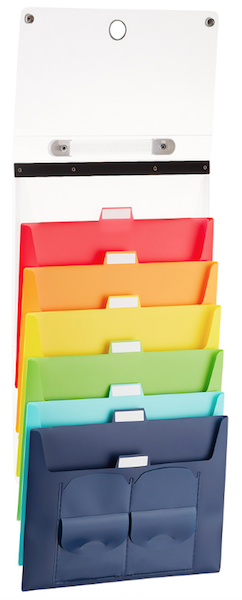
It measures 13 3/8″ wide by 10 1/2″ high, and when it’s not fully extended, it folds and collapses into a 1 1/2″ thick tote. Two snap closures open to reveal six cascading pockets (red, orange, yellow, green, teal, and dark blue) that hold letter-sized interior file folders (sold separately). You can label the tabbed pockets, and there’s both a handle for carrying the closed tote and a ring for hanging it for display.
If you like the idea of bright colors and poly folders but your older student already has a great desktop file system in place and doesn’t need to be mobile, consider Smead’s SuperTab® Poly File Folders. A box of 1/3-cut (left/middle/right) tabbed, letter-size poly folders come 18 per assorted pack, with three folders, each, in blue, green, orange, pink, purple, and yellow. The durable folders are acid-free and PVC-free for long lasting durability. (And nowadays, I’m a super-fan of poly, because you can wipe it down with a Clorox disinfecting wipe.)
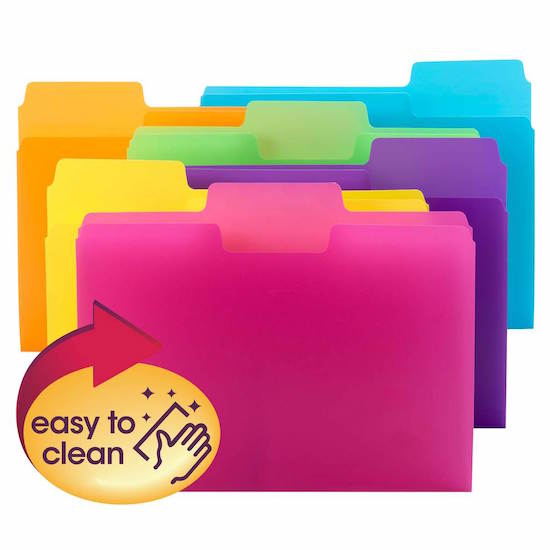
Oversize SuperTabs have a 90% larger labeling area than standard file folders, allowing you to use larger text, larger labels, or more lines of description. Although their tabs are larger than traditional file folders, they’ll nonetheless fit traditional vertical file drawers. These cheery Smead SuperTab® Poly File Folders run $17.06 at Smead or $16.44 at Amazon.
A WARNING ABOUT COLOR-CODING
I should note, I often warn against the potential problem of color-coding files. When a client invests in traditional boxes of assorted colored file folders (or boxes in multiple, different colors), I tend to worry about the Ralph Waldo Emerson’s quote, “Consistency is the hobgoblin of little minds.”
But wait, you might be thinking. Isn’t consistency the key to organizing?
When you color-code your folder system, it makes it easy to organize thematically. Green is biology (or family finances) and blue is literature (or insurance) and red is calculus (or medical records). But what happens when you need to make a new folder but run out of the color you need? For most people, this causes a breakdown in the system. Lacking the right folder, people often just stop filing!
But you see, Emerson’s entire quote is rarely given. It’s actually, “A foolish consistency is the hobgoblin of little minds, adored by little statesmen and philosophers and divines.”
But you are no fool! If lack of the right color is a problem for you or your student, just grab a different color folder and a Post-it! Note. Write a temporary label on the top, and stick it on the inside of the folder so that the label appears just about where a permanent label belongs. (Then go order a box of folders and get on with your day!)
HOMESCHOOL CHEER
If your student is 8 rather than 18, and you’re still doing the home-schooling thing this year (either because you’d planned it or because everyone got sent home a few days into the school year), you might want a colorful, vertical solution for making your home-school “classroom” feeling a little more official.
I like to borrow this trick from teachers who are tight on space in their classrooms or don’t have a base of operations. Scholastic’s File Organizer Pocket Chart lets you create a bright, vertical HQ for your home-schooling student’s worksheets, problem sets, instruction sheets, and other handouts.

Just as teacher would do in the classroom, you can use the ten sturdy pockets to hold letter-size file folders. The pocket chart is lightweight but made of durable nylon, and measures 14″ wide by 46 1/2″ high. There are three reinforced grommets at the top for hanging the chart on the wall or the back of a door. The pocket chart runs $15 on Amazon.
ACCENTUATE THE POSITIVE WITH A POP OF COLOR
Colorful highlighting is a great way to make important points stand out. But have you or your student ever highlighted the wrong thing? It’s a bummer!
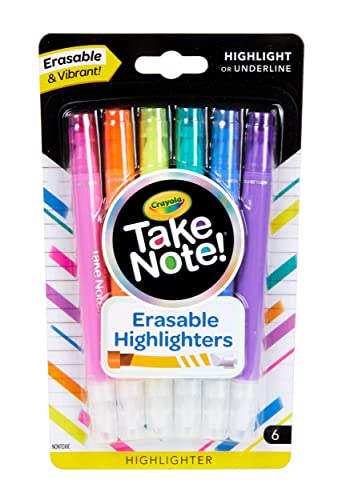
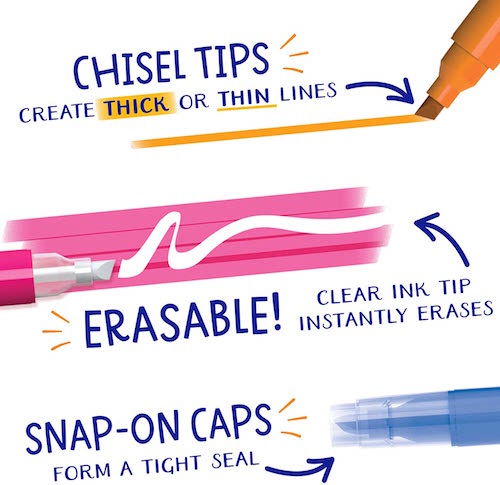
But did you know there are ERASABLE HIGHLIGHTERS? (I know! I can tell that you’re squealing, too!)
Crayola’s Take Note Erasable Highlighters let you highlight (or underline!) in six cheery colors (pink, orange, yellow, teal, blue, and purple). You can color-code your highlighting by class or use different colors for different types of information (yellow for the test, purple for a book report, etc.). And a set of six is only $5.99!
BACKPACKS THAT WILL MAKE YOUR TINY HUMAN SMILE
It’s hard to believe, but when Paper Doll was in school, back when dinosaurs roamed the earth, kids carried book bags rather than backpacks until late middle-school or high school, and even then, backpacks weren’t much of a fashion statement. They also weren’t much of a delight to wear or carry, as they lacked many dividers, pockets, or ways to keep things from falling to the bottom and papers were always getting smushed.
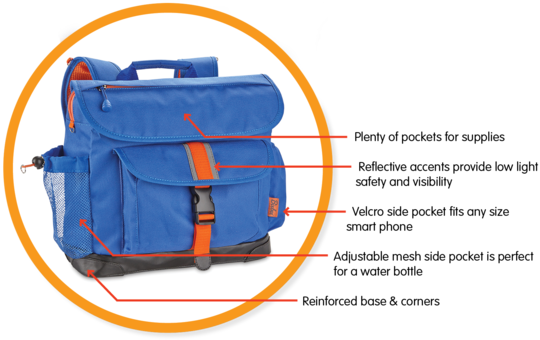
Nowadays, there’s a smorgasbord of backpack options, but I think the most child-pleasing ones are from Bixbee. They make their backpacks (and lunch boxes, duffels, luggage, and sleeping bags) with an eye to the special ergonomic needs of tiny humans so they can carry and organize all of their “stuff” without getting weighed down.
The bright and hardy backpacks are designed for the little tykes’ unique measurements and aesthetic tastes. The medium/large backpacks weigh only two pounds and use “contoured, air-mesh, adjustable shoulder straps with a sliding sternum strap” to distribute the horizontal load. Each backpack has an interior padded pocket to carry and protect a laptop or tablet from drops or bumps.
But I just think their stuff is cute, and if your backpack is cute, you’re less likely to leave it behind on the bus or the playground. Right? (Well, I hope I’m right.)
For example, the Firebird Flyer, with the fire-red rising phoenix on wings, comes in two sizes (one for pre-schoolers, one for the 5-7-year-olds). The smaller one is water-resistant, made of durable 600-denier polyester, and has a variety of features, including:
- Padded topside carrying handle
- Top flap zippered pocket offers quick access to small supplies
- Front flap pocket holds small supplies or snack
- 2 side pockets holds small water bottle
- Contoured & padded adjustable shoulder straps
- Padded back panel
- Easy-to-grab beehive zip pulls
- Detailed with reflective material for better visibility in low light
- D-rings for clipping on their favorite accessories
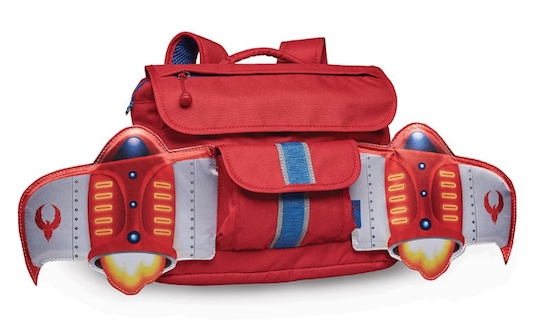
The interior has an ID card holder under main flap, and the main compartment is large enough for a sweater (so hopefully it won’t be left behind on the playground), and two interior slip pockets for small school supplies. The pre-schooler size is $31.99; the larger one is $49.99. For more about Bixbee’s wide array of backpacks, they’ve got a few videos, starting with this one:
Colorful, vertical (and yet, with their innovative design, also horizontal), and totally cute.
This post wasn’t designed to be a complete resource on back-to-school items. Next week, we’ll look at some back-to-school essentials for managing time and tasks at all age levels.
And if you want a throwback to the 1980s while still getting a sense of some college dorm advice that’s apropos today, check out this post from the vault, Paper Doll & Real Simple Organize Dorm Rooms: SUPER-EXTENDED Edition.
Disclosure: Some of the links above are affiliate links, and I may get a small remuneration (at no additional cost to you) if you make a purchase after clicking through to the resulting pages. The opinions, as always, are my own. (Seriously, who else would claim them?) For more information regarding how Best Results Organizing handles affiliate links, please see the affiliate section of the site’s Privacy Policy.
Paper Doll Post:

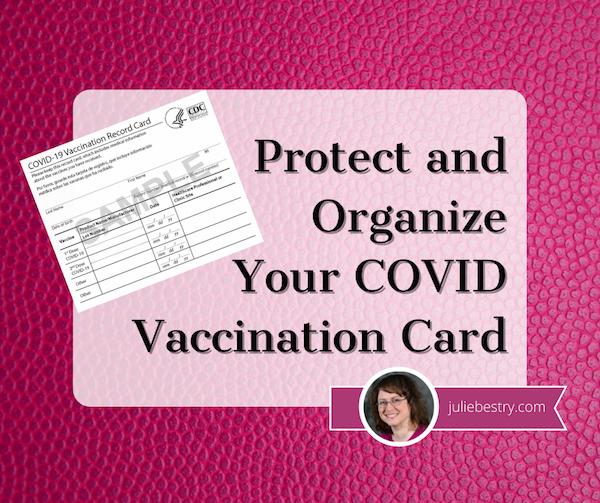
Protect and Organize Your COVID Vaccination Card
Throughout 2021, I’ve received a lot of questions from clients and readers regarding the best way to protect COVID vaccination cards from damage and where to store them for easy access.
WHY KEEPING YOUR VACCINATION CARD SAFE AND ACCESSIBLE IS ESSENTIAL
Let’s start at the beginning, even before COVID. While there’s been a great deal of hubbub lately about having to prove one’s vaccination status for work or to go various places, any adult knows that there have always been a variety of reasons one has had to prove they’ve had proper vaccinations.
Have you ever registered a child to attend school? Vaccination requirements date back to the mid-19th-century, when states began requiring proof of immunization against smallpox in order to register for school. Dating back at least as far as the WWII era, American schools have required proof of immunization against other communicable diseases. And while each state generally has its own laws regarding exactly what shots must be administered (and what medical or other exemptions exist), there are commonalities across all states.

For their children to attend kindergarten, parents usually have to provide documentation from physicians that their children have received the following immunizations:
- Diphtheria-Tetanus-Pertussis (DTaP, or DT if appropriate) — required in all 50 states
- Haemophilus influenzae type B (Hib)
- Hepatitis A
- Hepatitis B (HBV) — required in 43 states
- Measles, Mumps, Rubella — required in all 50 states
- Pneumococcal conjugate vaccine (PCV)
- Poliomyelitis (IPV or OPV) — required in all 50 states
- Varicella — required in all 50 states
(Note: Paper Doll is not a medical practitioner. Speak with your physician(s) regarding the requisite inoculations in your state appropriate for your family members. The CDC has a printable immunization schedule for your reference.)
To attend college, students have to prove they’ve been inoculated against a variety of contagious diseases. Students born before 1957 don’t have to have the MMR because, back then, measles, mumps, and rubella existed as separate shots. Students born before 1980 were generally never inoculated for varicella (that’s chicken pox to you and me) because the immunization for that horrible, itchy, scarring, illness (which can cause painful shingles later in life) didn’t exist yet.
In general, college students have to get the Meningococcal B immunization. (Take meningitis seriously; I know a guy who had meningitis in college, and he lost hearing in one ear.) College students are also advised to be get the vaccinations for HPV and the flu.
Summer camps and extra-curricular athletic programs generally require the same proof of vaccinations as elementary and high schools do, for both employees and campers/participants, with the addition of tetanus boosters. As an aside, we’re all supposed to get tetanus boosters every 10 years. (Considering most of us keep thinking 1980 was just 20 years ago, please check with your physician regarding the last time you actually had a tetanus booster.)
Certain jobs or professions require vaccinations. Obviously, there are requirements (by state) for healthcare workers. Because different illnesses can be airborne, water-borne, or spread by wounds or bodily fluids (OK, let’s all pause to say “Ick!”), hospitality and restaurant workers often have to prove that they’ve received their inoculations for Hepatitis A and B, the flu, and tetanus/diptheria/pertussis. Again, states vary, but teachers are generally required and/or advised to receive all of the same inoculations as students in kindergarten through college.
Vaccinations are required for travel to and from the United States (and many other countries). For travel just about anywhere, you should be sure to be have your DPT, MMR, polio, varicella, and flu shots, but for travel to many nations, you may need to get vaccinated against cholera, malaria, hepatitis A and B, typhoid, rabies, and/or yellow fever. (The CDC has nation-by-nation pages.)
 Photo by Tmaximumge from PxHere
And, of course, there’s COVID. The longer part of the population goes unvaccinated, the more opportunity the Delta, Delta+, Lambda, and other variants have to mutate, evolve, grow, and become more dangerous. So, every day, more schools, employers, governments, and nations are requiring COVID vaccinations, and thus, proof of vaccinations.
For the variety of reasons explained above, you may need to prove you’ve been vaccinated against contagious illnesses. If you are unable to do so, you (or a member of your family) may not be able to attend school, get a certain job, or avail yourself of a variety of travel or entertainment options. In some cases, you can get inoculated again for certain diseases; for others, that’s not possible.
If your pediatrician is still in practice, you may be able to get copies of your records. Paper Doll was delivered by a physician born in 1894 and my pediatricians have all long since retired. But because Paper Mommy was diligent in maintaining family medical records and passing them along, it was easy for me to handle my own information when registering for college and graduate school and for verifying immunizations later in life.
For others, though, lack of organized systems for maintaining medical information presents a problem, which is why this blog has had so many posts over the years regarding organizing medical records and why it will continue to do so.
HOW & WHERE SHOULD YOU KEEP YOUR COVID VACCINATION CARD?
Can you keep your vaccination card in your wallet? Obviously, yes.
But should you keep your vaccination card in your wallet? That’s a more complicated question. Here’s what I suggest you do.
1) Take a photo of your COVID vaccination card. (But no, don’t post it to social media. Your birth date and other personal information on your card is fodder for identity thieves, so don’t post it, or your driver’s license or other ID, on “the socials.”)
Take a photo of your COVID vaccination card. (But no, don't post it to social media. Your birth date and other personal information on your card is fodder for identity thieves, so don't post it, or your driver's license or other ID,… Click To TweetLabel the photo with your name (or your family member’s name, if you’re keeping records for your spouse, kids, or parents) and date. Something like:
COVIDVax-BenedictCumberbatch-April2021
Once you have your photo or scanned copy, don’t just count on it living in your camera roll. Save it to one or more of the cloud solutions you use often, whether that’s Dropbox, Evernote, OneNote, iCloud, GoogleDrive, or something similar.
Create a folder for Vital Documents or VIPs (very important papers), and you can gather all of your other photos/scans of essential documents, from your birth certificate to other vaccination records, all in one logical place.
2) Think about your lifestyle and how often you will be needing to show your vaccination card. If you are a frequent traveler, you’ll need to show your card often, and may want to keep it in your wallet or purse. If, however, you are working remotely and live somewhere that proof of vaccination hasn’t (and isn’t likely to) come up with frequency because you’re avoiding crowded, indoor spaces, you can file it away.
This is a good time to get aware of the rules of where you live and where you’re going. For example, New York City announced last week that COVID vaccines will be required for anyone wishing to enter restaurants, bars, or gyms; in California, they’re weighing the same types of requirements for using indoor amenities.
In France, the law requires that anyone wanting to go to a bar or restaurant must have proof of COVID vaccination. As of this past weekend, in Italy, you’ll need your proof of vaccination to gain access to indoor seated dining at restaurants and bars, museums, exhibitions, cultural sites, sporting events, swimming pools, gyms, concerts, fairs, conferences, amusement parks and other venues.
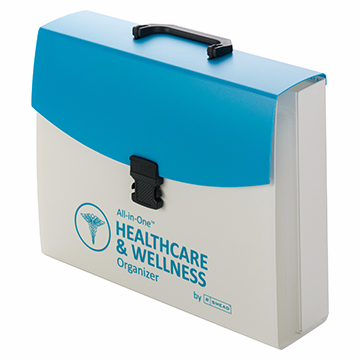
3) File your card away if you’re not going to need to carry it around. For many people, the most logical place to file your proof of COVID vaccination will be in your family filing system, in your personal medical file. That might be in a regular file drawer, or in something like the Smead All-in-One Healthcare & Wellness Organizer.
However, if your file is bulky even after you’ve pared it down to your actual medical records, you may want to store your vaccine card with your other VIPs (very important papers), like your birth certificate and Social Security Card, in your fireproof safe, for quick and easy access.
IN WHAT SHOULD YOU KEEP YOUR VACCINATION CARD?
The best way to protect your vaccination card is to find a clear, flat, snug container. At the most basic, you can grab any zipper-lock sandwich bag, which protect your card from moisture, germs, and general schmutz. However, you won’t get a great fit.
The official CDC COVID vaccination card is 4″ wide by 3″ high. A typical zipper-lock sandwich bag rang from 6 1/2″ x 5 7/8″ to 8″ x 5″, yielding a lot of extra space. The half-height snack bags are 6 1/2″ wide x 3 1/4″ high, which offers a slightly better fit, but still with wiggle room, so you’ll either have unused space or be tempted to fold the bag over onto itself.
If you’re going to be keeping your vaccine passport card in a manila folder or three-ring binder, amid your other personal or family records, a plastic sheet protector will generally do the trick. However, sheet protectors are open at the top end, so if you’re going to be carrying your records around (say, if you’re a college student moving at the end of each semester or school year), it’s not a perfect solution.
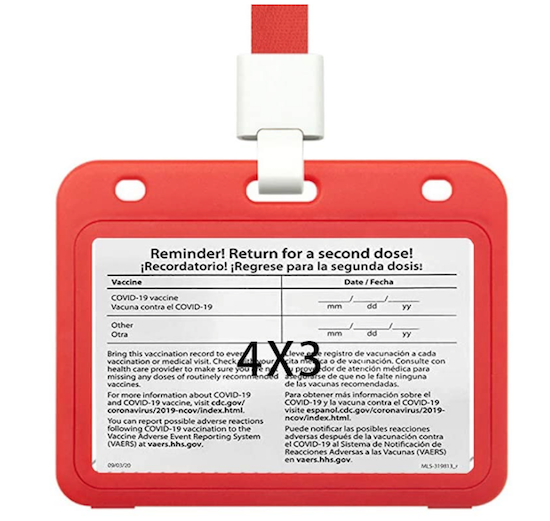
You might have an old badge holder around the house, if you’ve ever attended a conference or had a job that required an ID to get into the building. I dug through some old NAPO conference paraphernalia and found this badge—but only for photographic purposes.

The clear plastic badge holder seems almost ideal and it comes with a lanyard for wearing around one’s neck, which keeps hands free and prevents accidental loss. However, aside from the fact that the ribbons are permanently affixed and the sticker on the front isn’t going anywhere without making a gummy mess, the top of the badge holder is open. Without a snug fit, a vaccine card could fall out and get lost.
Personally, I’m more inclined to recommend one of the following inexpensive solutions. I started by searching Amazon and found a wide variety of basic options.
Clear vinyl plastic sleeves made to accommodate the CDC cards fit all the requirements. I believe no particular brand is better than any other, but as an example, Amazon carries Mljsh (yes, really, no vowels) CDC Vaccination Card record holders.
The sleeve is waterproof and has a re-sealable zipper. The inner dimensions are 4.31″ wide x 3.11″ high to accommodate a laminated card. A package of two costs $5.28.
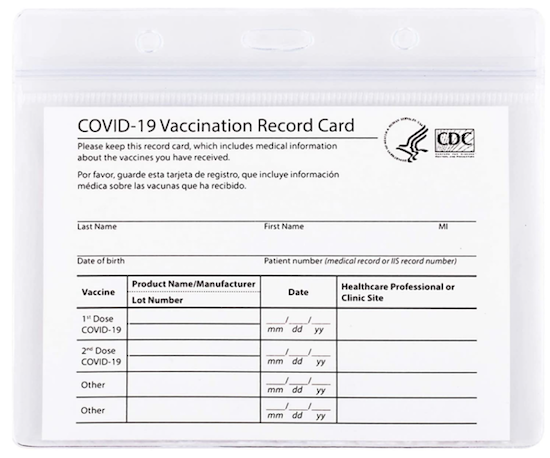
What I like about this particular card is that at the top, there are three slots/punctures so that you can attach your sleeved vaccine card to a lanyard or one of those retractable badge holders, the kind that makes that satisfying zip-line sound when retracting — Zzzzzwwwwjjjjzzzzz!
Again, Paper Doll is brand-agnostic regarding what card holder you choose, but I do like the fact that this one has both the plastic zipper top and the punched holes for accommodating a lanyard. However, there are so many options that it would be hard to select a wrong card holder.
If you need color in every area of your life, instead of picking a clear vinyl solution, you could choose something like Gurcyter’s more colorful design.
The front and back split open to allow you to center your vaccine card, and you get to choose from among five colors (red, dark blue, light blue, green, or yellow), and it comes with a matching 18.1″ ribbon lanyard.
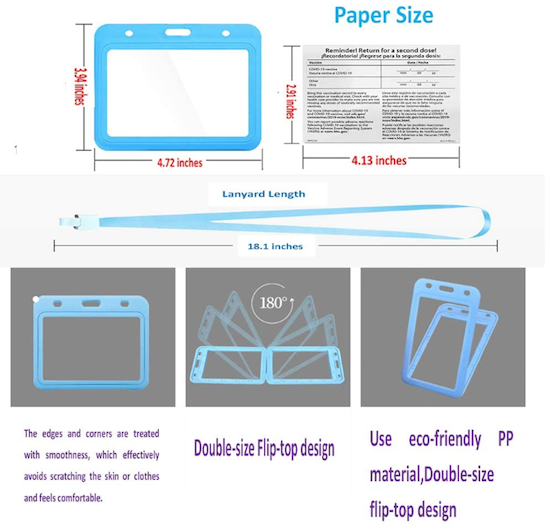
One holder is $6.99. Note, however, that the Gurcyter version is a little bit squished vertically, with the interior of the holder measuring 4.13″ wide x 2.91″ high, wide enough for a standard CDC card, but .09″ (2.2mm) shorter. So, if you pick this option, you might need to trim a little white space on one or both sides. (The things people will do for fashion!)
If you’re doing a lot of traveling, you might want a combination passport and vaccine card carrier. There are a number of colorful combination holders, like this Ciana faux leather, bi-fold passport and vaccine card holder for $5.99.
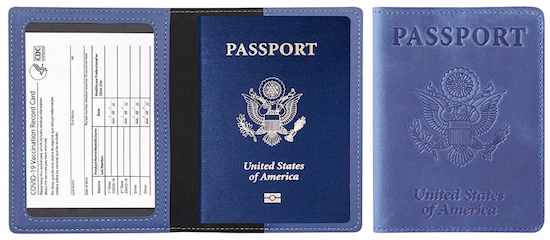
It comes in twelve colors (brown, burgundy, carbon-fiber black, dark blue, green, grey, light blue, pink, purple, red, rose gold, and turquoise), with a see-through compartment for your vaccine card and a sleeve for your passport.
Of course, Amazon isn’t the only place to find these solutions. A quick search of “vaccine card holder” or “vaccine card protector” will yield a number of options. As with masks, which are utilitarian but became fashion statements over the past 18 months, the creative people at Etsy have come up with solutions for every taste and style.
If you’d like to aim for a classier vaccine card holder, the Familiar Paws Etsy shop has leather vaccine card holders with a key ring for $12.99.

The front of the vaccine card is visible through the clear plastic window, and you can select from among a variety of soft, full-grain genuine leather options in one of eight colors (orange, navy blue, brown, pink, black, red, yellow, and aquamarine). At the top, the leather tab folds over a key ring. (Familiar Paws offers personalization with names or initials for an additional cost.)
For something cozier, Etsy shop QueentopazCreations uses Rifle Paper Company fabrics to create cloth vaccine card wallets.
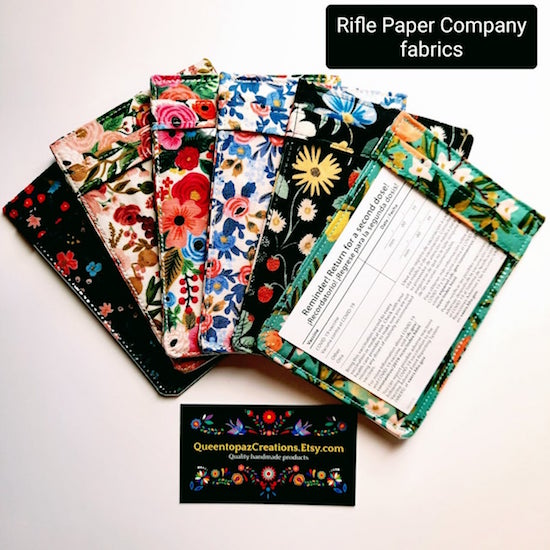
The card wallets come in six fabric designs (Strawberry Fields, Garden Party, Wildwood, Garden Party/Rose, Rosa Periwinkle, Citrus Floral Teal, and Herb Garden) and in two sizes: 4″ wide by 3″ high, for $13, or 4 1/4″ wide by 3 1/2″ high, for $15.
Each cloth wallet sleeve has stiff interfacing and a plastic insert to protect your card from bending. My only concern is that absent a zipper-lock mechanism, you’d want to make sure your card fits snugly in the wallet and won’t fall out.
Etsy also has some splashy and fun (if sometimes potty-mouthed) vinyl vaccine card holders, and more than a few options that say, “Proof of Fauci Ouchie!”
I’d be hard-pressed to encourage any client to spend more than $15 for something to hold a vaccine card, but if you’re the sort of person who buys $300+ shoes and can turn anything into a status symbol, Fashionista.com has a piece on vaccine passport cases and lanyards for keeping your cards fashionably handy (for ridiculous-to-me prices of $100-$500)!
TO LAMINATE OR NOT TO LAMINATE?
When the vaccine first became available, social media buzzed with suggestions for laminating COVID vaccination cards. It’s easy to understand why; paper is easily torn or damaged if it gets wet, and laminating paper protects it from both. However, there are some concerns with laminating your COVID vaccine card.
First, it’s becoming increasingly clear that booster shots may become necessary. If so, we may need to present our original vaccine cards to have more information added to the two lower lines where “other” is printed. Laminating the vaccine cards would prevent new information from being added; the vaccine site would probably end up having to give you a new card, which would obviate going to so much effort to protect your current one.
Second, if done incorrectly, laminating plastics and adhesives can damage your card. So, if you’ve got a laminator but haven’t ever cracked open the box, maybe starting with a vital document isn’t the best notion? Big box stores like Staples and Office Depot have offered to laminate vaccine cards for free, but obviously that’s designed to tempt you into the store to shop.
WHAT IF YOU LOSE YOUR VACCINATION CARD?
The federal government is not keeping a master list of who has been vaccinated, but the individual states are. So, if you lose your vaccination card, don’t panic! Each state has its own computerized vaccination registry. Just contact your state’s department of health to request a replacement; you will likely have to provide some personal information and request the documentation in writing or through the state’s website.
The CDC has a list of contacts for the immunization information systems (IIS) in each state. Not only can you request replacement cards through your state’s system, but you can get copies of your child’s immunization records for all the purposes described earlier in this post.
If you got your vaccination at a national pharmacy chain, you can contact them directly. For example, if you were vaccinated at Walgreens or CVS, the pharmacy chains can check their internal records and replace your card. Also, for most such retail pharmacy chains, you are able to create an account online and access your COVID-19 vaccination records directly.
Meanwhile, because the first thing I told you to do, up above, was photograph your card, you do have some level of proof of which vaccine you received and when.
FINAL NOTE
Nothing in this post should be considered controversial. We live in a society that has rules. “No shoes. No shirt. No service.” We have to wear seat belts and carry car insurance. Income tax filings are due (generally) on April 15th. And historically, to promote the general welfare and safety of students, campers, employees, customers, and citizens, rules are put in place by schools, camps, businesses, and governments.
Just as we have to show that we have a valid driver’s license to operate a motor vehicle or a passport (and visa) to enter a foreign country (or return to our own), there are times that we have to prove that we have been inoculated, whether it’s against polio and smallpox, or against COVID. Today’s post, like many others I’ve written, simply ensures that you know the best ways to protect and organize your vital documents.
I hope you will do all that’s necessary to stay safe, healthy, and organized.
Paper Doll Post:

Paper Doll To the Rescue: How To Save Wet Books & Documents
For something that’s supposed to be so good for us, water can cause quite a bit of trouble.
If you drop your cell phone in water, people will rush to tell you to stick it in rice, as though your Samsung or iPhone was a nice piece of baked salmon. It seems everyone has heard and shared that little hack for rescuing wet electronics.
For what it’s worth, you actually shouldn’t put your soaked phone in rice. Phone experts say airflow, not rice, is the key. Apple agrees. Desiccants and air-tight pouches can also help.
So, save the San Francisco Treat for your dinner table, OK?
There’s a common expression when people are talking about all their drawers and piles of papers and books. They say, “I’m drowning in paper.” But what happens when your paper drowns?
Have you ever dropped your book in the tub? Failed to zip your backpack up all the way and had a book land in a puddle? Had someone overzealously splash you while you’re reading poolside?
Ever have your garbage disposal eat a fork, spring leaks, and send all the water running down your drain through a cracked pipe and into your cabinets, soaking books on the other side of the wall? (Yes, that is TOO a thing that happens. Stop looking at me like that.)
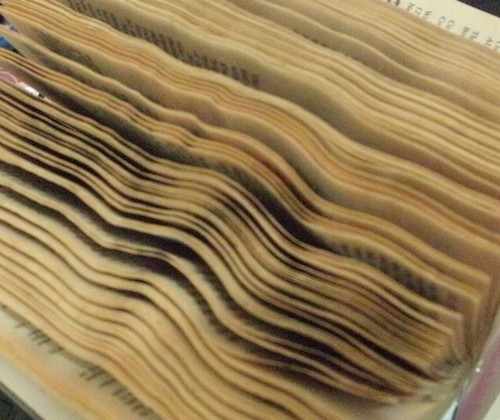
What happens when a book gets wet? Well, the first thing that happens is cockling. That’s the official term for when paper (especially bound paper) gets wet and bulges out in certain places, presenting a warped, wrinkled, puckered, or creased surface.
The worst part isn’t the cockling though. (C’mon, people, stop laughing at the word “cockling!”) The biggest concern should be mold. Mold can begin growing within 2-to-3 days, and because mold spores can flourish wherever conditions are warm and wet, you want to jump on solving your wet-paper problem right away!
I should note, Paper Doll is an expert on organizing paper, not restoring it. But I’ve sure had some interesting requests over the years. One client, whose entire library was along a leaking outside wall, wanted to “save” mold-covered books by taking nail scissors and cutting along the edges of the pages to rid them of mold. (No, this wasn’t possible. Not all mold is visible, and mold can be damaging to one’s neurological and respiratory systems. Don’t play around with mold!)
And clients have often asked how to restore important (though not necessarily financially valuable) books, like family Bibles, which have seen better days. For a book with serious financial or sentimental value, please seek the expertise of a professional book restoration service. Check out the website of the The American Institute for Conservation and do a zip code radius search on their Find a Conservator page.
RESTORING WATER-DAMAGED BOOKS
How you deal with a water-damaged book depends on whether the water left your book damp (as if it had been in a sauna), wet (as if you were caught in the rain between your parking space and your building) or soaked all the way through (like the most miserable camping trip, ever)!
If your book is damp, experts advise that you:
- Hold the book gently by the spine and shake the book side-to-side to rid it of any excess water.
- Gently remove any debris. (This works better if you’re trying to get stray leaves out of the book dropped in a shallow puddle; if you spilled your milkshake on the book, you’re not going to get bits of chocolate off of the pages so easily.)
- Cover the surface of wherever you’re going to dry the books with either absorbent paper (like unprinted newsprint — no, NOT actual newspaper!), absorbent towels, or plastic sheeting. This way, as the book dries, the surface you’re using won’t get damaged. The more books you have to restore, the more space you’ll need, as this is often a multi-day process.
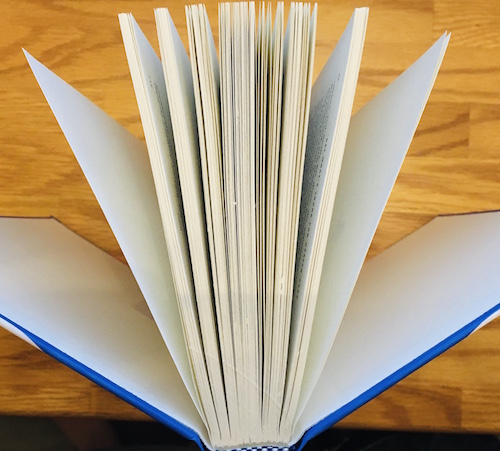
- Stand your book up and fan it out so no part is open more than 60°. Official advice will say to stand the book on its “head” or “tail” which just means that you’re not resting the book on its spine or on the part where it opens. Fanning it out means just that — if viewed from above, it’ll almost look like a fan.
- If it’s mostly the book cover (of a hardcover book) that’s damp, but not the actual text of the book, put some absorbent paper towels between the “boards” of the cover and the pages. Change as necessary (when the paper has absorbed all it can).
- Use fans in the room to circulate air so the book will dry, but don’t point the fans directly at the book.
- If you have a dehumidifier, this is the time to pull it out! Air conditioning is good, too. But none of the air blowing on the book should be so strong as to make the pages flutter.
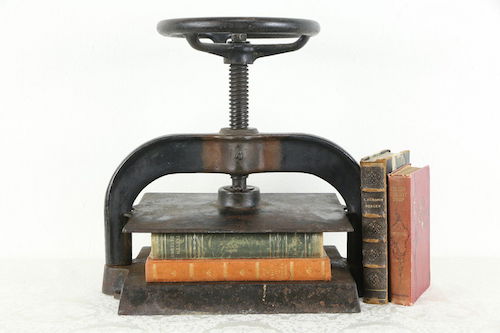
- Once the book is completely dry, lay it on its back cover, sandwiched between two wooden boards, and place something heavy (like a few bricks or an old-fashioned, massive hardcover dictionary) on top of it, making sure the spine (of the previously damp book) isn’t smushed by the weight. Or, you can use a book press, if you happen to have one of these babies hanging around.
RestorationMaster suggests that for paperbacks (which are usually more slender than hard cover books), you can hang the book on a bit of fishing line or string to help it air dry. (But only do this if the book isn’t soaking wet, or the its own weight could cause the book or its binding to tear.)
If the book is wet, think about the value of your time vs. the value of the book. If it’s a $300 textbook, your willingness to carry on may be different from what it would be if it’s a paperback novel.
- Cover your work surface, as described above.
- Lay the book flat and open it carefully (so as not to rip any of the wet pages) and start interspersing (interleaving, in book restoration talk) paper towels about every 20 pages, working from the front to the middle of the book. Once you get to the middle, flip the book over, and repeat the process from the back to the middle.
- Leave the book flat for about an hour so the paper towels can absorb some of the water. (If your book got that wet, chances are good some of your other stuff got wet. Go check on them.)
- Hour is up? Stand the book up, fanned, on the “head” or “tail” as described in the “damp” section, above.
- Switch out the surface covering and paper towels as they soak up the water, and periodically repeat the process until the book is “only” damp.
- Now follow the directions for damp books, above.
It’s hard to envision some of these steps, so I was delighted to find this video from Syracuse University, where I attended graduate school many, many years ago. Their Department of Preservation and Conservation illustrates how to save damp and wet books from becoming wrinkly, moldy goop.
(For more information, you may also want to peruse the Disaster Recovery Manual for the Syracuse University Libraries.)
If your book is soaked through, meaning it fell into a pool or your house flooded to the point that your book was submerged, this is really a job for professionals. The instructions below describe what they’ll do, not what you should do. Unless you are a restoration specialist, you are likely to be out of your depth. That said, there are two possible measures:
1) Air-Dry (For those of us for whom humidity makes us resemble Art Garfunkel, “air-dry” already has some unfortunate connotations!)
This is basically an advanced version of the solution for “wet” books above, with a few changes:
- DON’T OPEN THE BOOK (to the interior). Don’t fan the pages.
- Put paper towels between the front and rear covers and the interior of the book.
- Use those fans! Turn on the A/C. Get out the dehumidifier. And be patient.
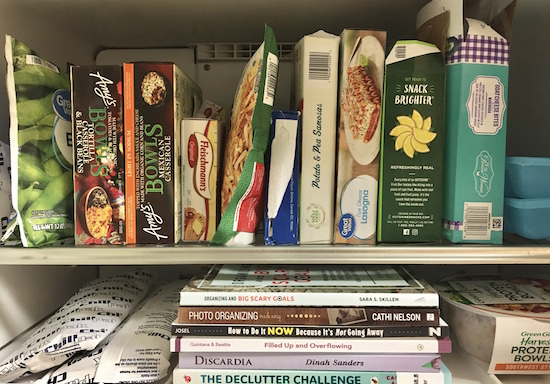
2) Freeze!
WAIT! Stop pulling the Eggos and last night’s leftovers out of the freezer to make room. Freezing books keeps mold and mildew from growing and gives professional restorers some extra time to plot out their attack.
 But to save soaked books, restorers use rapid freezing methods at temperatures down to -20°F (-28.9°C) so ice crystals won’t form on the books. Unless you’ve got a seriously fancy-pants freezer, your Frididaire probably isn’t going to cut it.
Once the wet books get frozen, restorers use vacuum freeze-drying to remove moisture, similar to how food is freeze-dried.
The water in the damaged book goes from being a solid (picture microscopic ice cubes) to a gas (think: water vapor) without ever turning into liquid.
This is called sublimation. (Is this starting to remind you of high school chemistry class? Or maybe you soaked your high school chemistry textbook and never read anything the rest of the semester?)
By skipping the liquid stage, there’s less of a chance of the paper cockling, the cover (boards) warping, or the ink running. This is good. But again, this is really the work of a professional.
That said, a number of resources, including WikiHow, advise that you can repair a wet book by freezing it in a regular household freezer. (Scroll down on the linked page to see their Method #2.) They advise removing excess water by interleaving small sets of pages with white paper towels, as described above, and then putting the damaged book into a zipper-lock plastic bag, and sealing it. (They warn, “Do not perform a vacuum seal, however; you want some air to be able to reach the book’s pages, and some space to be between the texture of the bag and the book itself.” OK, then!)
WikiHow says to keep the book in the freezer 1-2 weeks, depending on how long the book is. (So, go the full fortnight if it’s all 963 pages of Anna Karenina, which, coincidentally, Paper Doll just finished reading. I wish I could have frozen the chapters on wheat threshing, let me tell you!)
Then, when you pull the book out, you’ll go back to the methods for “damp” and “wet” books above, because you, my friends, do not have a vacuum freeze-drying machine for books. You got a lot of the water out, but as the book defrosts, there will still be moisture!
Anna Gooding-Call of Book Riot notes that the ice crystal problem (obviated by the fancy vacuum freeze-drying used by professionals) is a bigger deal. She notes, “To a certain extent, you might not be able to avoid this because you are a normal human being and you have a normal human being’s freezer. Ice can wreck your book for the same reason as it can wreck your fleshy body: freezing water expands and ruptures things. Set your freezer to its lowest setting—as in, the warmest temperature relative to how freezy it can possibly get—and check frequently. If you have a no-frost function, use it!”
The Houston Chronicle has similar advice about freezing, but notes that if there are any coated pages in a doused book, such as in a section of illustrations or photos, take extra precautions. Because coated pages may fuse together if not separated, their article advises putting a sheet of wax paper between every coated page to isolate each one.
Interleaving, fanning, freezing. This is a lot of work!
For what it’s worth, WikiHow also has instructions for rescuing your damp books using a hair dryer. After removing excess water, they recommend laying the book down on an absorbent towel and aiming the dryer at the pages, top-to-bottom, a few at a time, and not moving onward until the pages you’ve worked on are dry.
I once tried this dryer method, but it still yielded a LOT of cockling, and in the end, I had to reimburse the public library for a new copy anyway. Reader, beware.
Beyond that, my undergraduate alma mater, Cornell University, specifically says NOT to use heat to dry books! Cornell’s exact (final) words on the subject are:
CAUTION
Do not use artificial heat to try to speed the drying, as this will lead to dimensional distortion.
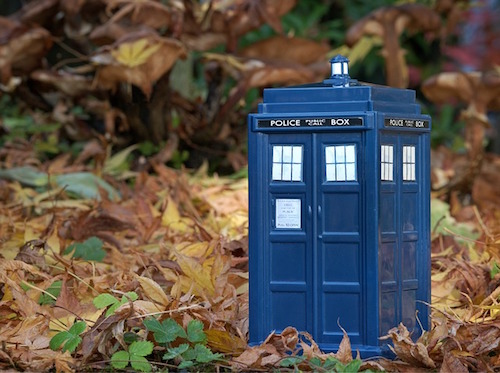 Undergrowth Doctor Who (MaxPixel)
“Dimensional distortion” sounds like something that’s better handled in Doctor Who than the Paper Doll blog, so we’ll just leave that right there.
RESTORING WET DOCUMENTS
Let’s say you haven’t soaked a book, but perhaps you were working on your family filing and a tiny human or furry friend got over-excited and upturned your glass of water. Most of the solutions for books will work just as well for individual papers.
The Library of Congress has a page of advice for emergency preservation of museum collections of paper, and this guidance is easily applied to your important documents at home:
- Create your safe workspace (away from the tiny humans, furry friends and, your beverages).
- Lay your wet papers flat on clean absorbent towels or unprinted (newsprint) paper. Periodically change the towels as they absorb water, and until your documents are merely damp.
- DON’T try to separate soaking wet sheets of paper. Wet paper is heavy and sticks together; if you try to separate the pages, they are likely to tear. Instead, just leave them in quarter-inch high stacks until most of the water has been absorbed by the towels or has evaporated.
- Once the pages are only damp, you can try gently prying them apart. Then interleave clean, white paper towels between the documents.
- Lightly weigh the documents down to flatten them and discourage cockling.
- Keep the air flowing in the room, but do not blow fans directly onto your papers. Not only would they cockle or ruffle, but they might blow away into the hands of those tiny humans or paws of the furry friends, and then you’ll have bigger problems than soaked papers.
The Library of Congress also advises against air-drying coated (glossy) paper. Instead, freeze the documents immediately using the same (home-based) methods as described for books.
MORE PROFESSIONAL ASSISTANCE AND GUIDANCE
This post should cover your casual book and document restoration needs. If you represent an association, government agency, museum, or other “collection” and need guidance with regard to restoration and conservatorship, try these resources:
American Institute of Conservation (AIC) and Foundation for Advancement in Conservation (FAIC) (including their downloadable documents on caring for books, photographs, and paper)
Canadian Association of Professional Conservators’ Find a Conservator
Canadian Conservation Institute (offers a free emergency telephone line for damage to paper collections)
Northeast Document Conservation Centre (NEDCC)
The National Archives of the United Kingdom, “How To Deal With Wet Documents”
Stay safe! Stay dry! And keep your phone out of the Rice-a-Roni!

Follow Me